Photoshop stands as a titan in the realm of digital image manipulation, offering unparalleled tools to transform ordinary photographs into breathtaking works of art. While its capabilities are vast, for those new to the software, navigating its professional and intricate features can initially seem daunting. However, with a structured approach, the process of editing photos in Photoshop becomes remarkably accessible. This guide will demystify the essential steps, empowering you to harness Photoshop's power, from fundamental adjustments to advanced enhancements.
Importing Your Image: The Starting Point
The journey of photo editing begins with bringing your chosen image into the Photoshop environment. This fundamental step is straightforward. You can initiate this by utilizing keyboard shortcuts: press Command+O on a Mac or Control+O on a PC. This command will directly open your image file from your computer's storage into Photoshop. Alternatively, if you are on the Photoshop home screen, you can simply locate and click the "Open" button.
Refining the Canvas: Cropping and Straightening
Once your image is loaded, the initial phase of editing involves basic refinements to its structure and composition. Cropping allows you to alter the dimensions of your image, removing extraneous elements and focusing attention on the subject. Straightening corrects any unintentional tilt, ensuring a level horizon or vertical lines.
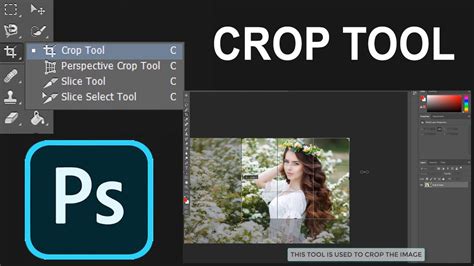
To crop your image, select the "Crop" tool from the tools panel. A cropping box will appear, surrounding your image. You can resize this box by dragging its corners or edges to achieve your desired dimensions. Photoshop offers pre-set size templates for common aspect ratios, or you can manually input specific dimensions in the boxes provided to the right of the menu bar. Once satisfied with the crop, click the "checkmark" button in the control bar to apply the changes.
For straightening, locate the straighten icon within the options bar. Then, click and drag your mouse to draw a line across a portion of your image that should be perfectly horizontal or vertical. Photoshop will use this line as a guide to automatically adjust the image's orientation. Pressing the "Enter" key will commit this straightening adjustment.
A simple crop can make a world of difference in improving a picture’s composition. Looking at an image, you might say that it already looks great-there’s no need to do anything else. Cropping is a very simple and seemingly inconsequential step in the photo editing process. Nonetheless, it does make a world of difference in improving a picture’s composition.
Enhancing Visuals: Adjusting Color and Lighting
With the foundational composition in place, the next step is to refine the image's color and lighting to achieve a more aesthetically pleasing result. Photoshop provides robust tools for these adjustments, allowing for both automatic enhancements and precise manual control.
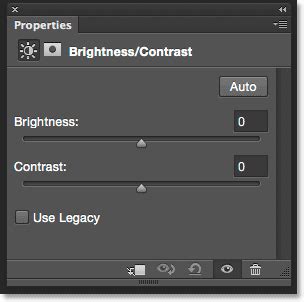
To begin adjusting brightness and contrast, navigate to your layers panel. Click on the half-white circle icon at the bottom of the panel and select "Brightness/Contrast." In the subsequent properties panel, you can click the "auto" button for Photoshop to automatically optimize these settings. For more nuanced control, manually drag the sliders to your preference. You can easily compare the original image with your adjustments by toggling the visibility icon (an eye symbol) located to the left of the adjustment layer.
Correcting color balance is equally crucial. Add a "Hue/Saturation" adjustment layer. Within its properties panel, adjust the saturation slider by dragging it to the right until the image exhibits the desired vibrancy.
If your camera did not achieve the correct exposure, tools like Brightness/Contrast, Exposure, and Shadows/Highlights are straightforward to use-simply move the sliders to make adjustments. Understanding how to read a histogram can greatly assist in making more accurate adjustments, especially with tools like Curves and Levels, which are favored by more experienced photographers for precise exposure control.
Even if you've properly adjusted the white balance on your camera, there might still be instances where color corrections are needed. For example, if your photo has a slight blue tinge, you can opt to leave it or use Photoshop's tools to achieve more accurate colors. It's always advisable to create an adjustment layer when modifying color to preserve the original image data. You can do this by clicking the Adjustment Layer icon in the Layers panel and selecting your desired adjustment type, or by going to Layer > New Adjustment Layer > Your Choice in the menu. Other effective tools for color correction include Vibrance, Hue/Saturation, or the Channel Mixer (found under Adjustments). The Color Wheel Color Picker, introduced in Photoshop CC 2019, allows for visualizing and selecting specific colors, including harmonious groups, complementary, and analogous colors, offering a more intuitive approach to color selection.
Eliminating Imperfections: Removing Unwanted Objects
Photoshop excels at retouching, allowing you to seamlessly remove distractions or blemishes from your images. For smaller imperfections, the "Spot Healing Brush Tool" is remarkably effective and user-friendly.
To begin removing unwanted objects, zoom into your image. You can do this by holding down Cmd on a Mac or Ctrl on a Windows system and then tapping the "Plus" key on your keyboard. Once zoomed in, you can then drag your mouse to pinpoint the specific area where you want to remove an object.
To utilize the "Spot Healing Brush Tool," first create a new layer for your retouching work. Navigate to Layer > New > Layer, name it something descriptive like "spot healing," and click "OK." In the tools bar, select the "Spot Healing Brush." In the options bar, ensure the "type" is set to "Content-Aware" and crucially, turn on "Sample All Layers." Now, simply place your cursor over the unwanted item and click. Photoshop will intelligently analyze the surrounding pixels and remove the object. You can repeat this process for multiple small objects by clicking on each one, or for larger areas, click and drag the tool across the target area.

Artistic Expression: Applying Filters
Filters in Photoshop offer a powerful way to imbue your images with unique textures, styles, and moods, enhancing their artistic appeal. The "Filter Gallery" provides a vast array of creative options.
To access these filters, click on "Filter" in the top menu bar, and then select "Filter Gallery." This opens a window showcasing numerous filter categories, including Artistic, Brush Strokes, Distort, Sketch, Stylize, and Texture. Choose a category that interests you and click on a specific filter. On the right side of the window, you can fine-tune the filter's settings to best complement your original photograph. Once you achieve the desired effect, click "OK" to apply the filter to your image.
Enhancing Detail: Sharpening Your Image
Sharpening is a critical post-processing step that enhances the definition of edges within an image, making in-focus areas appear crisper and more detailed. Photoshop achieves this by increasing the contrast along these edges, subtly lightening pixels on one side and darkening them on the other.
The "Smart Sharpen" filter is a built-in and highly effective tool for this purpose. To use it, go to "Filter" in the top menu bar, then select "Sharpen" > "Smart Sharpen." A preview window will appear, allowing you to see the effect of your adjustments. On the right side, you can modify various settings. It's generally recommended to start with the "preset" menu set to "default." Adjust the "Radius" slider to a low setting for optimal results, as excessive radius can introduce artifacts. Next, control the intensity of the sharpening with the "Amount" slider, dragging it leftward until the image appears sharp without looking unnatural. The "Reduce Noise" slider can be used to mitigate any luminance noise that might be introduced during the sharpening process. Once satisfied, click "OK" to apply the sharpening.
Most images benefit from sharpening as it adds more definition to the edges of your subject. The necessity of sharpening an image will depend on its intended viewing medium, whether on a computer screen or for print. Regardless of the output, the general rule of thumb in photo editing is to apply minimal changes incrementally.

Finalizing Your Creation: Exporting the Image
The culmination of your editing process is exporting your finished photograph. This step ensures your image is saved in a suitable format for sharing or printing.
Navigate to "File" > "Save As." Here, you can assign a descriptive file name and choose a specific location on your computer to save your edited image. Crucially, you will need to change the file format from Photoshop's native PSD to a more universally compatible format like JPEG. Then, click "Save" to export your image.
The workflow between Lightroom and Photoshop is designed for seamless integration. After making initial edits in Lightroom, you can easily open your photo in Photoshop for more advanced manipulations. This can include adding graphics, performing detailed retouching, removing elements, or incorporating text. To initiate this workflow, select File > Edit in Photoshop > Edit in Photoshop. Your photo will automatically open in the most recently installed version of Photoshop, often as Smart Objects or layers, preserving flexibility for further adjustments. After completing your edits in Photoshop, saving the image will update it in Lightroom.
Ultimately, Photoshop often represents the final stage in a photograph's journey from capture to presentation. Even images that appear perfect immediately after shooting can be significantly enhanced through post-processing. While numerous editing tools exist, Adobe Photoshop remains a cornerstone for many photographers, offering a powerful yet intuitive platform to elevate their images.
Advanced Techniques and Workflow Integration
For those seeking a deeper dive into Photoshop's capabilities, understanding its integration with other Adobe products like Lightroom is paramount. The Creative Cloud Photography plan offers a subscription service that bundles both applications, ensuring you always have access to the latest versions and features. For users interested in exploring Photoshop's potential without a subscription, the free Photoshop Express app provides a more streamlined, mobile-friendly editing experience.
Recognizing your specific editing goals is key to effectively utilizing Photoshop. Whether your aim is to refine colors and tones, meticulously clean up images with tools like the Clone Stamp, or to explore a comprehensive suite of editing functions, your approach will depend on the depth of your engagement with the software and your particular needs. Many photographers integrate Photoshop into their daily workflow, editing every photograph they capture.
A common and effective workflow involves distinct phases. The first phase, often termed "composition," encompasses lens corrections, straightening, and cropping. Utilizing the "Camera Raw filter" (Filter > Camera Raw filter) provides access to tools for these adjustments. Within Camera Raw, you can select the Lens Correction tab and the straightening tool. This is also the stage for initial retouching, including object removal.
The second phase focuses on "tone," which involves setting the brights and darks of the image. This can be achieved through global adjustments or more localized techniques like "dodge and burn." Dodge and burn, originating from darkroom techniques, involve selectively lightening (dodging) and darkening (burning) specific areas of an image. This can be simulated in Photoshop by creating new layers, setting them to a blend mode like "Overlay" or "Soft Light," and painting with black or white at a low opacity to darken or lighten areas, respectively. For a more advanced approach, you can create dedicated "Dodge" and "Burn" layers. To do this, hold down Alt/Option while creating a new layer, name it appropriately (e.g., "Dodge" or "Lighten"), and set the brush opacity low. Paint with white on the "Dodge" layer to lighten and black on the "Burn" layer to darken.
The third phase involves refining the overall color balance. After setting the tones, it's beneficial to group your dodge and burn layers into a Smart Object. Right-click on the selected layers and choose "Convert To Smart Object." This allows for global adjustments to color while retaining the flexibility of individual layers. Adjust the overall color balance using the temperature slider to add warmth or coolness. Further color refinement can be achieved using HSL (Hue, Saturation, Luminance) adjustments to make specific colors "pop."
The fourth and final phase is for final review and applying finishing touches. This often involves revisiting the "Camera Raw filter" (Filter > Camera Raw). Here, subtle effects like a vignette can be applied to enhance the image's focus by darkening the edges. Keyboard shortcuts like Cmd+Shift+Option+E (Mac) or Ctrl+Shift+Alt+E (Windows) can be used to create a merged copy of all visible layers, allowing for final adjustments without affecting the original layers.
The Importance of Post-Processing
In the digital age, post-processing is an indispensable part of photography. Even the most perfectly captured shot can benefit from the subtle magic of editing to reach its full potential. While shooting in RAW format provides greater flexibility for post-processing due to its unprocessed nature, even JPEGs can be significantly improved. The extent to which these techniques are applied is a matter of artistic choice, ranging from minimal polish to maintain authenticity, to bold manipulations for fine art prints. It's important to acknowledge that "authenticity" in digital photography is a complex concept, as every camera processes images differently.
RAW vs JPEG: The TRUTH
The fundamental steps outlined in this guide-importing, cropping, adjusting color and lighting, removing distractions, applying filters, sharpening, and exporting-provide a robust framework for mastering photo editing in Adobe Photoshop. With practice and experimentation, you will develop your own unique workflow and artistic style, transforming your photographic visions into compelling visual realities.