Have you ever tried upscaling an old image and ended up with a pixelated mess? Many content creators, marketers, and everyday users find themselves in this frustrating position. The core issue often lies not in a lack of creativity, but in the specialized knowledge of image manipulation software like Photoshop. Fortunately, upscaling an image in Photoshop doesn't require you to be a seasoned expert. By understanding the right tricks and techniques, you can significantly improve image resolution and clarity. This guide will equip you with the knowledge to transform low-resolution photos into stunning visuals with just a few simple steps, all without needing to pay for expensive crash courses.
Understanding Image Upscaling
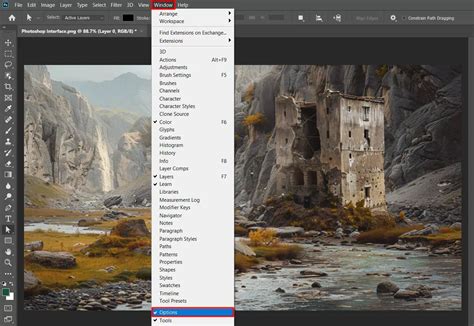
Before diving into Photoshop's capabilities, it's crucial to understand what image upscaling truly entails. Image upscaling is a sophisticated process of increasing the size of an image by intelligently adding new pixels. This process aims to enhance visual clarity and detail, a stark contrast to simply stretching an image, which inevitably leads to blurriness and pixelation. When you simply stretch an image, it becomes blurry and pixelated. By using Photoshop, your image is upscaled in a few clicks, leveraging advanced algorithms to create a more natural and sharp result.
The distinction between image upscaling and simple image enlargement is vital. Image enlargement-you enlarge an image, but it becomes blurry and pixelated. Image upscaling-you try to upscale an image, which adds realistic details and more pixels so that the picture looks big, natural, and sharp. This intelligent addition of pixels is what allows for a significant improvement in visual quality, making even old, low-resolution photos appear crisp and detailed.
Photoshop is a veritable gold mine for graphic designers and editing professionals, offering a plethora of powerful tools to adjust and enhance image resolution. With features like Preserve Details 2.0 and Neural Filters, Photoshop empowers users to achieve great-quality results when upscaling images. By mastering these methods, you can breathe new life into old or scanned photos by increasing resolution and sharpening details that were lost over time or in transit.
Method 1: The Image Size Dialog Box with Resample
The Image Size dialog box in Photoshop offers direct control over image dimensions, resolution, and the resampling algorithms Photoshop employs to add new pixels. This method is fundamental for resizing an image to larger dimensions without introducing pixelation, especially when combined with options like Preserve Details 2.0 or Camera Raw settings.
Step 1: Open the Image
Begin by opening your desired image in Adobe Photoshop. You can do this by navigating to "File" in the upper panel and selecting "Open." Alternatively, for a quicker approach, use the keyboard shortcut "CTRL+O."
Step 2: Access Image Size
Resizing is a necessary precursor to upscaling. To adjust the image size, click on "Image" in the top menu bar, and then select "Image Size." This action will bring up the dialog box where you can manipulate the image's dimensions and resolution.
Step 3: Image Resample Settings
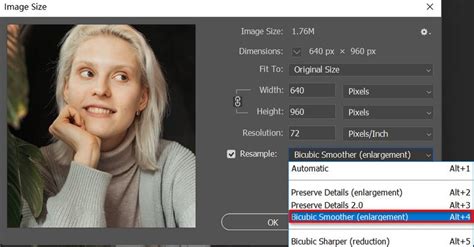
Within the Image Size dialog box, pay close attention to the "Resample" option. Ensure the chain link icon between the width and height is activated to maintain the image's aspect ratio and avoid distortions. Tick the "Resample" box, and from the dropdown menu, choose "Bicubic Smoother (best for smooth gradients)." This option is designed to produce a smoother look and can help with noise reduction. Subsequently, enter your desired dimensions, typically increasing them by 1.5x to 2x for a noticeable improvement in quality without excessive distortion.
Step 4: Preview and Apply
Before committing to the changes, it's essential to preview the results. In the preview window of the dialog box, zoom in to the maximum size (100%) to accurately assess potential quality loss. Once you are satisfied with the preview at this zoom level, click "OK" to apply the upscaling. You should observe a noticeable improvement in the image's clarity and detail.
Step 5: Refine the Image
After the initial upscaling is complete, you can further refine your image. Navigate to the "Filter" menu in the top panel. Here, you can use various options to enhance the upscaled image. For instance, applying a "Sharpen" filter can make the image appear clearer, while "Noise Reduction" can mitigate any introduced graininess or artifacts. Experiment with different filters to achieve the best possible result tailored to your specific image.
Method 2: Preserve Details 2.0 Upscale (AI-Based Quality)
For achieving the highest quality when upscaling photographic images, the "Preserve Details 2.0" method leverages an AI algorithm to maintain detail and reduce blur. This is particularly effective for photographic content.
Step 1: Enable Preserve Details 2.0
Before you begin, ensure that "Preserve Details 2.0" is enabled in Photoshop's preferences. Go to "Edit" > "Preferences" (or "Photoshop" > "Preferences" on macOS). Navigate to the "Image Processing" section and make sure "Preserve Details 2.0" is checked. Click "OK" to save these settings.
Step 2: Open the Image
As with the previous method, open the image you wish to upscale by going to "File" > "Open," or by using the "CTRL+O" shortcut.
Step 3: Image Resizing
Access the "Image Size" dialog box via "Image" > "Image Size." This is where you'll initiate the resizing process before applying the advanced upscaling technique.
Step 4: Select Preserve Details 2.0 in Resample
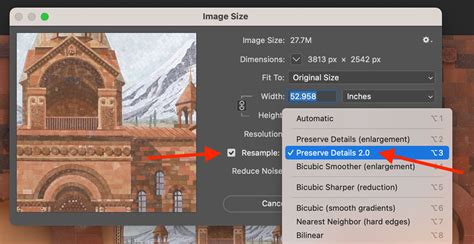
In the "Image Size" dialog box, ensure "Resample" is checked and the aspect ratio is linked. For the resampling method, select "Preserve Details 2.0" from the dropdown menu. This AI-powered option is specifically designed to intelligently add pixels while preserving fine details and minimizing noise. Enter your desired dimensions, again typically scaling up by 1.5x to 2x.
Step 5: Click OK and Apply
Preview the results at 100% zoom to confirm the quality. Once satisfied, click "OK." You will notice that the pixel dimensions and document size have increased significantly, resulting in a clearer and crisper version of your original image. The difference can be substantial, with pixel dimensions potentially upgrading from thousands to millions of pixels.
Method 3: Smart Object + Free Transform
This method is excellent for maintaining flexibility and ensuring that your upscaling efforts are non-destructive. By converting your image layer into a Smart Object, any transformations, including upscaling, can be modified later without losing pixel data.
Step 1: Open the Image
Begin by opening your image in Photoshop using "File" > "Open" or "CTRL+O."
Step 2: Convert Layer to Smart Object
In the "Layers" panel, right-click on your image layer. From the contextual menu, select "Convert to Smart Object." A small icon will appear on the layer's thumbnail, indicating that it is now a Smart Object.
Step 3: Activate Free Transform
With the Smart Object layer selected, go to the "Edit" menu and choose "Free Transform," or use the shortcut "CTRL+T." This will bring up a bounding box around your image.
Step 4: Upscale Image Non-Destructively
Drag any of the corner handles of the bounding box outwards to enlarge the image. To scale proportionally from the center, hold down the "Alt" key while dragging. At first glance, the image might appear pixelated during this transformation, but this is a temporary visual artifact.
What is Non-Destructive Editing? | Photoshop Tutorial | PHLEARN
Step 5: Commit Free Transformation
Once you have achieved the desired size, click the checkmark icon in the options bar at the top of the screen to commit the transformation. Photoshop will then apply its default resampling technique, and your image will be upscaled. The advantage here is that because it's a Smart Object, you can always re-enter "Free Transform" and adjust the size again without degrading the image quality further.
Method 4: Neural Filters for Enhancement
While Neural Filters in Adobe Photoshop are not directly used for traditional image upscaling (i.e., changing pixel dimensions by a specific factor like 2x or 4x), they can significantly enhance the perceived quality of an upscaled image. Filters like "Super Zoom" can help reconstruct fine details and improve clarity, complementing the primary upscaling process.
Step 1: Open the Image
Open the image you intend to upscale in Photoshop using "File" > "Open" or "CTRL+O."
Step 2: Access Neural Filters
Navigate to the "Filter" menu and select "Neural Filters." This will open a dedicated panel for AI-powered filters.
Step 3: Utilize Super Zoom (or similar enhancement filters)
Within the "Neural Filter" panel, explore the available filters. While "Super Zoom" isn't a direct upscaler in the traditional sense, it can intelligently zoom into an image and attempt to reconstruct details. Apply the filter and adjust its settings as needed. Allow the filter a moment to process. After the Super Zoom is done, preview the results and click "OK" to apply the enhancements.
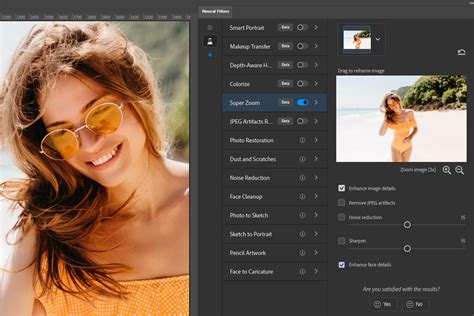
It's important to note that Neural Filters are best used after or in conjunction with a primary upscaling method like "Image Size" with "Preserve Details 2.0." They can refine the output of these methods by sharpening details, reducing noise, or improving JPEG artifacts, thereby enhancing the overall visual appeal of the upscaled image.
Method 5: Camera Raw Filter Upscale
The Adobe Camera Raw (ACR) filter, available as a plugin for Photoshop, offers a powerful "Enhance" feature that includes "Super Resolution." This is particularly beneficial for low-quality images and can effectively double the resolution of your image.
Step 1: Open the Image
Open your image in Photoshop via "File" > "Open" or "CTRL+O."
Step 2: Enable Smart Object
To ensure non-destructive editing, right-click on your image layer in the "Layers" panel and select "Convert to Smart Object."
Step 3: Activate Camera Raw Filter
Go to the "Filter" menu, then navigate to "Camera Raw Filter." If you don't see this option, ensure the Adobe Camera Raw plugin is installed and up to date.
Step 4: Enhance the Image with Super Resolution
Within the Camera Raw interface, locate and click on the "Enhance" button (often represented by a series of dots or sliders). In the "Enhance" dialog box, check the "Super Resolution" option. This mode intelligently doubles the image's resolution. Be mindful that this process can sometimes introduce artifacts if the source image is extremely low quality.
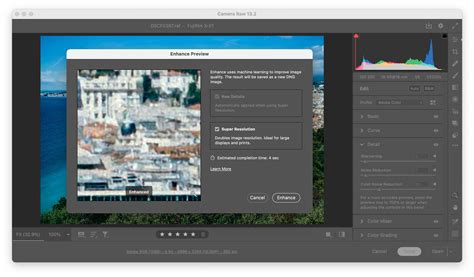
Step 5: Preview and Apply
After applying "Super Resolution," you can preview the changes. The Camera Raw filter also offers numerous other adjustments for refining color, exposure, and detail. Once you are satisfied with the enhanced resolution and overall look, click "OK" to apply the changes to your Smart Object layer. You can then further refine the image using Photoshop's standard tools for noise reduction or sharpening.
AI Tools for Effortless Upscaling
Beyond Photoshop's built-in capabilities, a growing number of AI-powered online tools can significantly simplify the image upscaling process, often delivering impressive results with minimal user input. These tools are ideal for users who need quick, high-quality upscales without delving into complex software.
1. Pixelbin AI Image Upscaler
Pixelbin's AI Image Upscaler is a user-friendly tool that makes upscaling accessible to everyone, regardless of their design expertise. You can upscale images in just a few clicks. Depending on your subscription plan (free or paid), your image can be enlarged to various sizes. The platform allows for batch uploads (up to 10 images at once) and offers basic editing tools like cropping and adjustments. The free tier typically limits users to a certain number of images per day. After upscaling, you can perform further adjustments and download the image in SD or HD quality, usually in PNG format.
2. Upscale.media
For those seeking a completely free and straightforward solution, Upscale.media is an excellent choice. This tool is designed to be incredibly easy to use, requiring no sign-up for its core functionality. Simply upload your image, and the AI will handle the rest. Upscale.media offers a set number of free credits per day, making it perfect for casual projects or users who don't require high-volume upscaling. Its interface is clean and intuitive, allowing for quick results.

3. DeepImage
DeepImage is another robust AI tool that excels at image upscaling, offering a fast and affordable solution. It operates entirely within your web browser, eliminating the need to download any software. DeepImage is a strong contender for both casual and professional projects due to its competitive pricing and high-quality output. You can upload your image, select the "Enhance" option, and the AI will process the image. Further edits can be made within the tool before downloading the final result. The results often show a significant improvement in clarity and a reduction in noise, as demonstrated by comparisons of old, blurry images transformed into sharper, more detailed visuals.
Adobe Firefly and Generative Upscale
Adobe has significantly advanced its AI capabilities within Photoshop, most notably with the introduction of Generative Upscale, powered by Adobe Firefly. This feature is designed to enhance image resolution with improved sharpness and clarity.
Generative Upscale can increase image resolution by up to eight megapixels, offering scaling options of 2x, 3x, or 4x. This tool is particularly valuable for professionals and casual creators who need cleaner, more detailed versions of very old or low-resolution digital photos for print or digital platforms without noticeable quality loss. The feature was a highly requested addition from the Photoshop user community.
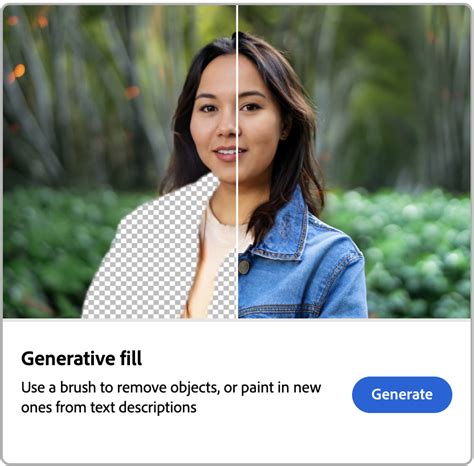
Currently available in beta for Photoshop desktop and web, Generative Upscale works by analyzing pixel data and intelligently resampling. This process complements other AI features within Photoshop, such as Neural Filters and Photo Restoration, allowing for comprehensive image refinement. While in beta, the tool has an output limitation of 4,096 pixels in both width and height. Users can combine Generative Upscale with other AI-powered tools for retouching old scans and enhancing image quality for various applications.
The latest public release of Photoshop also includes an improved Remove Tool, powered by the Adobe Firefly Image Model, which cleans up images with greater precision and generates realistic content to fill gaps. Additionally, the AI-Powered Harmonize feature (in beta) offers improved compositing tools for blending elements more naturally into existing photos.
Conclusion
Whether you are a seasoned Photoshop professional or a beginner looking to improve your image quality, the tools and techniques available today offer powerful solutions for image upscaling. Photoshop's built-in features like the Image Size dialog with Preserve Details 2.0, Smart Objects, and Camera Raw Filter provide granular control. For quicker, often equally impressive results, AI-powered online tools like Pixelbin, Upscale.media, and DeepImage are invaluable. Furthermore, Adobe's continuous integration of AI, such as Generative Upscale through Firefly, promises even more sophisticated and accessible image enhancement capabilities in the future. By understanding and utilizing these methods, you can effectively combat pixelation and transform your images into sharp, clear, and visually appealing assets.