In recent years, business cards have undergone a significant transformation. The traditional, old-school card is being replaced by more dynamic options, such as the shiny NFC business card. These modern cards offer the advantage of longevity and the seamless sharing of contact details with a simple tap on a compatible smartphone. Services like Blinq empower individuals to create custom NFC business cards, allowing for personalization with chosen colors, styles, and images. This tutorial will guide you through the process of designing your custom business card using Adobe Photoshop, with a specific focus on preparing files for both digital sharing and professional printing.
Understanding Adobe Photoshop for Design
Adobe Photoshop is a powerful and renowned creative application that enables users to edit images and graphics to produce stunning designs. Before diving into the practical steps of creating a business card, it's beneficial to grasp the fundamental principles of how Photoshop operates. Photoshop is primarily a raster-based application, meaning it works with pixels - tiny squares of color that form an image. This contrasts with vector-based applications like Adobe Illustrator, which use mathematical equations to define graphics.
When you import graphics into Photoshop, they are converted into specified pixel dimensions. It is crucial to set these dimensions correctly from the outset to prevent printed designs from appearing stretched, distorted, or compressed.
Why Choose Photoshop for Business Card Design?
Photoshop offers several advantages for creating business cards, especially if you are already familiar with its interface. Its robust editing capabilities make it ideal for incorporating photographic elements or complex graphic designs. The program's layer-based system is a significant asset, allowing for intricate designs and easy modification of individual elements without affecting others. Furthermore, as Photoshop is fundamentally a photo editor, it is the perfect tool if your business card design will prominently feature images.
Preparing Your Design File in Photoshop
To begin crafting your business card, you first need to set up your document with the correct dimensions and resolution for print. This ensures that your final printed product will be sharp and professional.
Setting Up Your Canvas
- Create a New Document: Launch Adobe Photoshop and navigate to
File > New. - Dimensions: For a standard business card with bleed, set the dimensions to
3.75 inchesin width and2.25 inchesin height. This includes a 1/8 inch (0.125 inch) bleed on each edge, which is essential for professional printing. The standard finished size of a business card is 3.5 inches by 2 inches. - Resolution: Set the resolution to
300 Pixels/Inch. This high resolution is critical for ensuring crisp, clear printing. - Color Mode: Select
CMYK Coloras the color mode. CMYK (Cyan, Magenta, Yellow, and Key/Black) is the color model used in professional printing, ensuring that the colors on your screen translate accurately to the printed output. RGB (Red, Green, Blue) is for digital displays and will not yield accurate printed colors.
Establishing Bleed and Margin Guides
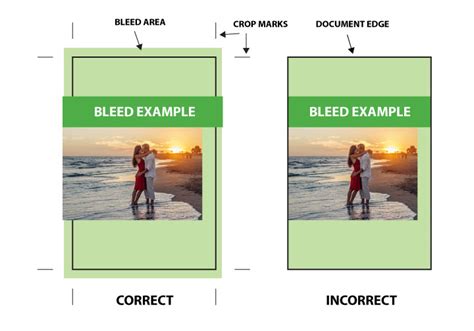
A bleed is the area that extends beyond the trim line of your business card. It ensures that no unprinted edges appear after the card is cut. A critical margin is the safe zone within the bleed area where important content should be placed to avoid being accidentally cut off.
- Show Rulers: If rulers are not visible, go to
View > Rulersor pressCtrl+R(Windows) /Cmd+R(Mac) to display them. - Create Bleed Guides: Click on the top ruler and drag down to create a horizontal guide. Place it at
0.125 inches. Repeat this process to create another horizontal guide at2.125 inches(which is 2.25 inches - 0.125 inches). - Create Margin Guides: Click on the left ruler and drag to create a vertical guide. Place it at
0.125 inches. Repeat this to create another vertical guide at3.625 inches(which is 3.75 inches - 0.125 inches). - Critical Margin: For the critical margin (safe zone), create guides at
0.125 inchesfrom the trim lines. This means guides at0.25 inches(0.125 bleed + 0.125 margin) from the left and top edges, and guides at3.5 inches(3.75 - 0.25) from the left and2.0 inches(2.25 - 0.25) from the top. Ensure all important text and logos are within these inner guides to prevent them from being cut off.
Designing Your Business Card Elements
With your canvas set up, you can now start adding the essential elements of your business card. It's best practice to create a new layer for each distinct element you add. This organization makes it easy to edit or move elements later without affecting others.
Choosing and Applying Colors
Color plays a vital role in brand perception and can evoke specific emotions. Select colors that align with your brand identity.
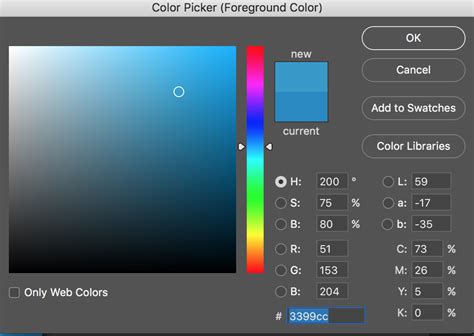
- Color Selection: The color selection tools are located at the bottom of the toolbar on the left side of the screen. The top square represents the foreground color, and the bottom square represents the background color. Click on either square to open the Color Picker.
- Background Color: You can fill the background with a solid color using the Paint Bucket tool. Select the Paint Bucket tool from the toolbar, choose your desired foreground color, and click anywhere on the background layer.
- Gradients: For a more dynamic background, use the Gradient Tool. Click and hold the Gradient Tool icon (often grouped with the Paint Bucket) to access it. You can select pre-set gradients or create your own by choosing a start and end color. Click and drag across your canvas to apply the gradient.
Adding Text and Typography
Your business card's text content is crucial for conveying essential information.
- Select the Type Tool: Activate the Horizontal Type Tool (represented by a "T" icon) from the vertical toolbar on the left.
- Place Text: Click on your canvas where you want to add text. A blinking cursor will appear.
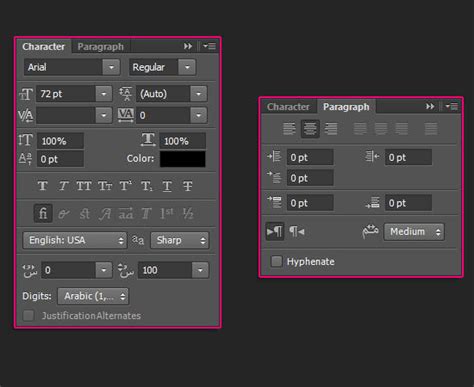
- Character Menu: The Character panel (usually found in the right sidebar, or accessible via
Window > Character) allows you to select your font, font style (e.g., Regular, Bold, Italic), font size, and font color. - Font Choice: Opt for fonts that are clear, legible, and professional. Consider your brand's personality when making your selection. Keep font choices consistent across your card for a cohesive look.
- Color Contrast: Ensure there is sufficient contrast between your text color and background color for readability. For dark backgrounds, light-colored fonts are generally best, and vice versa.
- Key Information: Type in your essential contact details: name, title, company, phone number, email address, and website.
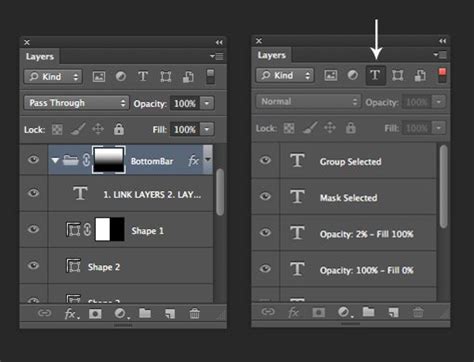
- Organizing Text: Use the Layers panel to rename your text layers (e.g., "Name," "Contact Info") for better organization.
Typography Tips:
- Hierarchy: Use different font sizes to establish a visual hierarchy. Your name should typically be the most prominent text, followed by your title and then contact details.
- Alignment: Use the Move Tool (
V) to align your text elements. Select multiple text layers by holdingShiftand clicking on them in the Layers panel. Then, use the alignment options in the top options bar to align them left, right, center, or distribute them evenly. - Readability: Printed business cards are small. Avoid overly decorative or small fonts for crucial information.
Incorporating Logos and Images
Adding your company logo and other visual elements can significantly enhance your brand recognition.
- Importing Graphics: To add a logo or image, go to
File > Place Embedded(orFile > Place Linkedif you want the image to update automatically if the original file changes). Browse your computer for the image file and click "Place." - Resizing and Positioning: Once placed, the image will appear on your canvas with a bounding box and handles (small squares) at the corners and sides. Click and drag these handles to resize the image. Hold down the
Shiftkey while resizing to maintain the image's original proportions and avoid distortion. Click and drag the image itself to reposition it. - Layer Management: The imported image will appear as a new layer in your Layers panel. You can drag this layer up or down in the stack to control whether it appears in front of or behind other elements.
- Transform Tool: For more advanced transformations, such as rotating or distorting an image, select the layer and go to
Edit > Free Transform(or pressCtrl+T/Cmd+T). Remember to commit transformations by clicking the checkmark icon in the top options bar.
Adding QR Codes for Digital Connectivity
Modern business cards, especially NFC cards, often include QR codes that link to digital profiles or websites.
- Generate QR Code: If you are using a service like Blinq for your NFC card, you will typically generate a QR code through their web interface. This code will link to your digital business card or profile.
- Download QR Code: Download the generated QR code as an image file (e.g., .PNG).
- Import QR Code: Import the QR code image into your Photoshop design using the
File > Place Embeddedmethod described above. - Position and Resize: Place the QR code in a suitable location on your business card, ensuring it is large enough to be easily scanned by a smartphone.
How to Create a DIGITAL BUSINESS CARD for FREE 2026 | Canva Tutorial | Share Your Contact Details
Finalizing and Exporting Your Design
Once you are satisfied with your design, it's time to prepare it for printing and digital sharing.
Saving Your Editable File
It is crucial to save your work frequently throughout the design process.
- Save As .PSD: Go to
File > Save As. SelectPhotoshop (.PSD)as the file format. This is your master editable file. It preserves all your layers, allowing you to make future modifications. Always save your .PSD file before exporting for print.
Exporting for Print
For professional printing, you'll need to export your design in a high-quality format.
- Save As .TIF or .PDF: Go to
File > Save As.- TIFF (.TIF): This is a high-quality, lossless image format often preferred by printers. Select
.TIFfrom the dropdown menu. - PDF (.PDF): Portable Document Format is another excellent choice for print. Select
.PDFand ensure you choose a preset that supports high-quality printing (e.g., "Press Quality").
- TIFF (.TIF): This is a high-quality, lossless image format often preferred by printers. Select
- Filename Convention: It's good practice to add "PRINT" to your filename (e.g., "MyBusinessCard_PRINT.tif") to distinguish it from your editable .PSD file.
- Printer Specifications: Always check with your chosen print shop for their specific file format and resolution requirements. Some may prefer .JPG, but .TIF and .PDF are generally recommended for professional printing.
Exporting for Digital Use (e.g., Web)
If you need a version for online sharing or proofing before printing, you can export as a .JPG or .PNG.
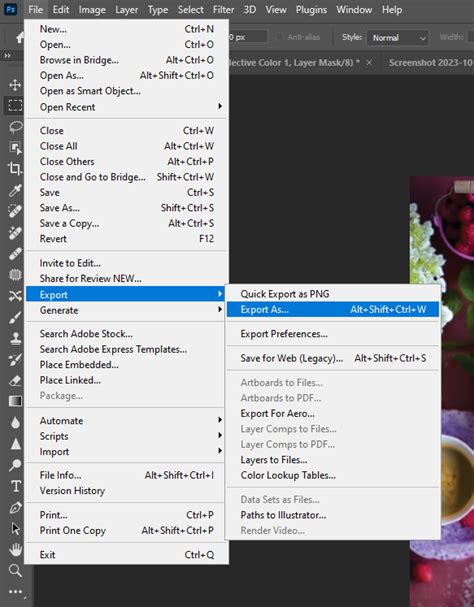
- Export As .JPG or .PNG: Go to
File > Export > Save for Web (Legacy)...orFile > Export > Export As....- JPEG (.JPG): This format is suitable for photographic images and offers good compression for smaller file sizes.
- PNG (.PNG): This format supports transparency and is ideal if your design has transparent backgrounds.
- Color Mode: For digital use, you'll typically work in RGB. The "Save for Web" option will usually handle this conversion appropriately.
Considerations for NFC Business Cards and Printing
When designing for NFC business cards, remember that the physical card is a gateway to a digital experience. Ensure your design is appealing and that any QR codes or NFC functionality is clearly indicated or intuitively placed.
Printing Best Practices
- Test Prints: Before committing to a large print run, always print a single test copy. This allows you to check colors, text readability, and overall layout accuracy.
- Color Accuracy: Be aware that colors can appear slightly different on screen compared to printed output, even with CMYK. Your print provider can help calibrate colors if precise matching is critical.
- File Format: Confirm the exact file format required by your printer. Some services have specific templates or requirements.
By following these steps, you can leverage the power of Adobe Photoshop to create professional, eye-catching business cards that effectively represent your brand and facilitate both physical and digital connections.