Photoshop's Sky Replacement function has been a welcome addition to an already astonishing software. It gives photographers the opportunity to replace a sky in a photo effortlessly without the need to learn how to mask or use layers. This powerful feature, enhanced by Adobe Sensei AI, allows for quick and straightforward sky transformations, making it accessible even for beginners. The process is designed to be intuitive, enabling users to achieve professional-looking results with minimal effort.
Understanding the Core Functionality
At its heart, Photoshop's Sky Replacement is an AI-powered tool that intelligently detects the original sky in a photograph and replaces it with a new one. The AI automatically adjusts the lighting and shadows to seamlessly match the new sky to the existing scene, ensuring a natural and believable outcome. This feature is particularly beneficial for photographers who want to enhance their images without delving into complex layer manipulation or masking techniques. The integration with Lightroom further streamlines the workflow, allowing for quick back-and-forth movement of images between the two applications.
The Power of AI in Sky Replacement
The AI-based sky replacement feature in Photoshop is a testament to the advancements in artificial intelligence within creative software. Adobe Sensei, Adobe's AI and machine learning platform, is the engine behind this capability. It analyzes the original image, identifies the sky, and then applies the selected replacement sky while making critical adjustments to lighting and color. This intelligent automation means that users don't have to manually select the sky or worry about matching the tonal values of the new sky to the scene. The AI handles these complex tasks, saving significant time and effort.
Customization and Control
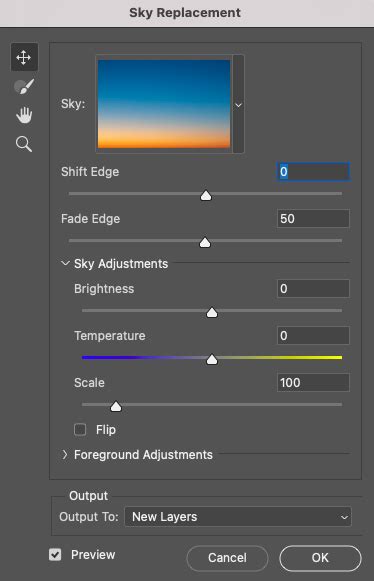
While the AI does a remarkable job, Photoshop's Sky Replacement also allows for a high degree of customization. Users can import their own sky images, providing an endless array of options beyond the built-in library. This is crucial for achieving specific moods or matching unique lighting conditions. Furthermore, the tool offers several sliders to fine-tune the replacement:
- Shift Edge: This slider allows you to adjust the position of the new sky relative to the horizon. Moving it left can reveal more of the original sky, while moving it right can bring the new sky lower. This is particularly useful if the default placement isn't quite right or if there are elements like low clouds that need to be incorporated or hidden.
- Fade Edge: This slider controls the blend between the new sky and the original image. A higher value creates a softer, more gradual transition, which can be effective for blending with subtle atmospheric effects or when the horizon line is not sharply defined. A lower value results in a more distinct edge, which might be necessary to cover faint clouds or to achieve a crisper separation.

Importing Custom Skies
To import your own sky images, you can simply click on the dropdown arrow next to the sky preview in the Sky Replacement panel and select "Add Sky to Library." You can then navigate to your desired sky image file. It's important to note that for seamless results, especially with panoramic images, custom skies should ideally be seamless themselves. This might involve using skies specifically designed for 360-degree images or meticulously retouching seams in existing sky photographs.
When to Use Sky Replacement: A Philosophical Approach
The question of whether to manipulate skies in photography often sparks debate. While purists argue for unadulterated images, the reality is that creative expression through digital tools is a valid artistic pursuit. For photojournalism, authenticity is paramount, and significant manipulation is generally unacceptable. However, for fine art photography, printing for display, or personal projects, altering the sky can be a powerful way to achieve a specific artistic vision. Just as a painter adjusts colors to convey emotion, a photographer can replace a sky to enhance the mood or narrative of their image. The key lies in the purpose of the image and the artist's intent.
Achieving Seamless Results, Especially with Panoramas
One of the challenges that can arise, particularly with wide-angle or panoramic images, is achieving a truly seamless sky replacement. When viewing a panorama in a viewer or shifting the image pixels horizontally, seams in the replaced sky can become noticeable. This is especially true if the replacement sky is not designed to be seamless or if the aspect ratio doesn't match.
The Challenge of Equirectangular Panoramas
Equirectangular images, commonly used for 360-degree panoramas, present a unique challenge for sky replacement tools. The extreme distortion at the edges of these images means that a standard sky image, when mapped onto this format, can appear to have visible seams. As noted in user discussions, the new Photoshop Sky Replacement feature can be used with equirectangular panorama images, but the resulting sky might not be seamless when viewed in a panorama viewer.
Strategies for Seamless Panoramic Skies
To overcome this, several strategies can be employed:
- Use Seamless Custom Skies: The most effective method is to use sky images that are already seamless. This often means sourcing skies specifically created for 360-degree photography or preparing your own by carefully retouching any visible seams. If you download skies for 360 images or cut them from 360 images, you know it works without seams.
- Adjust Sky Width: When using a custom sky, you will have to adjust its width to match that of your equirectangular panorama. This ensures that the sky image covers the entire 360-degree field of view without stretching or repeating unnaturally.
- Align Sun Position: Naturally, you will have to align your panorama so the sun is at the same angle location as your sun in the new sky. This is crucial for maintaining realism. You can often achieve this by adjusting the orientation of your panorama in software like PTGui prior to importing it into Photoshop for sky replacement.
- Post-Replacement Refinement: Even with the best preparation, some minor adjustments might be needed. Tools like the Sky Brush, which is less known but highly effective, can help refine the edges and blend the sky more naturally. The "Shift Edge" and "Fade Edge" sliders are also critical for fine-tuning the transition, especially around the horizon.

Fine-Tuning for Realism
Beyond the initial replacement, achieving a truly natural look often requires further refinement. The goal is to make the new sky feel like an integral part of the original scene, not an overlay.
Matching Tones and Brightness
A common pitfall is using a sky that doesn't match the lighting and tones of the foreground. If your original scene has bright, warm light, a dramatic, cool-toned sunset sky might look out of place. Before saving, it's essential to compare the sky to the scene and make adjustments. You might need to brighten the sky, add color casts (like yellow tones to match a sunny scene), or reduce its intensity to create a more harmonious blend.
For example, if your photo has more brightness and tones of yellow in the scene, these should ideally be present in the sky. You can then brighten the sky and add more yellow to it to match the scene better.
Addressing the Edges and Transitions
The edges between the sky and the foreground are critical. Zooming in on your image and carefully adjusting the "Shift Edge" and "Fade Edge" sliders is paramount. The "Shift Edge" slider can help correct horizons that appear too high or too low. The "Fade Edge" slider, with its default set to maximum (100), can sometimes be too aggressive, leading to an overly soft transition. You may need to reduce this value to achieve a more subtle blend, especially if you want to preserve some detail or cover faint clouds.
The Sky Brush for Subtle Refinements
The Sky Brush is a tool that very few people know exists, let alone use, but it can significantly affect the edge of the replacement. It allows for localized painting on the sky layer, enabling precise control over blending and masking. This is particularly useful for areas where the AI might have struggled, such as around complex objects like trees or intricate architectural details.
EVERY Setting Explained! Advanced Photoshop Sky Replacement
Photoshop's Sky Replacement: A Quick Overview of the Steps
The process of replacing a sky in Photoshop is designed to be remarkably straightforward:
- Pick an Image: Open the photograph you wish to edit in Photoshop.
- Access Sky Replacement: Go to
Edit > Sky Replacement. - View the Gallery: A panel will appear displaying a gallery of pre-selected skies organized into categories like "Blue Skies," "Spectacular," and "Sunset." You can also import your own skies here.
- Let Adobe Sensei Work: Select a sky from the gallery or your custom library. Photoshop's AI will automatically detect the original sky and replace it.
- Adjust and Refine: Utilize the sliders (Shift Edge, Fade Edge) and other options to fine-tune the replacement for a seamless and natural look.
- Confirm: Once satisfied, click "OK." You will notice your image adjustment layers appearing on the right-hand side of the Photoshop interface, allowing for further non-destructive editing.
Considerations for Optimal Results
While Photoshop's Sky Replacement is powerful, its effectiveness can depend on the source image. The AI-powered tool generally performs best on photos with a clearly defined horizon and distinct sky. Images with very complex foregrounds that merge with the sky, or those with heavy atmospheric haze, might require more manual intervention.
The Role of the Horizon Line
A clear horizon line makes it easier for the AI to differentiate between the sky and the land or sea. If your horizon is obscured by clouds, fog, or intricate details, the AI might have difficulty with the initial selection, and you may need to use manual masking or the Sky Brush to refine the edges.
Lighting and Mood Consistency
The most successful sky replacements are those where the lighting and mood of the new sky are consistent with the foreground. A bright, sunny day scene will look unnatural with a dark, stormy sky, unless that contrast is intentional for artistic effect. Always consider the direction of light, the color temperature, and the overall brightness when selecting or adjusting a replacement sky.
Beyond Replacement: Enhancing the Scene
Sometimes, even after a successful sky replacement, the foreground might look slightly disconnected. You can further enhance the integration by:
- Adjusting Foreground Exposure and Color: Use adjustment layers to match the brightness and color balance of the foreground to the new sky. If the new sky is warmer, consider adding a touch of warmth to the foreground.
- Adding Subtle Effects: For instance, if the new sky is dramatic and cloudy, you might add a subtle vignetting effect to draw the viewer's eye towards the center of the image, enhancing the overall mood.
Photoshop's Sky Replacement is a fantastic tool for manipulating photos, offering a quick, easy, and enjoyable process for users of all skill levels. By understanding its capabilities and employing thoughtful refinement techniques, photographers can elevate their images with dramatic and captivating skies.
tags: #adobe #photoshop #sky #replacement