Procreate, a powerhouse of digital art creation, offers an intricate yet intuitive system for managing layers. Understanding how to effectively manipulate these layers is fundamental to a streamlined and efficient artistic workflow. This guide delves deep into the process of ungrouping layers, while also exploring the broader spectrum of layer control, from selection and manipulation to protection and deletion. Mastery of these features empowers artists to maintain organization, safeguard their work, and unlock advanced editing capabilities.
The Foundation: Understanding the Layers Panel
The Layers panel is the central hub for all layer-related operations in Procreate. To access it, users simply tap the button in the upper right corner of the screen, which is depicted as two overlapping squares. This panel displays all the layers present in your artwork, allowing for individual or collective management. Within this panel, layers are visually represented by thumbnails, offering a quick glance at their content.
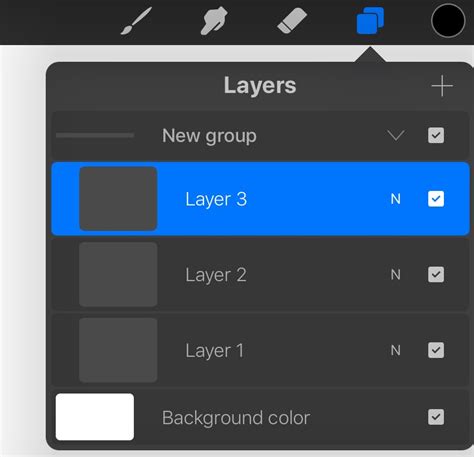
The interface within the Layers panel provides immediate access to a suite of essential functions. You can move, lock, duplicate, and delete layers, offering a comprehensive toolkit for day-to-day art creation. The ability to control and edit multiple layers simultaneously is a significant time-saver, enabling bulk operations such as moving, grouping, deletion, or transformation.
Selecting Layers: The Gateway to Control
Effective layer management begins with precise selection. Procreate offers several methods for selecting one or multiple layers, each suited to different scenarios.
Primary and Secondary Layer Selection
When you interact with layers in the Layers panel, they are categorized as either Primary or Secondary. Your Primary layer will be visually distinguished by appearing in a bright blue hue within the Layers panel. Conversely, Secondary layers are indicated by a dark blue color. The selection of a Secondary layer unlocks new functionalities at the top right of the Layers panel, specifically the Delete and Group options.
Layer Select: Precision Through Touch and Pencil
A particularly powerful feature for selecting layers is Layer Select. This function uses touch gestures to highlight all layers associated with a specific area of your canvas. When Layer Select is active, as you move your finger or Apple Pencil around the canvas, the layer-specific content will be highlighted. Lifting your finger or Pencil at that moment selects the highlighted layer. If multiple layers occupy the same area, a pop-up panel will appear, presenting all available layers for you to choose from.
To enable Layer Select, navigate to Actions (wrench icon) > Prefs > Gesture Controls > Layer Select. Within this menu, you can configure touch and Apple Pencil shortcuts to seamlessly integrate Layer Select into your workflow. For users of the Apple Pencil Pro, Layer Select can even be assigned to the squeeze function in Gesture Controls, offering a convenient way to select layers without direct screen interaction. It's important to note that the squeeze gesture can only be assigned to one function at a time.
Group Selection
Procreate also allows for the selection of entire layer groups. A swipe right gesture on a layer group will select it as a Secondary Group. Conversely, a tap on a Primary Group selects it. This functionality is crucial as it enables the application of all Selection and Transform actions to the entire group. Furthermore, if you are actively painting, smudging, or erasing with a group selected in the Layers Panel, Layer Select will automatically appear, further enhancing contextual control.
Multi-Layer Selection for Bulk Operations
To perform bulk operations, selecting multiple layers is essential. One method involves swiping right on each individual layer you wish to select; these selected layers will then appear in blue. Alternatively, you can employ a tap-and-hold gesture. Tap and hold a layer to pick it up, then tap other layers to add them to your selection. Once multiple layers are selected, you can then perform actions such as rearranging them as a cohesive unit.
Rearranging and Organizing Layers
The order of layers significantly impacts the final artwork. Procreate provides straightforward methods for reordering layers, both individually and in groups.
Individual Layer Rearrangement
To reposition a single layer, tap and hold it until it slightly pops out of place. From this state, you can freely drag the layer up or down within the list to its desired position.
Rearranging Multiple Layers
The ability to rearrange multiple layers simultaneously is a considerable advantage. After selecting the desired layers (using the methods described above), you can then follow the same tap-and-hold and drag procedure. This allows for the bulk repositioning of several layers at once, maintaining their relative order.
Grouping Layers: Enhancing Organization and Workflow
Grouping layers is a powerful technique for maintaining order, especially in complex artworks. It consolidates related elements into a single, manageable unit.
The Grouping Process
- Select Layers: To group layers, you first need to select them. Swipe right on each layer you wish to include in the group. The selected layers will be highlighted in blue.
- Create Group: With the desired layers selected, tap the Group option that appears at the top of the Layers panel. This action will create a new group containing the selected layers, which can then be named for further clarity.
Ungrouping Layers: Releasing Elements from a Group
When the need arises to break apart a layer group and work with individual layers again, the ungrouping process is remarkably simple.
The Ungrouping Process
- Open Layers Panel: Ensure your Layers panel is open.
- Access Group Options: Tap directly on the name of the group you wish to ungroup.
- Select Ungroup: A pop-up menu will appear. From this menu, select the Ungroup option. This action will dissolve the group, returning all constituent layers to the main layers list, individually accessible.
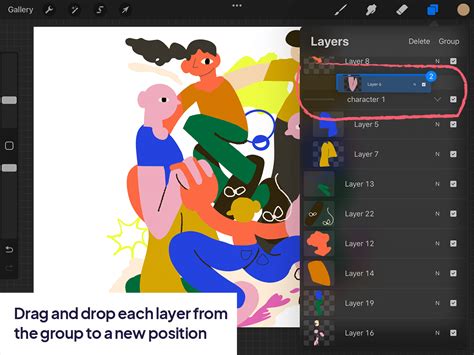
Merging Layers: Consolidating for Efficiency
Merging layers involves combining two or more layers into a single layer. This can be beneficial for reducing file size, freeing up layer space, or simplifying complex compositions.
Merging Two Layers
- Arrange Layers: Layers that you intend to merge must be positioned directly next to each other in the Layers panel. Rearrange them if necessary.
- Merge Down: Tap the thumbnail of the top layer you wish to merge, and then select Merge Down from the contextual menu. This action will combine the selected layer with the one directly below it.
Merging More Than Two Layers
Procreate offers a gesture shortcut for merging multiple adjacent layers. With the layers you wish to merge positioned contiguously, place one fingertip on the thumbnail of the top layer and a second fingertip on the thumbnail of the bottom layer in the sequence. Then, pinch all the layers together. This action will merge all layers between your two fingertips into a single layer.
The Implication of Merging: Unmerging
It is crucial to understand that once layers are merged, the only way to revert this action is to use the Undo function. If you exit your project or close the application, the ability to undo the merge will be lost. Therefore, it is advisable to consider merging only when you are confident in the composition or when space is a critical concern.
Advanced Layer Manipulation
Beyond basic organization, Procreate offers robust features for manipulating layers with precision and safety.
Moving Layers by Dragging
The tap-and-hold gesture is central to moving layers. Tap and hold a layer or a Layer Group to "pick it up." Once held, you can drag it up or down through the layer stack to change its order. This same gesture can be used for moving multiple selected layers simultaneously.
Bulk Moving with Multi-Selection
When multiple layers are selected, you can tap and hold any one of them to pick up the entire selection. You can then drag this collection of layers to a new position within the layer order. If you are moving these layers to a different canvas, you can drag them while holding them with one finger, and then use another finger to tap your destination canvas in the Gallery.
Protecting Layers with Lock
The Lock function is a vital safeguard against accidental edits. When a layer is locked, its contents are protected, preventing any unintended modifications or deletions. To lock a layer, swipe left on the layer in the Layers panel and tap Lock. A small padlock symbol will appear next to the layer's name, visually indicating its locked status. To unlock a layer, swipe left again and tap Unlock. Attempting to edit or delete a locked layer will result in a notification explaining that the selection contains locked items, and the delete button will be greyed out.
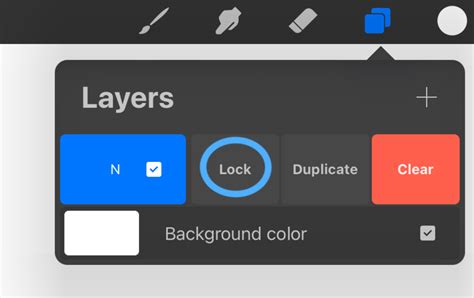
Duplicating Layers: Creating Backups and Variations
The Duplicate function allows you to reproduce an existing layer. This is incredibly useful for creating backups before making significant changes, or for generating variations of an element without altering the original. To duplicate a layer, swipe left on the layer and select Duplicate.
Deleting Layers: Permanent Removal
Deleting a layer removes it from your artwork. It's important to remember that deletion should generally be considered a permanent action. While there is an Undo function, it's best to be certain before deleting.
Deleting a Single Layer
To delete a single layer, swipe left on the layer in the Layers panel with your Apple Pencil or finger, and then choose Delete.
Deleting Multiple Layers
To delete multiple layers simultaneously, first select the layers you wish to remove. Once selected, tap the Delete option. You will be presented with a warning prompt; tap the red Delete button again to confirm the deletion.
Hiding Layers: Isolating and Exporting Control
Hiding layers is a non-destructive way to temporarily remove them from view. This is particularly useful for focusing on specific elements of your artwork or for controlling what is included when exporting your final image. Hidden layers will not be exported. To hide a layer, simply tap the checkbox located to the right of the layer's name. Tapping the checkbox again will make the layer visible.
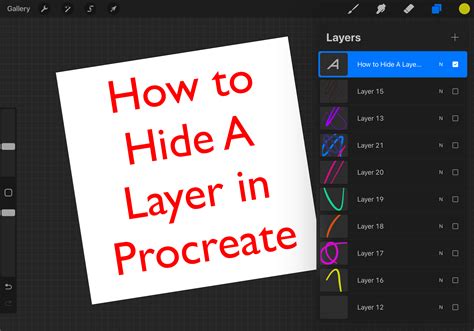
Understanding Layer Limits
Procreate artworks are subject to a maximum number of layers. This limit is not fixed and varies depending on the size and resolution of your canvas. Larger canvases with higher resolutions will generally have a lower maximum layer count. This is an important consideration during the planning stages of your artwork, and the ability to merge layers becomes essential when approaching these limits. Procreate Pocket documents also adhere to similar layer limitations, which are dependent on the document size.
Layer Select and Apple Pencil Pro Integration
The integration of Layer Select with the Apple Pencil Pro's squeeze function offers a novel approach to layer management. By assigning Layer Select to the squeeze gesture, artists can quickly isolate and select layers on their canvas without needing to directly interact with the Layers panel. This streamlines the workflow, allowing for more fluid transitions between drawing, editing, and layer manipulation. When using this feature, it's important to remember that the squeeze gesture can only be assigned to one function at a time, necessitating a choice between Layer Select and other potential squeeze-activated actions.
How to Use Alpha Lock, Clipping Mask & Layer Mask in Procreate - Procreate Tips
By thoroughly understanding and implementing these layer management techniques, artists can elevate their Procreate workflow, ensuring a more organized, efficient, and creatively liberating digital art experience. The ability to move, lock, duplicate, delete, group, and ungroup layers, coupled with advanced selection methods, provides the control necessary to bring any artistic vision to life.