Affinity Designer is a versatile design application developed by Serif, offering a robust suite of tools for both vector and raster graphics. Its comprehensive feature set makes it suitable for a wide range of design tasks, from crafting intricate business cards and eye-catching logos to mocking up application interfaces and designing complex illustrations. Whether you are a seasoned professional or a complete beginner, Affinity Designer provides the capabilities to bring your creative visions to life. This article will delve into various aspects of Affinity Designer, exploring its core functionalities, essential tools, and practical applications through a series of tutorials and insights.
Understanding Affinity Designer's Core Capabilities
Affinity Designer stands out as a powerful tool because it seamlessly integrates both vector and raster editing environments. This dual nature allows designers to leverage the scalability and precision of vector graphics for elements like logos and illustrations, while also benefiting from the pixel-based manipulation capabilities of raster graphics for detailed photo editing or textured artwork. The software is part of the broader Affinity suite, which includes Affinity Photo and Affinity Publisher, offering a cohesive ecosystem for design workflows.
The fundamental strength of Affinity Designer lies in its approach to design. It empowers users to create scalable artwork, meaning that vector graphics can be resized infinitely without any loss of quality. This is crucial for applications where designs need to be used across various mediums, from small social media icons to large-format banners. Conversely, the Pixel Persona allows for pixel-level editing, providing a familiar environment for those accustomed to raster-based software.
Getting Started with Affinity Designer: Essential Tools and First Steps
For newcomers to Affinity Designer, a solid understanding of the basic functionality and tools is paramount. Numerous resources exist to guide beginners through the initial learning curve. Many tutorials offer a quick start, providing an overview of all the basic functionalities and tools. These often include subtitles for easy viewing and comprehension, making them accessible to a broader audience.
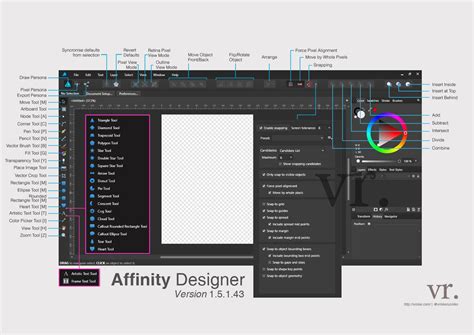
A common starting point for any design project is understanding how to manage files and set up a new document. Affinity Designer provides a Resource Manager to help keep track of files, a crucial aspect for maintaining organized projects. For those new to the software or considering a purchase, a UI overview is an excellent place to start, offering a visual introduction to the workspace and its components. Further beginner tutorials delve into the file menu, explaining each option and its usage. The ultimate getting started video guide for Affinity Designer covers all the basics in one comprehensive package, often under 20 minutes, teaching users how to start a new document, utilize premade and custom shapes, work with colors, understand layers, combine shapes, manipulate vectors using the vector brush and pen tools, add text, and save/export their creations.
Mastering Text and Typography in Affinity Designer
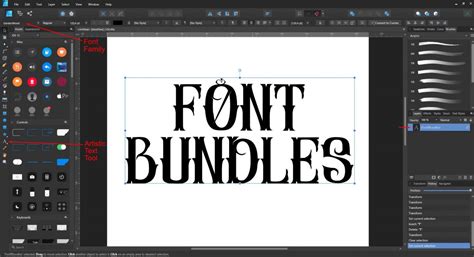
Text is a fundamental element in graphic design, and Affinity Designer offers sophisticated tools for its manipulation. You can learn how to add text to your designs using both the Artistic Text Tool and Frame Text tools, and subsequently modify character properties to achieve desired aesthetics.
The Artistic Text Tool is ideal for single lines of text, such as headlines or short phrases, where you want to apply creative effects. Frame Text, on the other hand, is designed for larger blocks of text, allowing it to flow within a defined area, much like in a traditional layout program.
Affinity Designer tutorials often explore creating "text effects," transforming standard typography into visually compelling elements. This can range from subtle repeating shapes to bolder, more experimental treatments. One area of focus is creating cartoon text effects, which often involve stylized outlines, vibrant colors, and playful shapes. Another popular technique is creating text effects with the Artistic Text Tool, allowing for unique and customizable typographic treatments.
Text manipulation can sometimes be a point of contention among design purists who advocate for preserving the integrity of typefaces. However, in many project scenarios, applying specific effects is necessary to meet design requirements. Affinity Designer provides the tools to achieve these effects, from subtle repeating shapes to bolder statements, offering several different ways to create patterns within text.
Advanced Text Effects and Customization
Beyond basic text addition, Affinity Designer excels in advanced text manipulation. Tutorials explore how to create bold, chaotic acid graphics, often incorporating distressed or experimental typography. The ability to modify character properties extends to kerning, leading, tracking, and baseline shifts, giving designers granular control over the appearance and spacing of text.
Creating unique and customizable guilloché brushes is another advanced technique that can be applied to text elements for intricate decorative patterns. These brushes, when used with text, can produce highly sophisticated and detailed results, often seen in historical engraving or security printing.
Exploring Vector and Raster Workflows in Affinity Designer
Affinity Designer's dual vector and raster capabilities open up a vast array of creative possibilities. The Pixel Persona, in particular, offers a comprehensive set of tools for pixel-based editing, catering to users who may be more familiar with raster graphics software.
Crafting Vector Illustrations and Icons
The vector functionality of Affinity Designer is a cornerstone of its utility. It allows for the creation of infinitely scalable graphics, making it the perfect tool for logo design, where a single design needs to be reproduced at various sizes without compromising quality. Furthermore, Affinity Designer is adept at creating illustrations. Tutorials guide users through the process of creating flat illustrations, which can be the foundation for more complex artwork, logos, or icon designs.
Icon design is a significant application for Affinity Designer, as icons are ubiquitous in UI design, web design, social media, and more. Tutorials specifically focus on icon design, detailing the step-by-step process and offering bonus information on choosing the appropriate size and utilizing various tools effectively.
Seamless Patterns and Textures
Creating seamless patterns is another area where Affinity Designer shines. Whether for backgrounds, textiles, or digital assets, the software provides methods for generating repeating designs. Tutorials explore different options for creating patterns, from subtle repeating shapes to more intricate arrangements. While some of these tutorials may involve a significant number of steps, the accompanying instructions and screenshots are designed to be easy to follow.
Leveraging Affinity Designer for Specific Design Projects
Affinity Designer's versatility extends to specialized design tasks, with numerous tutorials catering to specific project types.
App Mock-ups and Business Cards
The software is capable of handling projects of all scales, from designing a simple business card to mocking up a complex app interface. The ability to work with both vector and raster elements allows for a flexible workflow, enabling designers to combine precise vector shapes with textured raster elements.
Hand Lettering and Brush Tools
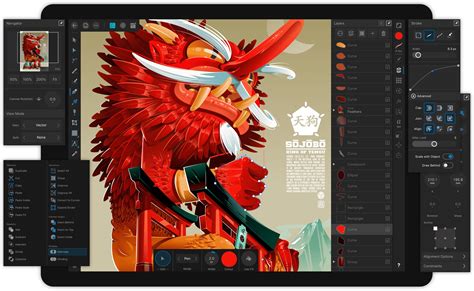
Affinity Designer for iPad is particularly well-suited for hand lettering. It provides a digital canvas for practicing and executing professional hand lettering work. Quick tutorials guide users from the very basics to creating sophisticated lettering art, often demonstrating how to use the brush tools with ease. The tutorials show on-screen exactly what to do and what steps to take, ensuring that users can effectively utilize the brush tools.
A unique aspect of Affinity Designer is its ability to create custom brushes. Users can learn how to create a unique, customizable guilloché brush, which can then be applied to various elements within a design. Brushes can significantly speed up workflows and enable the creation of custom stroke styles.
Utilizing Layers, Groups, and Symbols for Organization and Efficiency
Effective file management and design organization are critical for any project. Affinity Designer's layer and group system is a powerful function that helps keep files organized and manageable. Using layers and groups in Affinity Designer is presented as a fairly easy process within tutorials.
Symbols are an exceptionally powerful feature, acting as intelligent linked objects. This means that editing a single symbol instance can propagate changes across all other instances of that symbol within the design. This capability is invaluable for maintaining design consistency and for making global edits efficiently. Tutorials demonstrate how to use symbols as intelligent linked objects for great global editing capabilities.
Advanced Techniques: Masks, Grids, and Color Management
Beyond the core functionalities, Affinity Designer offers advanced techniques for sophisticated designs. The Pen tool can be used to create dynamic masks for selections of an image, allowing for precise control over image compositing and modification.
Applying shapes to curved lines can be achieved quickly and efficiently. Tutorials show how to create a brush from a shape and use it to apply to any shape or size of curved line, offering a creative way to add decorative elements.
Color management is also a key aspect. Users can create, save, and store colors and fills in Affinity Designer, which is extremely useful for creating reusable palettes and avoiding the manual re-entry of color mixes.
For projects requiring precise 3D representation in a 2D format, Affinity Designer allows for the setup of an axonometric grid. An axonometric grid displays a three-dimensional object at a skewed angle, revealing multiple sides of the illustration, which is particularly useful for technical drawings or isometric illustrations.
Exploring Specific Affinity Designer Tutorials and Resources
The world of Affinity Designer learning is rich with diverse tutorials catering to all skill levels. These resources often showcase specific features and techniques through practical application.
Creating Maximalist Seamless Patterns
For those interested in intricate and dense designs, a tutorial on creating a maximalist seamless pattern design in Affinity Designer offers a deep dive into this style. These patterns are characterized by their complexity and abundance of elements, often creating a sense of visual richness.
Acid Graphics and Chaotic Designs
The discovery of the power of Affinity Publisher is often linked to creating bold, chaotic acid graphics. While this specific mention points to Publisher, the principles and techniques can often be translated or complemented by Affinity Designer's capabilities, especially when it comes to manipulating shapes, colors, and textures to achieve a raw, energetic aesthetic.
Specific Feature Deep Dives
Beyond broad overviews, many tutorials focus on specific features. For instance, there are quick video tutorials for the Affinity Designer iPad version that highlight a particular function, making it easy to learn specific features. These quick lessons are hugely valuable for troubleshooting or mastering a niche tool.
Tips and Tricks for Efficient Design
Some tutorials adopt a fast-paced approach, showcasing useful tools and features in an engaging manner. One such tutorial uses the Alphabet as a structure to introduce tools in Affinity Designer, making the learning process fun and memorable. This lateral thinking approach to tutorials can be highly effective for retaining information.
Comprehensive Learning Resources
For a complete understanding, a video guide that covers every aspect of the software for over 2 hours, despite being titled "quick start," provides an in-depth introduction for complete beginners. These comprehensive resources ensure that users gain a thorough understanding of Affinity Designer's potential.
The Value of Doing
Ultimately, the best way to learn is by doing. Affinity Designer tutorials that encourage active participation, such as designing vector art illustrations, are invaluable. This hands-on approach is perfect for anyone interested in learning comic art illustrations or even navigating the Affinity Designer for iPad app.
By exploring the diverse range of tutorials and understanding the core functionalities of Affinity Designer, users can unlock its full potential and elevate their design projects to new levels of creativity and professionalism.