Creating interactive digital documents in Adobe InDesign, particularly complex digital planners, can often feel like an arduous undertaking, especially when it comes to implementing hyperlinks. InDesign, by default, does not offer a direct shortcut for hyperlink creation, presenting a significant hurdle for those aiming for efficiency. This article aims to demystify the process, offering practical solutions to streamline how you add and manage links within your InDesign projects, from basic text linking to object-based interactivity.
The Challenge of InDesign Hyperlinking
The inherent difficulty in adding hyperlinks in InDesign stems from the absence of pre-assigned keyboard shortcuts. This means that each hyperlink typically requires a series of manual steps: right-clicking an object, navigating through menus to "Hyperlinks," and then selecting "New Hyperlink." For users frequently creating digital planners or other interactive documents, this repetitive action can consume a substantial amount of time and detract from the creative workflow. Furthermore, the target area for a hyperlink can be a concern. When hyperlinking directly to text, the clickable area can be quite small, especially when viewed on devices like iPads, potentially leading to user frustration. To mitigate this, many users opt to create hyperlinks by applying them to empty rectangles, thereby providing a larger, more forgiving click target. This practice, however, often leads to a greater need for editing existing hyperlinks rather than creating new ones from scratch.
Customizing Your Workflow: Creating Keyboard Shortcuts
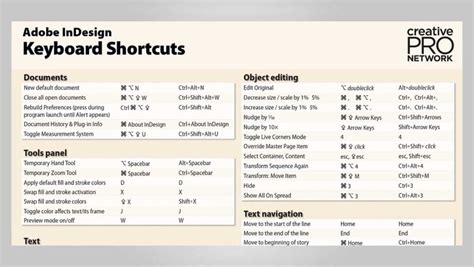
To overcome the limitations of InDesign's default settings, we can create custom keyboard shortcuts to significantly speed up the hyperlinking process. The strategy involves setting up two distinct shortcuts: one for creating a new hyperlink and another for editing an existing one. A logical assignment, as suggested by experienced users, is to use 'H' for editing hyperlinks and 'Shift+H' for creating new ones. This is particularly effective because the 'H' key, when pressed alone, is typically assigned to the Hand tool. However, the Hand tool can be easily accessed by holding down the Spacebar, making the 'H' key available for a more frequently used function like editing hyperlinks.
To implement these custom shortcuts, navigate to the 'Edit' menu in InDesign. Near the bottom of the dropdown, you will find 'Keyboard Shortcuts.' Within this dialog box, it's crucial to create a 'New Set' of shortcuts. This is because InDesign does not allow direct modification of its default shortcut configurations. By creating a new set, you can build a customized set of shortcuts without altering the original InDesign defaults, ensuring that all standard functionalities remain accessible.
When creating your new shortcut set, it's advisable to name it descriptively, such as "My Hyperlinks," and to base it on the default set. This ensures that all existing shortcuts remain active, and you are only adding or modifying the ones you intend to change.
Once your new set is established, focus on the 'Panel Menus' section. Within this category, commands are helpfully sorted alphabetically, making it easy to locate the 'Hyperlinks' options. Here, you can assign your chosen keystrokes. As 'Shift+H' is typically unassigned, it's a prime candidate for creating a new hyperlink. For 'H,' if you do not frequently use the Hand tool, reassigning it to 'Edit Hyperlink' offers a significant workflow improvement. After assigning your shortcuts, click 'OK' to save your changes. There's no need to click 'Save' separately; the changes are applied immediately upon closing the dialog.
How to Change Keyboard Shortcuts in InDesign
Enhancing Link Management with Sections
Beyond keyboard shortcuts, InDesign offers another powerful feature to simplify hyperlinking: the use of 'Sections.' By assigning meaningful names to your document sections (which correspond to pages or groups of pages), you can create much more intuitive and manageable links. Instead of referencing a page by its numerical designation, such as "page 316," you can hyperlink to a named section like "sep8." This method is far easier to track and significantly expedites the hyperlinking process, especially in large documents like digital planners.
It is important to note that InDesign's hyperlinking system is dynamic. If you rearrange pages within your document, the associated hyperlinks will automatically update to reflect the new page order. For instance, inserting a new page between existing pages will renumber subsequent pages, and any hyperlinks pointing to those pages will adjust accordingly.
Understanding Hyperlink Creation Methods
InDesign provides several ways to create hyperlinks, catering to different needs and preferences.
Direct Text Hyperlinking
The most straightforward method involves typing the desired text directly onto your InDesign page. Once the text is in place, select it. You can then copy the URL to your clipboard and paste it directly into the 'URL' field within the Hyperlinks panel. This action will automatically apply a character style to the text, typically rendering it blue with an underline, indicating it's an active hyperlink. The Hyperlinks panel will display a blue dot next to the link, signifying its source location within the document, and a green dot, confirming that the URL is valid. A red dot indicates an invalid URL, often due to stray spaces or return characters at the end of the URL, while a gray dot suggests the panel cannot verify the URL's validity.
Linking Objects
Hyperlinks are not exclusively for text. InDesign allows you to apply hyperlinks to any object on your page, including shapes, images, or groups of elements. This is particularly useful for creating larger click targets, as previously mentioned. The process is similar: select the object, and then define its destination within the Hyperlinks panel.
Using the Hyperlinks Panel for New Links
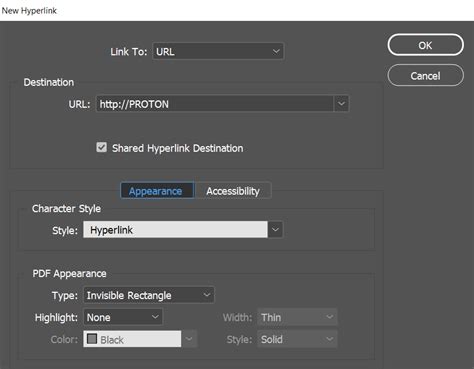
While pasting URLs directly is efficient, you can also create new hyperlinks from within the Hyperlinks panel itself. Select the text or object you want to serve as the hyperlink source. Then, click the 'New Hyperlink' icon at the bottom of the panel. In the dialog box that appears, you can specify the 'Link To' destination. While this dialog offers numerous options, for basic URL linking, the panel itself is often sufficient. However, this dialog is invaluable for editing existing hyperlinks or modifying the character style applied to the hyperlink text, moving away from the default style that might have been automatically applied.
Historically, creating custom character styles for hyperlinks was a prerequisite, involving defining a specific color swatch (e.g., "Hyperlink") and applying an underline. While InDesign now automates much of this, understanding these underlying principles can be beneficial for advanced customization.
Automating Hyperlink Creation: Convert URLs to Hyperlinks
For documents containing numerous URLs embedded within text, manually creating each hyperlink can be incredibly time-consuming. InDesign offers a powerful automation feature: 'Convert URLs to Hyperlinks.' Accessible from the Hyperlinks panel menu, this command scans your document for text that resembles URLs and automatically converts them into active hyperlinks.
The 'Convert URLs to Hyperlinks' dialog box allows you to define the scope of the conversion, choosing between 'Document' or 'Story.' You can also specify a character style to be applied to the newly created hyperlinks. With the scope defined, you can choose to 'Find' and 'Convert' individual instances or 'Convert All' to process the entire document or story.
While this feature is a significant time-saver, it's not without its quirks. The automatically generated hyperlink names are often generic, requiring you to select each one to understand its destination. Occasionally, the command may encounter issues. A red circle in the Hyperlinks panel serves as an indicator that InDesign was unable to locate or validate a URL. For example, URLs containing hyphens can sometimes be mishandled by the automatic conversion process, although hyperlinks broken by discretionary hyphens are usually converted without issue.
Beyond Web Pages: The Versatility of InDesign Hyperlinks
It's a common misconception that InDesign is solely a print design tool. In reality, InDesign is a robust page layout application capable of producing a wide array of interactive digital formats. The three primary interactive formats supported by InDesign are PDF, EPUB, and Publish Online. Each of these formats supports different types of interactivity. For instance, EPUB and Publish Online both accommodate animations, but they do not support form fields. Conversely, interactive form fields can be created directly within InDesign for PDFs, though PDF does not currently support animations. However, a universal feature supported across all these formats is hyperlinking.
Images and Links in InDesign
When working with images in InDesign, it's essential to understand the concept of 'Placed' and 'Linked' images. When you place an image using 'File > Place,' InDesign establishes a link to the image file's location on your computer. This linking mechanism allows you to work efficiently with large files without embedding them directly into your InDesign document, which would otherwise significantly slow down your workflow. If you move an image file to a different location on your computer, InDesign will flag the link as broken, indicated by a question mark (?) icon within the image frame. Similarly, an exclamation mark (!) indicates that the image has been modified in its source location since it was placed.
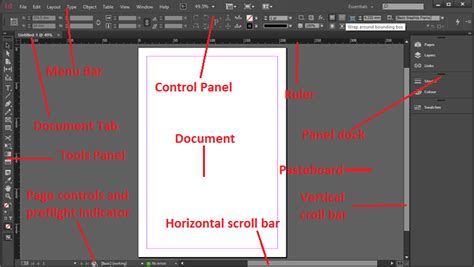
Images in InDesign are always contained within frames. You can choose from various frame shapes, including rectangles, ellipses, and polygons. When an image frame is selected, you can go to 'File > Place' to insert an image, or utilize options within the control panel. It's important to remember that resizing or repositioning the frame does not alter the image's original dimensions or resolution; it only changes how much of the image is visible within the frame. To directly manipulate the image itself (scale, rotate, etc.) within its frame, you can double-click on the frame to select the image content directly. The 'chain link' icon, often seen at the top left of an image frame, signifies that the image is successfully linked.
By mastering these techniques, from custom keyboard shortcuts and section naming to understanding the nuances of various linking methods and interactive export options, you can transform the often-tedious task of hyperlinking into a streamlined and efficient part of your InDesign workflow.