Krita stands as a beacon for digital artists, offering a powerful and free open-source platform brimming with tools and features tailored for painting. Unlike some alternatives that can present a steep learning curve due to an overwhelming array of options for various disciplines like photo retouching and manipulation, Krita prioritizes the digital painter. Its interface is designed with a clean, painter-friendly aesthetic, minimizing distractions and dedicating the majority of the screen real estate to your canvas. With tools accessibly placed, Krita offers a gentle learning curve, making it both easy and crucial to familiarize yourself with its capabilities before embarking on your creative journey. This tutorial aims to provide an overview of a robust workflow, offering insights and tips to guide you through the entire process of creating digital art.
Getting Started: Setting Up Your Digital Canvas
Embarking on a new digital painting begins with establishing your canvas. In Krita, this is achieved by navigating to File > New. To precisely control the dimensions of your artwork, you can select from a range of templates available in the Predefined drop-down menu, or manually adjust the dimensions to your specific requirements. You have the flexibility to choose between pixels or inches for your measurements, and then set the canvas size to achieve your desired aspect ratio. For a balance between detail and manageable file size, a preference for larger dimensions is often recommended, with a minimum of 3,000 pixels on the shortest side and a maximum of 7,000 pixels on the longest side. This provides ample space for intricate details without creating an excessively large file that could impact performance.
Navigating Krita's Essential Tools
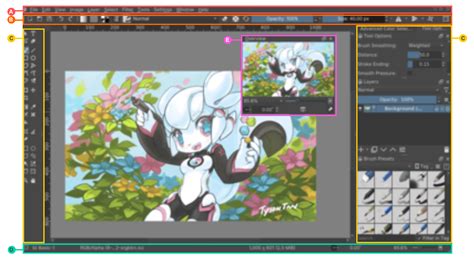
Krita's interface is thoughtfully organized to facilitate an efficient workflow. On the left-hand side, you'll find the Toolbar, which houses a selection of tools that are fundamental to the digital painting process. The Freehand Brush tool is your primary instrument for all painting and drawing activities. Beneath it, the Transform tool proves invaluable for selecting and resizing or reshaping specific areas of your artwork. For efficiently filling large areas with color, the Gradient tool and Fill tool are indispensable. Essential for seamless color blending during the painting process is the Color Selector tool.
On the right-hand side of the interface, you'll encounter the Advanced Color Selector, the Layers panel, and Brush Presets. The Advanced Color Selector, often featuring a color wheel, simplifies the process of shifting hues and is particularly useful for establishing complementary color schemes. The Layers panel is the backbone of non-destructive editing, allowing you to create new paint layers, masks, or filter layers, thereby granting you complete control over your canvas. Finally, the Brush Presets allow for rapid browsing and selection of various brushes, enabling you to quickly switch between different textures and behaviors.
Customizing Your Brushes: The Key to Unique Styles
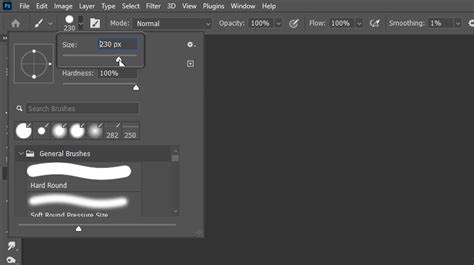
The Freehand Brush tool is incredibly versatile, and its capabilities are further expanded through extensive customization options. By selecting the Freehand Brush tool and clicking the Edit Brush Settings button, which is typically located on the top toolbar, you unlock a vast array of parameters to fine-tune your chosen brush. Among these, the Opacity and Size filters are likely to be the most frequently utilized. Adjusting opacity allows you to control the transparency of your brush strokes, enabling subtle layering and blending, while the size slider dictates the thickness of your lines and the coverage area of your brush. Experimenting with these settings is crucial for developing a personal brush library that suits your unique artistic style and the specific demands of each project.
The Foundation: Sketching and Storyboarding
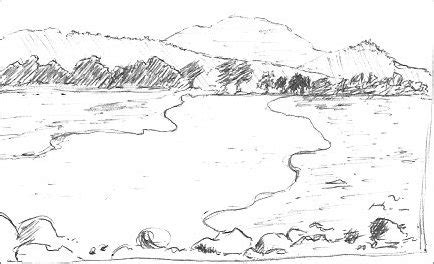
A critical first step in the digital painting process, as highlighted by many artists, is the preparation of a thumbnail or a rough sketch using a large brush. This initial phase is paramount for addressing one of the most common challenges faced at the outset of an illustration: "What to paint? Where to paint it?" Successfully establishing a clear vision and composition at this early stage significantly streamlines the subsequent steps. It's a time-saving measure that provides a solid roadmap, ensuring that your efforts are directed effectively. For landscape compositions, this often translates into defining distinct areas for the foreground, middleground, and background, establishing depth and spatial relationships within the artwork.
Building the Structure: Silhouettes and Flat Colors
Once the foundational sketch is in place, the next stage involves defining the core shapes of your artwork through silhouettes. After painting these silhouette shapes, a common practice is to lock the layer's opacity. This crucial step ensures that any subsequent painting occurs strictly within the boundaries of these shapes, preventing accidental stray marks. Following this, a pass of flat colors is applied, as if the entire scene were illuminated by the soft, diffused light of an overcast sky. This "cloudy day" lighting approach simplifies the initial coloring process and makes it easier to begin texturing elements like rocks and tree trunks.
Organizing Your Layers: From Chaos to Clarity
As the painting progresses, the layer stack can rapidly become a complex and unmanageable entity. To counteract this, it becomes necessary to zoom out of the layer stack and implement a consistent naming convention for your layers and groups. Naming your layer groups and individual base layers clearly helps in maintaining order. A useful technique involves filling a layer positioned above your base layer with a middle RGB gray color (127, 127, 127). This specific gray value plays a significant role when using the Hard Light blending mode, as middle gray is rendered as transparent under this mode, allowing underlying colors to show through while still providing a base for further manipulation.
Krita Tutorial For Beginners 2020: Layers Made Easy.
Refining the Form: Shading and Paint-Over
While the silhouette and flat color stages provide a strong structural foundation, the process rarely culminates in an immediate "Tadaaaaa!" moment. Often, a certain rigidity in the shapes becomes apparent, necessitating further refinement. At this juncture, many artists choose to merge clipping groups, consolidating elements for easier manipulation. The subsequent stages involve adding depth and form through shading.
A sophisticated approach to shading and adding detail involves utilizing a middle gray layer set to the Hard Light blending mode. Because middle gray becomes transparent in this mode, it allows the colors beneath to show through, but the Hard Light mode interacts with the underlying colors to create highlights and shadows based on the gray layer's values. This method can be particularly effective for rendering textures like rocks and tree trunks, adding a sense of volume and surface detail.
The "paint-over" stage is where the illustration truly comes to life. This involves painting directly over the existing layers, refining details, adding more nuanced lighting, and enhancing the overall aesthetic. It's a stage that allows for significant artistic interpretation and the introduction of painterly qualities. This method of building an illustration, with its organized steps, instills a sense of discipline. However, the flexibility of separating and refining each stage is a significant advantage, allowing for iterative improvements and experimentation.
Post-Production: Enhancing the Final Image
The final touches on a digital painting often involve post-production techniques to elevate the image. At the conclusion of the painting process, adjustment layers are frequently employed to fine-tune contrast and color balance, ensuring the artwork has the desired visual impact. For instance, using an adjustment layer with a Multiply blending mode can be an effective way to add a subtle vignette effect, darkening the edges of the image to draw the viewer's eye towards the center. While this particular illustration may not require such an effect, it remains a valuable tool in the digital artist's arsenal for enhancing mood and focus.
Krita's Strengths: A Painter-Centric Environment
Krita's commitment to being a free and open-source painting program is a significant draw for artists. Its feature set is comprehensive, catering to a wide spectrum of artistic needs. While professional software like Photoshop offers a vast array of tools that can extend beyond painting into photo manipulation, this breadth can sometimes lead to a challenging learning curve for those primarily focused on digital art. Krita, in contrast, maintains a streamlined and intuitive interface, ensuring that the canvas remains the central focus and that essential tools are readily accessible.
The emphasis on a gentle learning curve means that artists can quickly become proficient with Krita's features. The program offers multiple brush types to accommodate diverse art styles, robust layer management capabilities, drawing assistants to aid in perspective and line work, and even animation tools for those looking to bring their artwork to life. Furthermore, Krita's capabilities can be expanded through a wealth of online resources and assets, including custom brushes, patterns, vector libraries, texture packs, and plugins that introduce new functionalities.
Community and Development: A Thriving Ecosystem
A strong indicator of Krita's vitality is its active and supportive community. An online community of Krita artists provides a platform for sharing artwork, exchanging tips, and seeking advice. This collaborative environment is invaluable for artists looking to improve their skills, troubleshoot issues, or simply connect with like-minded individuals. Feedback from this community is also crucial for developers, informing the creation of new features and plugins.
As a public project licensed under the GNU GPL, Krita is owned by its contributors, ensuring it remains Free and Open Source software indefinitely. This open model fosters transparency and allows for continuous improvement driven by a global network of artists and developers. The Krita roadmap, often discussed in developer sessions, outlines future enhancements and development goals, demonstrating a clear vision for the software's evolution. Recent bugfix releases and beta versions of upcoming major releases, such as Krita 5.3 and Krita 6.0, underscore the ongoing commitment to refining and expanding Krita's capabilities.
The journey of an artist, from initial concept to final polish, is a dynamic and often iterative process. Krita provides a powerful and accessible platform that supports artists at every stage. By understanding and implementing a structured workflow, leveraging Krita's extensive toolset, and engaging with its vibrant community, digital painters can unlock their full creative potential and bring their visions to life with confidence and skill.