Achieving professional-grade video quality in your 4K projects hinges significantly on the correct DaVinci Resolve bitrate settings during the export process. The configuration you choose directly impacts how your videos perform across various platforms and the overall visual fidelity they attain. This guide delves into the essential settings and considerations for exporting high-quality 1080p and 4K footage, ensuring your final renders are both visually impressive and technically sound.
Navigating the Deliver Page: Your Export Hub
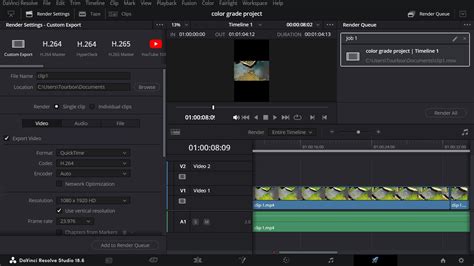
The first step in optimizing your export is to access DaVinci Resolve's dedicated export workspace. This is achieved by navigating to the "Deliver" tab, identifiable by the rocket icon located at the bottom right of the DaVinci Resolve interface. Within this section, you gain comprehensive control over all export parameters for your project.
Choosing Your Render Strategy: Single vs. Individual Clips
Upon entering the Deliver tab, you'll encounter two primary rendering modes: "Render Single Clip" and "Individual Clips." The "Render Single Clip" option consolidates your entire project into a single output file. Conversely, selecting "Individual Clips" is particularly advantageous when you have edited multiple distinct segments within a single timeline and wish to export each as a separate entity. This granular control is invaluable for managing content libraries or delivering episodic material.
Core Export Configurations: Format, Codec, and Bitrate
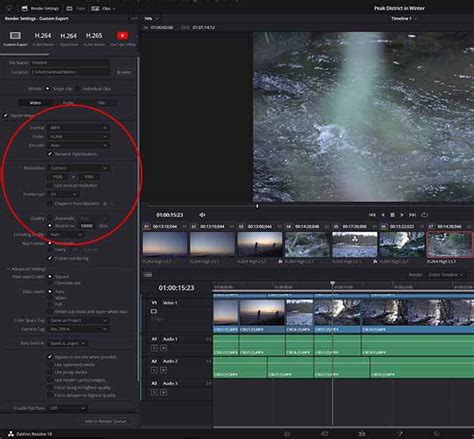
The selection of your video format and codec plays a pivotal role in determining compatibility and quality. For general distribution and broad platform support, MP4 is frequently the most reliable format. While QuickTime (MOV) can be used, it may occasionally present playback challenges on certain systems or platforms.
The Power of H.264 and H.265
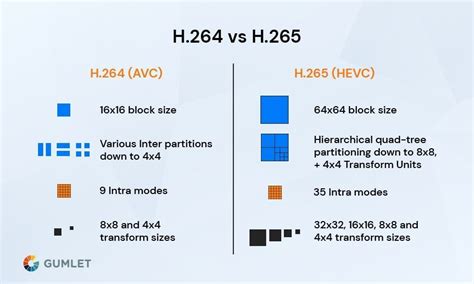
Within the codec options, you'll find H.264 and H.265. H.265 is a more modern and efficient codec, capable of delivering superior image quality at smaller file sizes compared to H.264. However, H.264 generally boasts wider compatibility across a broader spectrum of devices and platforms. The choice between them often involves a trade-off between file size, quality, and playback ubiquity. For YouTube, specifically, H.265 is often recommended for a higher quality and lower file size upload, though YouTube will further compress your content.
Leveraging Hardware Encoding (Studio Version)
For users of the DaVinci Resolve Studio version, the option to utilize hardware encoding is a significant advantage. This feature harnesses the processing power of your graphics card, leading to substantially faster rendering times. To maximize this performance benefit, ensure that "Network Optimization" is unchecked.
Tailoring Settings for Resolution and Frame Rate
The resolution and frame rate of your export should ideally align with your project's timeline settings unless specific delivery requirements dictate otherwise.
Optimizing for 1080p Exports
For standard Full HD (1080p) videos, the resolution should be set to 1920x1080 pixels. The frame rate should match that of your source footage and timeline. When it comes to quality settings for 1080p, a common recommendation is to set the bitrate to "Restrict to" and enter a value of 30,000 kilobits per second (kb/s). This ensures a consistent level of detail and clarity for your 1080p content.
Achieving Pristine 4K Exports
When exporting in 4K (Ultra HD), the resolution needs to be adjusted to 3840x2160 pixels. For achieving the best possible quality in your 4K exports, a bitrate of "Restrict to" 50,000 kb/s is a strong recommendation. This higher bitrate is crucial for preserving the intricate details and sharpness inherent in 4K resolution.
Video Bitrate Explained in 1 Minute
Bitrate Strategies: CBR for Consistency
The bitrate is essentially the amount of information packed into each second of video, directly dictating the quality of your output. For consistent streaming and playback, selecting "CBR (Constant Bitrate)" is advisable. Unlike variable bitrate (VBR) methods, CBR maintains a steady data flow, which can lead to more predictable performance, especially on platforms that may have limitations or preferences for consistent streams. While DaVinci Resolve can automatically determine bitrate settings (e.g., "Automatic" > "Best"), manual control offers greater precision. For H.265, some experts suggest a bitrate value equivalent to a minimum of 2000 times the frames per second of your footage as a starting point for high-quality renders.
Audio Settings: Usually Best Left Unchanged
In most scenarios, the default audio settings within DaVinci Resolve are sufficient for delivering satisfactory audio quality. Unless you have specific professional audio requirements or are working with specialized audio formats, it is generally recommended to leave these settings as they are. For high-quality stereo audio, a bitrate of 320 kbps is often considered optimal.
Streamlining Your Workflow: Presets and Test Renders
To enhance efficiency and minimize the risk of errors, DaVinci Resolve allows you to save your preferred export configurations as presets. After meticulously setting up your desired parameters for either 1080p or 4K, you can save them by clicking the three dots icon at the top right of the render settings panel and selecting "Save as New Preset." Naming conventions like "1080p MP4" or "4K MP4" can make these presets easily identifiable for future use.
The Importance of Test Renders
Before committing to a full project render, it is a highly recommended practice to export a short test clip. This allows you to quickly verify that your chosen settings are producing the desired visual quality, that there are no unexpected artifacts or color shifts, and that the file performs as expected on your target playback environment. This proactive step can save significant time and prevent the need for re-rendering entire projects.
Finalizing Your Export: Adding to Render Queue
Once you are satisfied with your settings and have perhaps saved your presets, the final step is to add your project to the render queue. Back in the main Deliver page layout, locate and click the "Add to Render Queue" button. From the queue panel, typically found on the right side of the interface, you can then initiate the rendering process by clicking "Render All."
Considering Delivery Requirements
Different platforms and delivery scenarios have unique specifications. For instance, YouTube recommends specific bitrates for optimal uploads, and while they will re-compress your video, starting with a well-chosen bitrate helps maintain quality. For archival or professional master files, formats like MOV with codecs such as ProRes 422 HQ (for macOS) or DNxHR HQX (for Windows) are preferred for their high-fidelity preservation. If file size and upload time are not primary concerns, these professional codecs offer superior quality compared to H.264 or H.265.
Exporting your project correctly in DaVinci Resolve is crucial to preserving the quality, compatibility, and intended use of your video. Whether you’re delivering content for YouTube, Instagram, TV broadcast, or a client project, the right export settings will make all the difference. By understanding and implementing these settings, you can ensure your video content appears as professional and polished as possible, meeting the exact requirements of its final destination.