Adobe Lightroom presets have revolutionized the way photographers approach post-processing, offering a powerful yet accessible method to achieve stunning visual results with remarkable efficiency. These pre-defined settings act as sophisticated filters, allowing users to apply complex adjustments to their images in a single click. Whether you're a beginner struggling to grasp the intricacies of photo editing or a seasoned professional looking to streamline your workflow, understanding and utilizing Lightroom presets can be a game-changer. This guide delves into the multifaceted world of Lightroom presets, from their fundamental nature and various types to practical application, creation, and essential considerations for both mobile and desktop users.
Understanding the Power of Presets
At their core, Lightroom presets are simply saved development settings. When you meticulously adjust sliders for exposure, contrast, color balance, and other parameters to achieve a desired look, those exact settings can be saved and reapplied to other photographs. This ability to replicate an edit across multiple images is the cornerstone of their time-saving appeal. Instead of painstakingly recreating the same adjustments for each photo in a series, a preset allows for instantaneous application, providing a consistent aesthetic.
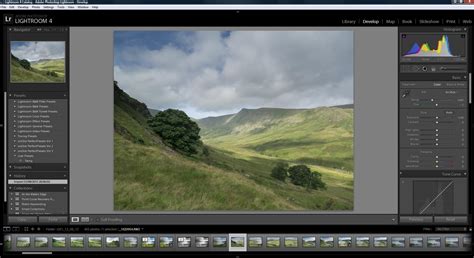
The "Develop module" within Lightroom is where the magic happens. Here, an almost infinite array of adjustments can be made to an image. Once these adjustments are perfected, they can be saved as a preset. This saved preset then becomes available in the "Presets panel," ready to be applied to any other photo with a single click. This process is particularly beneficial for photographers who shoot large volumes of images, such as at weddings, events, or during extensive travel. It allows them to achieve a signature style and maintain visual cohesion across their entire portfolio.
Navigating Lightroom's Preset Ecosystem
Lightroom offers a tiered approach to presets, catering to different needs and preferences. These are broadly categorized into:
Recommended Presets: These are intelligently generated by Adobe Sensei, Adobe's artificial intelligence platform. Based on the content of your photograph, Sensei suggests presets that it predicts will complement your image. The beauty of these is their dynamic nature; the recommendations can evolve over time, even for the same image, as Adobe Sensei learns and refines its algorithms. A key feature within Recommended Presets is the "More like this" option. Hovering over a preset thumbnail and selecting this will reveal a curated selection of similar presets, allowing for deeper exploration of a particular style.
Premium Presets: These are typically curated by professional photographers or photography educators, offering expertly crafted looks that often represent specific styles or aesthetics. They can be purchased and are designed to provide high-quality, often unique, editing solutions.
Yours (User Presets): This category encompasses presets that you create yourself or import from third-party sources. It's where your personalized editing style and custom-built looks reside, offering unparalleled control and customization.
Managing Your Presets for Optimal Workflow
Effective management of your preset library is crucial for an efficient editing process. Lightroom provides tools to organize, hide, and favorite presets, ensuring that your most-used tools are readily accessible.
Favorites: Marking a preset as a favorite allows for quick access, bypassing the need to navigate through various folders. This is ideal for your go-to presets that you use daily.
Single-Group Mode: This setting in the Presets panel controls how preset groups are displayed. When active, opening one group automatically closes any other open group, presenting a cleaner, more focused view. When inactive, multiple groups can be expanded simultaneously, offering a broader overview.
Hiding and Showing Preset Groups: Your preference for which preset groups are visible is specific to your computer or device. Under the "Manage" section within the Presets panel, you can select which groups you wish to see, decluttering your workspace and highlighting only the presets relevant to your current workflow.
Exploring Lightroom's Built-in Presets
Lightroom itself comes equipped with a selection of presets developed by Adobe. While some users find these to be a helpful starting point, others may find them less impactful than custom-created or premium options. Nevertheless, they are readily available within the Develop module on the left-hand side of the interface. Hovering over each preset will often provide a live preview of its effect on your image in the "Navigator" panel, allowing you to see the potential transformation before committing to an edit.
When you apply a preset, the corresponding adjustment sliders on the right side of the interface will update to reflect the preset's settings. If you apply a preset by mistake, the "Reset" button, located at the bottom right of the Develop module, will revert your image to its original state. It's important to note that applying a new preset over an existing one might not always overwrite all settings; it can sometimes layer adjustments, leading to unexpected results.
Understanding Preset Functionality: Standard vs. Adaptive
While standard presets apply a saved set of adjustments across the entire photo, Adaptive Presets offer a more sophisticated approach. These presets can target specific areas of an image, often by automatically creating masks for elements like the sky or the main subject. This selective application allows for more nuanced and context-aware edits. For those new to presets, starting with standard presets is recommended before diving into the more advanced capabilities of adaptive presets.
The Art of Creating Your Own Lightroom Presets
The ability to create your own Lightroom presets is where true personalization and workflow optimization truly shine. This process, while rewarding, requires patience and a systematic approach.
Why Create Your Own Presets?
- Consistency: Develop a signature style that is consistently applied across all your images.
- Efficiency: Save significant editing time by having your common adjustments pre-packaged.
- Learning: The process of creating presets deepens your understanding of Lightroom's editing tools.
- Inspiration: Experimenting with different looks can spark new creative directions.
The Creation Process: A Step-by-Step Approach
Creating a robust and effective preset is not a quick endeavor; it often involves significant trial and error. The presets offered by professionals, for instance, can take months of development and testing across thousands of photos.
Start with a Suitable Image: Select an unedited, "straight out of camera" image that has good lighting and a relatively straightforward subject matter. Avoid overly complex lighting situations, dramatic sunsets, or challenging color casts for your initial preset creation.
Make Universal Adjustments: Begin by applying the adjustments you consistently make to the majority of your photos. This might include a slight bump in exposure, an increase in whites, or a subtle warmth adjustment. The key here is to focus on adjustments that will be beneficial for most of your images, rather than making drastic changes that will require significant re-editing later. The goal is to get "close-ish" to your desired look, not to complete the entire edit in one go.
Develop a "Look": This is the creative heart of preset creation.
- Select a Set of Images: Choose a collection of photos from the same location or with a similar color palette and lighting.
- Utilize Color and Tone Tools: Dive into modules like the Color Mixer, Tone Curve, and Effects. Experiment with color grading and subtle enhancements to create a cohesive aesthetic. Many photographers are inspired by film cinematography, aiming for a "cinematic look." This approach works best when you intentionally seek out photos that could plausibly be film stills.
Trial and Error is Key: Once you've achieved a look you're happy with on your initial set of images, copy these edit settings. Then, apply them to other photos within your chosen set. Observe how the preset performs. You'll likely need to fine-tune the settings repeatedly until the preset consistently brings most of the images in your set closer to your desired outcome.
Save and Organize: When you're satisfied, save your adjustments as a new preset. Name it descriptively, perhaps referencing the location, lighting conditions, or the primary effect it creates. This naming convention will be invaluable for recalling what the preset is best suited for later.
Iterate and Expand: Don't stop at one preset. Once you have a foundational look, find a new set of photos with slightly different lighting or a different location. Apply your first preset and then adjust it to work effectively with this new set. Save this refined version as a new, distinct preset, named accordingly. Continue this iterative process to build a collection of presets that cover a wide range of common shooting scenarios you encounter. The ultimate goal is to have a library of presets that, when applied, make your photos look like they belong together, regardless of the original shooting conditions.
Common Mistakes to Avoid When Creating Presets:
- Heavy Color Grading or Major Adjustments: Presets with extreme edits are less likely to be universally applicable. Minor tweaks to temperature and exposure are generally more effective than drastic color shifts or dramatic contrast changes.
- Adjusting Lens Corrections or Optics: While these corrections are important, they are often specific to the lens used and may not translate well to presets intended for a broader range of images.
- Ignoring Exposure and White Balance: These two settings are highly image-specific. A good preset often leaves them open for manual adjustment, as they are the most likely to need fine-tuning on a per-image basis.
Importing and Using Presets
Whether you've purchased presets or found free ones online, importing them into Lightroom is a straightforward process.
Importing Presets
The most common method for importing presets involves using the '+' icon at the top right of the Presets panel. This will open a small menu with the option to "Import Presets." Select this, and navigate to the location where your preset files are stored.
- Desktop (Lightroom Classic): Presets are often distributed as
.XMPfiles. When importing, Lightroom Classic will place these files in its designated presets folder, which can be accessed via "Show in Explorer/Finder" from the Presets panel. - Mobile (Lightroom Mobile): Presets for mobile are typically distributed as
.DNGfiles. You'll need to download these DNG files to your phone and then import them into your Lightroom Mobile library. Once added, they will appear as photos with a DNG icon. To convert them into usable presets, open the DNG file, tap the three dots in the top right corner, and select "Create Preset." You can then name it and save it to a new preset collection.
Applying Presets
Once imported, presets appear in the Presets panel. To apply one:
- Select Your Image: Ensure the photo you wish to edit is selected in Lightroom.
- Locate the Preset: Navigate through your preset folders in the Presets panel.
- Hover for a Preview: Hovering over a preset will show a live preview on your selected image.
- Click to Apply: Click on the desired preset to apply its settings.
Fine-Tuning Applied Presets
It's rare for a preset to be a perfect one-click solution for every image. After applying a preset, always assess the result and make minor adjustments as needed. Common adjustments include:
- Exposure: Fine-tune the overall brightness.
- White Balance (Temperature and Tint): Adjust for accurate or creative color rendition.
- Highlights and Shadows: Recover detail in the brightest and darkest areas.
- Contrast: Enhance the tonal separation.
- Saturation/Vibrance: Adjust the intensity of colors.
When you find a preset that's almost perfect but needs a slight tweak, you can make those adjustments and then save the modified settings as a new preset, further refining your workflow.
Lightroom Versions and Preset Compatibility
Understanding the different versions of Lightroom is crucial, especially concerning preset compatibility.
- Lightroom Mobile CC: A free app for iOS and Android, ideal for casual users. Presets for mobile are typically
.DNGfiles. - Lightroom Desktop CC: A cloud-based desktop application that syncs seamlessly with the mobile app. It requires a Creative Cloud subscription. Presets can be synced between mobile and desktop CC versions.
- Adobe Lightroom Classic: The most powerful and feature-rich version, designed for serious photographers. It offers a more robust workflow and is generally recommended for professionals. Presets for Lightroom Classic are typically
.XMPfiles.
Important Note on Compatibility: Mobile presets (.DNG files) are generally designed for JPEGs and mobile photos, while desktop presets (.XMP files) are optimized for RAW files from DSLRs and mirrorless cameras. While it's sometimes possible to use them interchangeably, the results may not be optimal due to the inherent differences in file quality and processing. Applying desktop presets to JPEGs or vice versa can lead to less desirable outcomes.
When to Buy Lightroom Presets
The decision to purchase Lightroom presets is a personal one, with valid reasons both for and against.
Reasons to Consider Buying Presets:
- Beginner Assistance: If you're new to editing or find Lightroom daunting, presets can provide a much-needed starting point and help you achieve good results quickly.
- Emulating a Specific Look: If you admire a particular photographer's style and want to achieve a similar aesthetic, buying their presets can offer insight and a shortcut.
- Inspiration: Presets can introduce you to new editing techniques and creative possibilities you might not have considered.
- Supporting Creators: Purchasing presets can be a way to support photographers whose work you admire and gain an understanding of their editing process.
Reasons to Be Cautious About Buying Presets:
- Potential for Scams: The market is flooded with low-quality presets that do not deliver on their promises. Be wary of claims of "magic" or "one-click wonders."
- Cost: High-quality preset packs can be expensive. Given that a preset might only work perfectly on a limited range of images, the investment may not always be justifiable.
- Over-Reliance: Relying solely on presets can hinder your development as an editor. Understanding the underlying adjustments is key to true mastery.
When considering a purchase, look for presets that are well-made, offer natural-looking results at normal strength, and are consistent as a set. Treat any purchased preset as a starting point, not a final solution.
Beyond Presets: Understanding Lightroom Profiles
It's important to distinguish between Lightroom presets and Lightroom profiles. While presets apply saved slider adjustments, Lightroom Profiles alter the underlying rendering of the photo, influencing how color and tone are interpreted at a fundamental level. They can be thought of as a base layer of color and tone before any other adjustments are made. Profiles are often used in conjunction with presets for a more comprehensive editing workflow.
How to Use the NEW Lightroom Advanced Color Grading Tool
Advanced Techniques: Layering and Adaptive Presets
While a standard preset applies a uniform set of changes, layering presets can be a valuable technique when done intentionally. This involves applying one preset and then, with careful consideration, applying another. However, it's often more effective to use Adaptive Presets.
Adaptive Presets take editing a step further by automatically identifying and masking specific elements within an image, such as the sky, a person's skin, or the subject. This allows for targeted adjustments that are contextually relevant, providing a more sophisticated and nuanced editing experience. For instance, an adaptive preset might brighten the sky while simultaneously enhancing the colors of the landscape, all within a single application.
The Philosophy of Editing: Beyond the "One-Click"
The true power of Lightroom presets lies not in their ability to perform magic with a single click, but in their capacity to serve as a powerful starting point. A well-crafted preset can get you 80-90% of the way to your desired edit, leaving you to fine-tune the remaining crucial details. This approach is essential for maintaining efficiency without sacrificing quality. As professional photographer Nick emphasizes, "The lighting, colors, time of day, subject matter, and any number of other variables will have changed, even with shots taken a few moments apart, so inevitably, adjustments will need to be made."
The goal is to build a small, consistent set of presetsâperhaps 5 to 10âthat suit the majority of your work. These presets should focus on repeatable adjustments like tone shaping, color grading, and subtle finishing effects, while leaving room for the essential per-image adjustments of exposure and white balance. By embracing this philosophy, you can leverage the efficiency of presets while retaining the artistic control necessary to create truly compelling images.
Specialized Applications of Presets
Lightroom presets are versatile and can be tailored for a wide array of photographic genres and specific effects.
Silhouette Photography: Presets can be designed to enhance the dramatic mood and mystery of silhouette shots. By increasing contrast and potentially manipulating shadows, a preset can emphasize the dark, defined outline of a subject against a brighter background.
Cityscapes: For busy urban environments, presets can add contrast to ensure that individual buildings "pop" without creating a disjointed image. This helps maintain visual distinction within complex scenes.
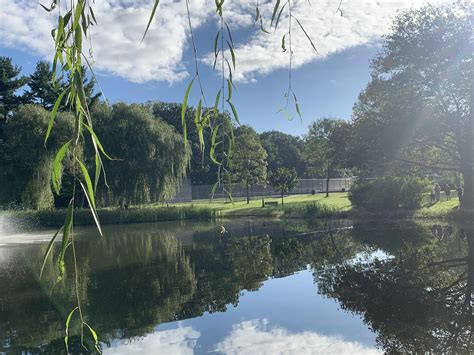
Landscapes: Presets can be crucial for bringing out the richness of natural settings. They can counteract the tendency for colors to appear muted in photos, boosting warmth and contrast to highlight features like mountain lakes, coastal cliffs, and wildflower fields.
Black and White Photography: A versatile black and white preset can be a valuable tool. High contrast can create a crisp image, while increased exposure can bring out brighter tones. Presets can also be designed to add a grainy, timeless feel, perfect for portraits or artistic interpretations.
Calm and Serene Scenes: For images captured on overcast days or in bustling environments, presets can be tuned to create or emphasize a sense of calm. This often involves desaturating colors and reducing warmth without making the image appear washed out.
Warm and Glowing Landscapes: Presets can enhance the warmth of landscapes, particularly those with coastal cliffs or sprawling hillscapes. By adjusting the temperature and white balance, these presets can give natural features a subtle glow and dimensional effect.
Monochromatic Tones: In scenes with subtle tonal variations, such as desert rock formations or monochrome cityscapes, presets can help preserve and enhance this differentiation, preventing the loss of visual richness.
Vibrant Blues: Presets can be created to emphasize blues, leaning into cyan tones and bumping up exposure to achieve invigorating yet gentle images, perfect for capturing clear blue skies or serene water bodies.
Nature's Majesty: For breathtaking natural scenes like purple mountain majesties or spring blooms, presets can add depth and dimension through increased contrast, while simultaneously smoothing out highlights and brightening the scene.
By understanding the core principles of Lightroom presets and how to effectively apply and create them, photographers of all levels can significantly enhance their workflow and elevate the visual impact of their images.