Adobe InDesign is a powerful and versatile page layout and design program, often perceived as intimidating by newcomers. However, with a structured approach and a focus on fundamental principles, anyone can master its capabilities. This tutorial aims to demystify InDesign, guiding beginners through the essential steps to create professional-quality documents, from initial setup to final export. We'll explore core functionalities, essential tools, and practical workflows, ensuring a solid understanding for both novice designers and those looking to enhance their digital design skills.
Getting Started: Your First InDesign Document
Welcome to the world of Adobe InDesign! Before diving into intricate designs, it's crucial to understand how to initiate a new project. The first step in creating any document within InDesign is to utilize the "New Document" feature. This fundamental process lays the groundwork for all future endeavors, providing essential settings that influence the final output.
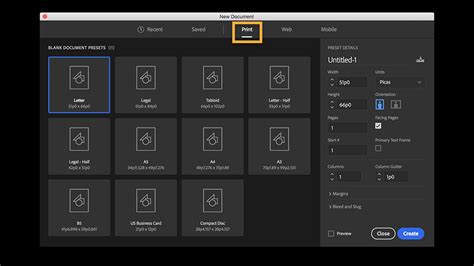
When creating a new document, you'll encounter various options. Understanding these is key. For instance, you'll need to define the document's dimensions, orientation (portrait or landscape), and the number of pages. If you're curious about design terms that might be new to you, such as bleed or slug, don't worry! These concepts will become clearer as you progress. For a print-ready brochure, setting up the correct bleed is essential to ensure content extends to the edge of the page after trimming. Similarly, understanding the difference between RGB and CMYK color modes is vital, especially when preparing designs for print versus digital display. RGB (Red, Green, Blue) is used for screens, while CMYK (Cyan, Magenta, Yellow, Key/Black) is the standard for professional printing.
Navigating the InDesign Workspace
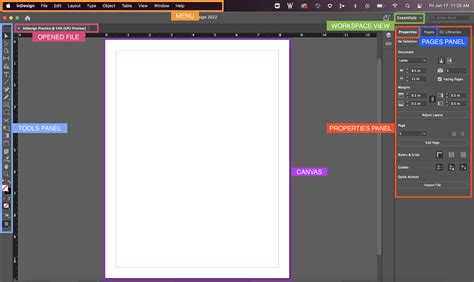
Once a document is created, the next logical step is to familiarize yourself with the InDesign workspace. This digital environment is where all your design magic happens. Understanding how to navigate around in InDesign is paramount to efficient workflow. The work area itself is comprised of various panels, toolbars, and the main document window.
0001. user interface in indesign
This lesson takes a look at basic navigation and interaction with objects in your composition. You'll learn how to zoom in and out, pan across your layout, and select different tools. Being able to easily preview your work without guides and margins visible is also a crucial skill. This print-like view allows you to assess the overall aesthetic and identify potential issues before final output. Mastering these fundamental navigation techniques will significantly streamline your design process and reduce frustration.
The Power of Typography: Working with Text and Fonts
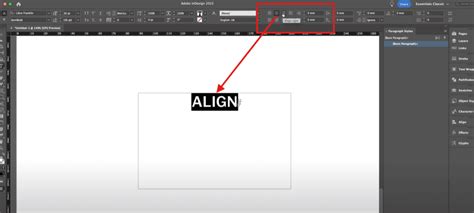
Text is a fundamental element in most design projects. Adobe InDesign offers robust tools for incorporating and manipulating text. It's time to start adding text to your work! This involves understanding how to create text frames, inputting copy, and formatting it to achieve the desired look and feel.
Adobe Fonts, formerly known as Adobe Typekit, provides a vast collection of high-quality fonts that can be used in your design work, even for commercial purposes. You can easily access and activate these fonts directly from within Adobe InDesign. Walking through the process of accessing and using Adobe Fonts is a key part of this learning journey.

Beyond Adobe Fonts, you might need to import fonts that are not part of the Adobe Fonts library. Learning how to install fonts that aren't included in Adobe Fonts expands your creative possibilities significantly. Whether you're working with a specific brand's proprietary typeface or simply exploring new typographic options, understanding font management in InDesign is essential.
Incorporating Visuals: Images and Vector Graphics
No design is complete without compelling visuals. Adobe InDesign excels at integrating various types of graphical content, including photographs and illustrations. If you're looking for high-quality, professional images, as well as InDesign templates, illustrations, fonts, and more, services like Envato Elements offer unlimited access to a huge library of content that can be used in your design projects. Exploring free image resources is also a valuable part of any designer's toolkit.
However, simply having access to images isn't enough; you need to know how to use them effectively within your InDesign document. This includes placing images, resizing them, cropping them, and applying basic adjustments. For vector imagery, which is scalable without losing quality, InDesign also provides tools to incorporate and manipulate these graphics. Understanding the nuances of working with both raster (pixel-based) and vector graphics ensures your designs remain sharp and professional across different media.
Structuring Your Layout: Pages and Spreads
Adobe InDesign is designed for creating multi-page documents, and understanding how to manage them is crucial. Up to this point, you may have been working on a single page. Adobe InDesign makes it easy to create both single pages and two-page spreads. You don't necessarily need to create a new document to switch between these layouts.
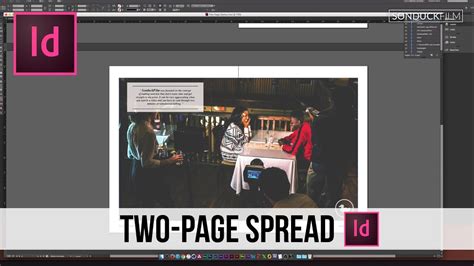
Creating two-page spreads is particularly important for projects like magazines, books, or brochures where facing pages are intended to be viewed together. This feature allows for a more cohesive and immersive reading experience. Ready to create some two-page spreads of your own? This capability is fundamental to professional print design and opens up a world of layout possibilities.
Handling Extensive Text Content
In many cases, you may find yourself working with large amounts of text in your InDesign document. This could be for a book, a lengthy report, or a detailed brochure. InDesign provides advanced features to manage and style these text-heavy layouts efficiently. This includes using paragraph styles, character styles, and master pages to ensure consistency and save time.
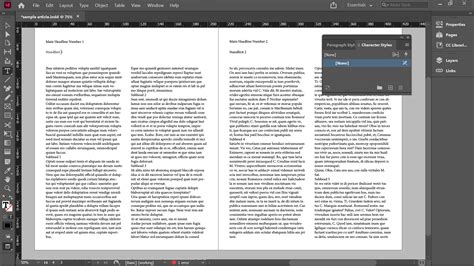
The ability to style text with a single click is a significant time-saver. Powered by Adobe Sensei, built-in Style Packs can read and apply different styles to various sections of your text, streamlining the formatting process. This intelligent automation, often referred to as "Auto Style," is a testament to InDesign's continuous evolution and its commitment to enhancing user productivity.
Advanced Features and Intelligent Design
Adobe InDesign is a very robust program, with a wealth of features to explore and utilize. Beyond the basics, there are advanced functionalities that can elevate your designs. For instance, Generative Expand allows you to seamlessly fill up any empty space around your image, intelligently creating content that matches the surrounding pixels.
Furthermore, InDesign's integration with Adobe Sensei brings intelligent design capabilities to the forefront. This includes the ability to wrap text around subjects in an image intelligently by following simple steps. You can wrap text around the contours of a subject directly, eliminating the need for complex workarounds like Alpha Channels or Photoshop paths. This feature significantly simplifies the process of creating visually integrated text and image compositions.
Collaboration and Feedback
Modern design workflows often involve collaboration. InDesign now facilitates sharing your designs with stakeholders for review and managing feedback comments directly within the application. This integrated feedback loop streamlines the revision process and ensures everyone is on the same page.
While sharing a working InDesign file (INDD) can be more complex than sharing a static JPG or PDF, InDesign offers a robust solution: packaging your work. Going to File > Save to save your work, and then File > Package initiates a process that bundles all necessary assets, such as linked images and fonts, into a single, organized folder. This ensures that anyone who receives your InDesign document can open and view it correctly, preserving all your design elements. It's important to remember that your InDesign document may have a number of dependent links; if you share the document but not the linked images, it won't display properly.
Leveraging Templates for Efficiency
If you're new to InDesign or design in general, templates can be an amazing way to get started. Thankfully, InDesign offers some ready-made templates directly within the software, providing a solid foundation for your projects.

Additionally, you can download a vast array of professionally designed InDesign templates from external sources like Envato Elements. With over 10,000 templates available, often included for a single low price, these resources can significantly accelerate your design process. Learning to download and effectively use templates from external sources is a valuable skill for any InDesign user.
Mastering Specific Design Tasks
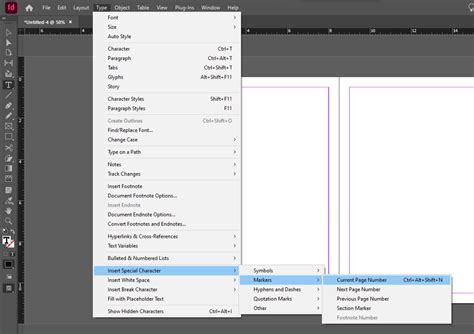
Beyond the general workflow, InDesign offers specialized features for various design needs. For instance, adding page numbers to your documents is a common requirement, and InDesign allows you to add a page number marker to a master page, ensuring consistent numbering across your entire document.
Another aspect of professional document creation is understanding export settings. When you're ready to share your work, walking through the export process in Adobe InDesign is crucial. Taking a look at export settings for your consideration is important because different projects have different needs. Knowing where these settings are and what they do empowers you to produce the optimal output file for print or digital distribution.
Troubleshooting Common Issues
Even experienced designers encounter issues. A range of problems at the document or system level can prevent you from printing or exporting a document as a PDF. For instance, if your document uses fonts with special characters in their names, InDesign might crash during launch or when you use the Type tool.
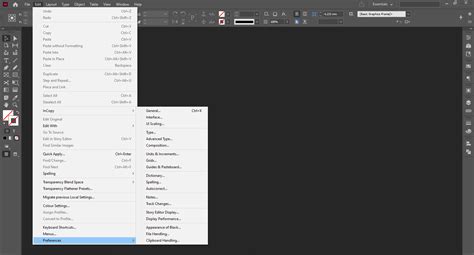
Corrupted InDesign preferences can also lead to strange behavior. Luckily, it's easy to replace your InDesign preferences, often resolving many unexpected issues. Understanding how to troubleshoot these common problems can save you a significant amount of time and frustration, ensuring your design projects run smoothly.
Continuing Your InDesign Journey
Congratulations on embarking on your journey to master Adobe InDesign! As you wrap things up, it's important to consider what's next. There are countless InDesign tutorials for beginners available, offering deeper dives into specific features and advanced techniques. Exploring resources like Envato Tuts can provide further learning opportunities.
0001. user interface in indesign
For those who have delved into specific versions, such as Adobe InDesign CS5.5, training videos by experts can be an indispensable resource for anyone wanting to learn this powerful program. These comprehensive courses often cover everything from setting up your workspace and using grids to mastering the layers panel, working with text, paragraph formatting, creating and using styles, and combining text and objects. New features, like EPUB export capabilities in CS5.5, are explored in-depth, alongside exporting finished work in various formats for both print and interactive documents. By the conclusion of such a computer-based training program, you will be fully versed in creating print and digital-ready documents in Adobe InDesign. Many courses include work files, allowing you to practice alongside the instructor, truly learning the ins and outs of this powerful desktop publishing software.
Remember, you can install InDesign and other Creative Cloud apps on up to two computers. If you need to install it on a third, you'll need to deactivate it on a previous machine. Continuous learning and practice are key to becoming proficient in Adobe InDesign.