Sometimes, a photograph captures a moment beautifully, but a distracting element mars the perfection. Whether it's an unwanted power line on a pristine landscape, a photobomber crashing a family portrait, or a stray tree intruding on a serene lake scene, the ability to erase these distractions can elevate a good photo to a great one. While Photoshop is often lauded as the king of content-aware editing, Lightroom, a tool tailor-made for photographers, offers robust capabilities for object removal, simplifying your workflow by keeping these edits within a single application. This tutorial will guide you through the process of removing unwanted objects and people from your photos using Lightroom's powerful tools, making your pictures truly polished.
Understanding Lightroom's Removal Tools: Clone vs. Heal
Lightroom provides two primary tools for object removal: the Heal tool and the Clone tool. Understanding their nuances is key to achieving seamless results.
The Heal Tool: Subtle Retouching for Imperfections
The Heal tool is ideal for subtly targeting unwanted objects and for general photo cleanup. It's particularly effective for smaller imperfections like skin blemishes or dust spots. When you use the Heal tool, Lightroom analyzes the surrounding pixels and attempts to blend the sampled area with the target area, mimicking the texture, lighting, and shading. This makes it excellent for blending in corrections without leaving obvious traces.
To use the Heal tool, you'll first select it from the toolbar. Then, you'll adjust the size of the brush to appropriately cover the area you wish to remove. A feathered edge on the brush can help create a softer transition. Once you've painted over the imperfection, Lightroom will automatically sample an area and attempt to heal the selected spot. You can then drag the sampled area to a different part of the image if the initial selection isn't satisfactory.
The Clone Tool: Precise Duplication for Larger Objects
The Clone tool, on the other hand, is designed for more precise duplication. It copies pixels from a source area and pastes them directly onto the target area. This is often more effective for removing larger objects or areas where the texture and pattern need to be replicated exactly.
When using the Clone tool, you'll also select it from the toolbar and adjust your brush size and feathering. After painting over the object you want to remove, you'll notice two white marquee areas. The one with solid lines over your painted object indicates the target area. The second marquee area, with dashed lines, represents the source area from which pixels are being copied. You can then click and drag this source area to choose the exact pixels that will replace your unwanted object. It’s crucial to select a source area that closely matches the surrounding texture, lighting, and color to ensure a natural-looking result.
The Generative Remove Tool: Leveraging AI for Complex Removals
For more complex scenarios, especially when dealing with intricate backgrounds or objects that cast shadows and reflections, Lightroom's Generative Remove tool, powered by Adobe Firefly, offers a powerful AI-driven solution. This feature can effectively remove distractions like vehicles, signboards, poles, and even people, even on complex backgrounds.
How to Use Generative Remove
- Select the Tool: Navigate to the Remove tool in Lightroom's Develop module. You'll find the option for "Use generative AI."
- Brush Over the Object: Ensure the "Use generative AI" option is enabled. Then, brush over the object you want to remove. Make sure your brush strokes cover the main object entirely.
- Generate Variations: Lightroom will then analyze the image and generate three different variation options for removal.
- Choose the Best Fit: You can select the "Variations arrow" to cycle through these generated options and choose the one that best aligns with your vision. Alternatively, you can select "Done" to continue with the currently selected variation.
Advanced Techniques and Tips for Seamless Removal
Achieving a truly seamless object removal often involves a combination of techniques and a keen eye for detail.
Utilizing Detect Objects
The "Detect objects" option within the Remove tool can significantly streamline the process. When activated, you can either circle or scribble over an object. Lightroom then automatically detects the object, including any associated shadows or reflections, and masks it. This feature can be used independently or in conjunction with Generative AI.
- Detect Objects Independently: If you use "Detect objects" on its own, Lightroom will analyze the image and select a source area by default. To refine this source area, you can use Cmd+drag (on macOS) or Ctrl+drag (on Windows) over the photo to manually define the source.
- Detect Objects with Generative AI: When used together, Lightroom analyzes the image, detects the object, and then generates three AI-powered removal variations.
Refining Your Selections
- Visualize Spots: This feature helps you visualize spots, allowing for more accurate selections, especially when dealing with fine details or subtle imperfections.
- Brush Size and Feathering: Adjusting the size of your brush is crucial. You can use the "[" and "]" keys to quickly change your brush size for all three remove object tools. Feathering the brush edge helps create softer transitions, making the blended area less noticeable.
- Refresh Button: If you're not satisfied with the initial results of the Heal or Clone tool, don't hesitate to click the "Refresh" button. This will prompt Lightroom to re-sample and re-apply the effect, potentially yielding a better outcome.
Testing Lightroom's New Generative Remove AI Tool
When to Consider Photoshop
While Lightroom is incredibly capable, there are instances where Photoshop's advanced tools might be necessary. For extremely complex removals, particularly those involving intricate patterns, detailed textures, or when precise manipulation of multiple layers is required, Photoshop's Content-Aware Fill and advanced cloning capabilities might offer superior results. However, for the majority of common object removal tasks, especially for photographers primarily using Lightroom for editing, the tools within Lightroom are more than sufficient and significantly simplify the workflow.
Specific Scenarios and Solutions
Removing a Distracting Element in a Landscape
Consider a scenario where a tree is intruding into the lower left corner of a beautiful lake landscape. While the rest of the photo is perfect, this single element detracts from the overall composition.
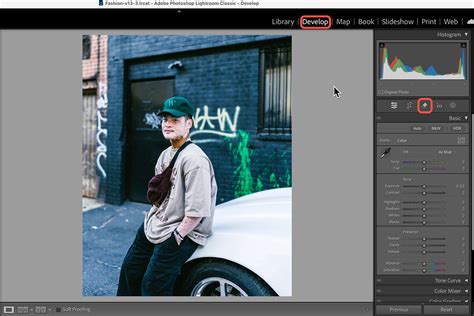
- Select the Remove Tool: Choose the Remove tool in Lightroom.
- Choose Heal or Clone: For a tree brushing into a water surface, you might start with the Clone tool to ensure the water texture is accurately replicated.
- Adjust Brush and Feather: Set an appropriate brush size to cover the tree and a moderate feather for blending.
- Paint and Refine: Paint over the offending tree. Lightroom will sample and attempt to blend. You may need to drag the source area to a part of the lake with a similar texture and light. If the initial results show a noticeable difference in exposure or color, you might need to try sampling from a different area or even switch to the Heal tool to see if it blends more naturally. The "Refresh" button can be your friend here.
Removing a Person from the Background
A common challenge for beginners is removing a person who has inadvertently wandered into the background of a shot. While some guides might point solely to Photoshop, Lightroom can handle this, though it might require more effort.
- Start with Spot Removal (Heal/Clone): For a less complex background, you can try the Heal or Clone tool. Select the tool, adjust the brush size to be slightly larger than the person, and paint over them. Lightroom will attempt to fill the area. You'll likely need to refine the source area or use multiple passes. Be aware that if the background is complex (e.g., detailed patterns, multiple objects), the results might be less than perfect, and the background can get very messed up.
- Leverage Generative Remove: For a much easier and often more effective solution, use the Generative Remove tool. Brush over the person, and let the AI generate options to seamlessly replace them with plausible background elements. This is particularly effective for removing tourists or other incidental figures.
Removing Small Imperfections
The Heal brush is your go-to for smaller issues. If you have dust spots on your sensor that appear in your photos, or minor blemishes on skin, the Heal tool excels. Simply select the tool, adjust the brush to be just larger than the spot, and click or paint over it. Lightroom will intelligently sample and blend, making the imperfection disappear.

The Power of Lightroom for Photographers
The ability to remove unwanted objects from your photographs is a powerful editing capability that can significantly enhance the impact of your images. Lightroom, with its intuitive interface and increasingly sophisticated tools like Generative Remove, empowers photographers to achieve polished results without needing to switch to more complex software for many common tasks. Whether you're aiming for a pristine landscape without power lines or a perfect portrait without a photobomber, mastering these object removal techniques within Lightroom will undoubtedly simplify your workflow and elevate your photographic output. The process can be completed in just a few easy steps: select your photo, navigate to the Develop tab, choose the appropriate removal tool (Heal, Clone, or Generative Remove), and make your edits. With practice and by understanding the strengths of each tool, you can transform your photographs and present them exactly as you envisioned. If you have questions or ideas to share, the Adobe Lightroom community forums are a fantastic resource for connecting with other photographers.