Understanding how to effectively compare your edited photographs with their original, unedited versions is a cornerstone of efficient and impactful photo editing. Adobe Lightroom, a powerhouse for photographers, offers several intuitive tools to achieve this, allowing you to meticulously track the evolution of your images and ensure that no crucial details are lost in the creative process. This guide delves into the various methods for viewing your original image in Lightroom, from quick keyboard shortcuts to more advanced techniques involving virtual copies and the history panel.
The Essential Backslash: Instant Before & After Comparison
The most immediate and frequently utilized method for comparing your original image with its edited counterpart in Lightroom is the backslash key (\). This simple keyboard shortcut provides an instant toggle between the two states of your photograph. Located typically above the Return or Enter key on most keyboards, the backslash key is your gateway to a rapid preview of your edits.
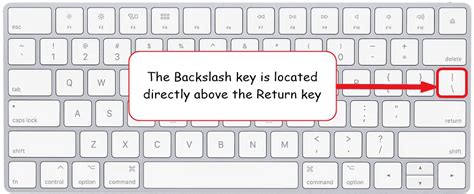
When you press the backslash key while in the Develop module, Lightroom will display the original, unedited version of your image. Pressing it again restores the view to your edited version, allowing for a seamless back-and-forth comparison. This is invaluable for ensuring that you haven't inadvertently desaturated a color you intended to keep vibrant, or darkened an area to the point where important texture definition is lost. It acts as a critical checkpoint, allowing you to assess the impact of your adjustments in real-time.
The backslash key is not just for a full-screen comparison. Within the Develop module, you can also access "Before & After" view options through the View menu. This menu often provides sub-options for comparing images side-by-side, vertically, or horizontally. While the backslash key offers the quickest full-screen toggle, exploring the View menu can reveal additional comparison layouts tailored to your specific needs. For instance, some versions of Lightroom might present a layout where the original photo is on the left and the altered version is on the right. Subsequent presses of the backslash key, or utilizing the dropdown menu associated with the 'Y' key (discussed later), can cycle through different comparison views, such as a split view where one half of the image shows the original and the other half shows the edited version, or a top-down view.
Beyond the Backslash: Exploring Advanced Comparison Techniques
While the backslash key is remarkably efficient, it doesn't always display the entire original, uncropped photo, especially if cropping was one of your initial edits. This can be a point of frustration if you wish to re-evaluate the original framing and potentially re-crop the image in a new way. Fortunately, Lightroom provides more nuanced methods to access and compare the absolute original state of your photograph.
The History Panel: Reverting and Comparing Stages
One of the most powerful, yet sometimes overlooked, tools for managing your edits and comparing different stages of development is the History panel. Located within the Develop module, this panel acts as a chronological record of every adjustment you make to an image.
By default, the History panel records the state of your image when Lightroom was last shut down. However, you can actively use it to designate specific editing points as your "Before" image. When you click on a particular step in the History panel, Lightroom reverts the image to that state. This allows you to select any prior editing step and effectively use it as your "Before" reference. For example, if you've made significant adjustments using the Basic panel and then moved on to more detailed color grading, you can go back to the step before you started the color grading and use that as your "Before" view when toggling with the backslash key or other comparison tools.
A particularly useful technique involves "clearing history above this step." If you've experimented with multiple edits and want to isolate a specific point in your editing process as the "Before" state, you can right-click on that step in the History panel and select "Clear History Above This Step." This action removes all subsequent edits from the history, allowing you to continue editing from that designated point without losing your prior work, and setting it up perfectly for a "Before & After" comparison.
Virtual Copies: Unlocking Unlimited Editing Possibilities
Virtual Copies are a fundamental concept in Lightroom for managing multiple versions of a single image without duplicating the actual file on your hard drive. Creating a Virtual Copy essentially adds another record in the Lightroom catalog that points to the same master image file. This means you can have an unlimited number of "versions" of a photograph, each with its own unique set of edits.

The process of using Virtual Copies for "Before & After" comparisons is straightforward. If you have an edited image and want to see the original unedited version side-by-side, you can:
- Create a Virtual Copy: Right-click on your edited image in the Library or Develop module and select "Create Virtual Copy."
- Reset the Virtual Copy: With the newly created Virtual Copy selected, go to the Develop module and click the "Reset" button (usually found in the bottom right corner of the Develop module). This will revert the Virtual Copy to its original, unedited state, including removing any crop.
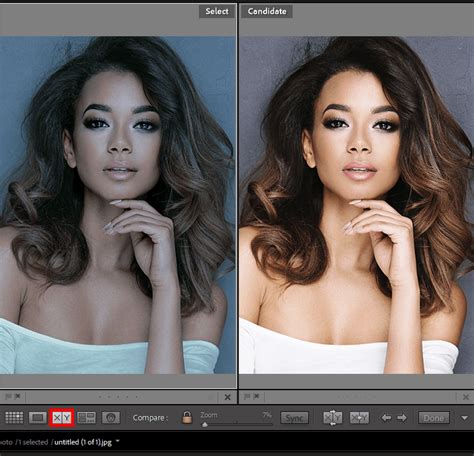
- Compare: You can now select both the original edited image (which is now a Virtual Copy) and the reset Virtual Copy. Using the "Survey View" (keyboard shortcut 'N') or the "Compare View" (keyboard shortcut 'C'), you can view them side-by-side. If you want to toggle between them in full screen, select both and press 'E' to enter the "Loupe View," then use the right arrow key to cycle between the selected images.
This method is particularly effective if you want to regain the full, uncropped original image to re-evaluate your composition. By resetting a Virtual Copy, you effectively strip away all developed edits, including the crop, presenting you with the unadulterated raw file. The master image, with your edits, then becomes a Virtual Copy, while the new master has all changes removed.
Snapshots vs. Virtual Copies: Understanding the Nuances
It's common to encounter terms like "Snapshot" and "Virtual Copy" when discussing image versions in Lightroom, and understanding their distinct purposes is key.
Virtual Copies are independent versions of an image that can be developed and edited separately. You can create multiple Virtual Copies from the untouched original or from any stage of development. Each Virtual Copy is a distinct record in the catalog, allowing for extensive experimentation without affecting the original file or other Virtual Copies. Think of them as distinct editing paths you can explore.
Snapshots, on the other hand, are more like bookmarks within the development history of a single image. They capture a specific point in the editing process, allowing you to quickly return to that state without creating a new record in the catalog. Snapshots are ideal for saving intermediate stages of your edit, such as after completing the Basic panel adjustments, before you dive into more complex color work. This makes it easy to revert to a specific mid-point in your workflow if you want to experiment further from that saved state.
Snapshots and Virtual Copies in Lightroom
While both Snapshots and Virtual Copies enable you to manage different versions of your images, Virtual Copies offer greater flexibility for distinct editing paths and full comparison with the original, unedited state, especially when you need to account for initial crops.
Lightroom Mobile: Simplified Before & After Viewing
The convenience of comparing original and edited images extends to Lightroom Mobile as well, offering a streamlined experience for users on the go.
On Lightroom Mobile, the process is remarkably intuitive. After making your edits to a photo, simply hold your thumb down on the image. This action will temporarily reveal the original, unedited version of the photograph. Releasing your thumb brings back the edited version. This direct touch-and-hold gesture provides an immediate and tactile way to compare your edits without needing to navigate complex menus or keyboard shortcuts.
The "Y" Key and Toolbar Options: Alternative Comparison Views
Beyond the backslash key, the 'Y' key and its associated toolbar options offer a more visually diverse approach to "Before & After" comparisons. At the bottom left of the center image display in the Develop module, you'll find a toolbar area that often includes a dropdown menu represented by an icon, sometimes depicted as two opposing arrows or a similar visual cue. Clicking the down arrow next to this icon reveals various view options for side-by-side or top-down comparisons.
When you first activate these options, you might see a direct comparison of the Before image next to the After image. However, the true power of this feature lies in its flexibility. As mentioned earlier with the History panel, you can actually designate a prior editing stage as your "Before" image, not just the raw unedited state. By opening the History panel and dragging a specific step to the "Before" image area (where applicable in the interface), you can create custom comparison points. This allows you to see how specific sets of adjustments have impacted the image, offering granular control over your review process.
Maximizing Your Editing Workflow: Beyond Simple Comparison
The ability to view original images in Lightroom is not just about satisfying curiosity; it's a crucial component of a robust and efficient editing workflow.
- Preventing Over-Editing: Regularly comparing your edited image to the original helps prevent you from pushing edits too far. It allows you to identify when an adjustment has become detrimental to the image's natural appearance or detail.
- Understanding Your Edits: By seeing the progression from original to edited, you gain a deeper understanding of how each slider and tool affects the image. This knowledge is invaluable for developing your own unique editing style.
- Client Communication: If you're working with clients, being able to quickly show them the "before and after" can be incredibly persuasive and helps manage expectations.
- Archival and Versioning: The use of Virtual Copies and Snapshots ensures that you have a well-organized system for managing different versions of your photographs, preserving your creative journey.
Ultimately, mastering the "Before & After" functionality in Lightroom empowers you to make more informed editing decisions, refine your skills, and produce consistently better results. Whether you opt for the speed of the backslash key, the historical depth of the History panel, or the flexibility of Virtual Copies, Lightroom provides the tools to ensure you always have a clear perspective on how your images have transformed.