The animated GIF, or Graphics Interchange Format, has transcended its humble beginnings to become a ubiquitous element of online communication. From its inception in 1987 by CompuServe, this image file format has evolved from displaying simple graphics like stock market quotations to powering the dynamic, looping animations that pepper social media feeds and messaging platforms. Its enduring appeal lies in a unique blend of simplicity and versatility, making it an indispensable tool for conveying humor, reactions, and ideas in a visually engaging manner. While its 256-color limitation can sometimes lead to visual quirks like dithering, this constraint also contributes to the format's characteristic aesthetic and its ability to keep file sizes manageable, a crucial factor for web compatibility. The ability to display multiple frames in sequence, creating the illusion of movement, is undeniably the format's standout feature, cementing its status as the internet's favorite moving image.
Understanding the fundamental nature of GIFs is key to mastering their creation. Unlike video files, GIFs lack audio, and their color depth is restricted. This differentiates them from formats like JPG, which supports millions of colors and is ideal for photographic images, and PNG, a lossless format offering transparency and a broader color spectrum, intended as a successor to GIF. For high-resolution print work, TIFF remains the standard. However, for the specific purpose of short, looping animations, the GIF format excels. Its portability and relatively small file sizes, despite not being inherently compressed in the way JPGs are, make them highly suitable for web deployment. The evolution of the internet, from the early days of dial-up to the widespread availability of broadband, has played a pivotal role in the resurgence and widespread adoption of animated GIFs. As technical quality improved and creation tools became more accessible, GIFs transitioned from a niche digital artifact to a core component of digital culture, integrated into everything from advertising campaigns to personal online interactions.
The Mechanics of GIF Creation in Photoshop
Adobe Photoshop, a powerhouse in digital imaging, provides a robust suite of tools for transforming static images into dynamic animated GIFs. The core principle behind creating an animated GIF in Photoshop revolves around the concept of "Layers as Frames." This means that each distinct element or stage of your animation will reside on its own layer, and Photoshop's Timeline panel will interpret these layers as sequential frames of your animation. This approach offers a high degree of control over each individual component of your animation.
Setting Up Your Canvas and Workspace
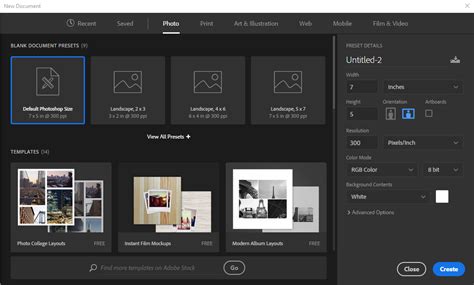
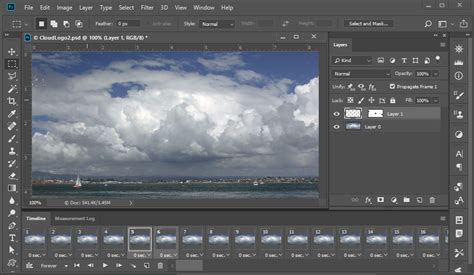
The first step in bringing your animation to life is to prepare your digital canvas. Navigate to File > New to establish your document. Here, you'll define the dimensions (width and height) and resolution of your GIF. For web-based GIFs, a resolution of 72 pixels per inch is typically sufficient. Once your document is created, you'll need to access Photoshop's animation tools by going to Window in the top menu bar and selecting Timeline. This panel is the heart of your animation workflow.
Building Your Animation Frames
There are several approaches to creating the individual frames that will form your GIF. One method involves drawing each frame directly within Photoshop. After creating a new document, you'll want to establish a "Video Group" within your Timeline. Click on the film roll icon next to "Layer 0" in your timeline and select "New Video Group." With this group active, use the "+" button to add new layers, each representing a subsequent frame of your animation. As you draw or manipulate elements on each layer, you are essentially building the progression of your animation.
Alternatively, you can prepare your animation frames in advance using other software, such as Adobe Illustrator, or even use existing image files. If your frames are separate image files, you can import them into Photoshop using File > Load Layers. If you already have a Photoshop file with multiple layers, where each layer represents a distinct frame, you can directly utilize these. The key is to ensure that each element or stage of your animation is isolated on its own layer or group of layers.
Photoshop Tutorial | QUICK TIP | Basic Frame by Frame Animation
The Role of the Timeline Panel
The Timeline panel is where the magic of animation truly unfolds. Once your layers are set up, you'll see them represented in the Timeline. For frame-by-frame animation, you'll want to convert your timeline to a "Frame Animation." Click on the menu icon (four horizontal lines) in the top right corner of the Timeline panel and select Convert to Frames. Each layer will typically correspond to a frame, though you can manually create, duplicate, or delete frames as needed.
When creating new frames, it's often efficient to duplicate an existing frame and then make modifications to the layers for the new frame. This ensures consistent duration across frames. You can adjust the duration of each individual frame by clicking on the time value displayed beneath it and selecting a new duration from the dropdown. The "Onion Skin Options" can be particularly helpful here, allowing you to see a semi-transparent preview of previous or subsequent frames, aiding in smooth transitions. Ensure your timeline scrubber (the red line with the blue arrow) is correctly positioned over the frame you are currently editing.
Refining Animation and Looping
Smoothness in animation is paramount for a professional look. This involves ensuring that each frame transitions logically and aesthetically to the next. By adjusting the timing of individual frames and the order in which they appear, you can fine-tune the pacing and flow of your GIF.
A crucial aspect of animated GIFs is their looping behavior. The Timeline panel provides options for controlling how many times your animation will repeat. At the bottom of the panel, you'll find a dropdown menu, often defaulting to "Forever." You can select options to loop the animation a specific number of times or play it through just once. Choosing the appropriate looping setting depends on the intended use and message of your GIF.
Exporting Your Animated Masterpiece
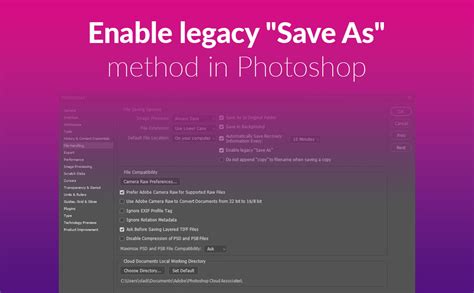
Once you are satisfied with your animation's appearance and looping behavior, the final step is to export it as a GIF file. Photoshop offers a dedicated "Save for Web (Legacy)" option for this purpose. Navigate to File > Export > Save for Web (Legacy). This dialog box presents a range of optimization settings crucial for web graphics.
Within the "Save for Web (Legacy)" dialog, you can make critical decisions about your GIF's quality and file size. The "Colors" setting allows you to choose the number of colors your GIF will use, from the maximum 256 down to a smaller palette. Reducing the color count can significantly decrease file size, but may also introduce more noticeable dithering or color banding. Experiment with different color settings to find a balance between visual fidelity and file size. The "Image Size" section allows you to adjust the physical dimensions of your GIF, which is important for ensuring it displays correctly on various devices and screen sizes.
After configuring these settings, preview your GIF within the dialog box to ensure it looks as intended. Pay close attention to the animation playback to confirm that the frames transition smoothly and the looping is set correctly. Once you're happy with the preview, click "Save." You'll then be prompted to name your file and choose a destination for saving.
Understanding GIF vs. Other Image Formats
While animated GIFs have carved out a significant niche, it's important to understand their limitations and how they compare to other common image file types. The 8-bit nature of the GIF format, restricting it to a maximum of 256 colors, means it is not ideal for high-fidelity photographic reproduction. This limitation can result in images appearing grainy or exhibiting color artifacts.
JPG (or JPEG): This format is the workhorse for digital photography. JPGs are compressed, typically with only a slight loss of quality, and support millions of colors. They are excellent for storing digital photos and are widely used across the internet for their balance of quality and file size. However, JPGs do not support transparency, and they are not suitable for animation.
PNG (Portable Network Graphics): Developed as a more advanced alternative to GIF, PNG is a lossless format. This means it retains all image data without any degradation in quality. PNGs support transparency, allowing for images with see-through backgrounds, and can also display millions of colors. They are an excellent choice for web graphics that require transparency or crisp, detailed imagery, but like JPGs, they do not inherently support animation.
TIFF (Tagged Image File Format): Primarily used in professional printing and publishing, TIFF is a lossless format renowned for preserving extremely high photographic quality. It is the go-to format for scanning and high-resolution artwork intended for print. TIFF files are typically very large and are not practical for web use.
The distinction between a GIF and a meme is also worth noting. While both are often used for quick, humorous communication, memes are typically static images, frequently accompanied by text captions. Animated GIFs, on the other hand, rely on sequential frames to convey their message or humor through movement.
The enduring popularity of animated GIFs, despite their technical limitations, speaks to their effectiveness as a communication tool. Their ability to capture fleeting moments, express complex emotions, or inject humor into digital conversations makes them an invaluable asset in the modern online landscape. By leveraging the tools within Adobe Photoshop, creators can harness the power of this format to produce engaging and dynamic visual content.
Photoshop Tutorial | QUICK TIP | Basic Frame by Frame Animation
The journey from a series of static images to a vibrant, looping animation is a testament to the evolution of digital media and the creative potential unlocked by software like Photoshop. Whether you're aiming to create a funny reaction for social media, a dynamic illustration, or a simple visual cue, the process of making an animated GIF in Photoshop is accessible and rewarding. The key lies in understanding the interplay between layers, the timeline, and the export settings, allowing you to bring your visual ideas to life with motion.