Clip Studio Paint (CSP) offers a powerful suite of tools designed to streamline the illustration process, and at the forefront of these is the Perspective Ruler. This indispensable feature allows artists to effortlessly create scenes with depth and realism by precisely controlling vanishing points. Whether you're constructing intricate indoor environments or vast outdoor landscapes, the Perspective Ruler acts as your guide, ensuring that lines converge accurately and your artwork achieves a convincing sense of three-dimensionality.
Understanding the Fundamentals of Perspective
Before delving into the specifics of Clip Studio Paint's tools, it's crucial to grasp the basic principles of perspective drawing. At its core, perspective is a method used to depict three-dimensional objects on a two-dimensional surface, making them appear to recede into space. This is achieved through the concept of vanishing points and horizon lines.
One-Point Perspective
One-point perspective is the simplest form, characterized by a single vanishing point. In this method, all lines that are parallel to the viewer's line of sight converge at this single point on the horizon line. This is often used for scenes viewed directly head-on, such as a road stretching into the distance or a room viewed from one end.

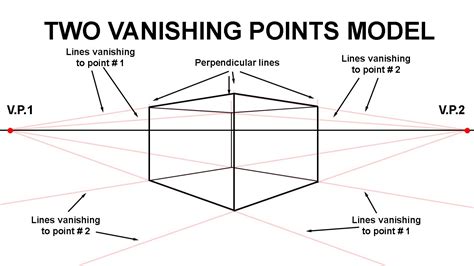
Two-Point Perspective
Two-point perspective involves two vanishing points, both situated on the same horizon line. This is commonly used when an object is viewed at an angle, so that neither its front nor its side is directly facing the viewer. Lines running parallel to one side of the object will converge on one vanishing point, while lines parallel to the other side will converge on the second vanishing point. This creates a more dynamic and complex sense of depth.
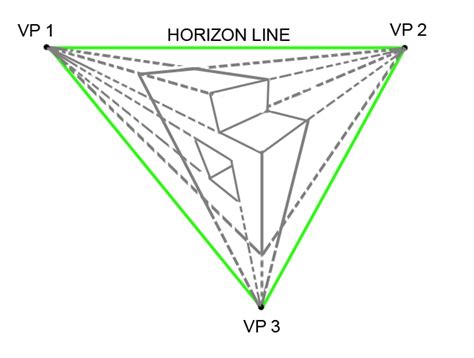
Three-Point Perspective
Three-point perspective introduces a third vanishing point, which is either located above or below the horizon line. This is typically used to depict scenes viewed from a very high or very low angle, such as looking up at a towering skyscraper or down from a high vantage point. The addition of the third vanishing point accounts for the foreshortening of vertical lines, further enhancing the illusion of extreme perspective.
Creating and Manipulating Perspective Rulers in Clip Studio Paint
Clip Studio Paint's Perspective Ruler tool makes the implementation of these concepts incredibly accessible. The software provides default rulers for one, two, and three-point perspective, which can be further customized to fit your artistic needs.
Initial Creation of a Perspective Ruler
To begin, navigate to the Layer menu, then select Ruler/Frame and choose Create Perspective Ruler. Upon clicking OK, a default perspective ruler will be established on your canvas. This foundational ruler can then be refined using the Ruler tool and its Perspective Ruler sub tool.
Adjusting Vanishing Points and Guides
The Perspective Ruler sub tool is your primary instrument for shaping the perspective grid. You can drag vanishing points from the canvas in any direction to establish their desired placement. When you drag a vanishing point, a guide line will appear, and by dragging this guide line from the canvas, you can draw a line where the vanishing point intersects. This process can be repeated to create additional vanishing points. For two-point and three-point perspectives, dragging a line to intersect an existing vanishing point establishes the eye level, which represents the viewer's eye height or camera position.
Editing Existing Perspective Rulers
Once a perspective ruler is created, it remains fully editable. The Operation - Object sub tool is crucial for this. Selecting a ruler with this tool will reveal its control points. You can then drag the white-and-blue circles at the vanishing points to reposition them, which will dynamically alter the perspective grid. Similarly, the eye level line can be moved or rotated by dragging its central handle.
Advanced Perspective Ruler Options
Clip Studio Paint goes beyond basic perspective grids with several advanced features:
- Three-Point Perspective Aligned with 3D Materials: For scenarios requiring precise alignment with camera angles from 3D models, you can create a three-point perspective ruler that matches the camera angle of a loaded 3D material. This is invaluable for concept artists and environmental designers.
- Curved Fisheye Perspective: The software supports the creation of curved, fisheye perspective rulers, which are ideal for achieving a wide-angle or distorted lens effect. This can be accessed through the
Create perspective rulerdialog or thePerspective rulersub tool by enablingAdd fisheye. - Adding and Deleting Vanishing Points: You can freely add or remove vanishing points using the
Perspective rulersub tool. TheProcessdropdown menu in the Tool Property palette allows you to selectAdd vanishing pointorDelete vanishing point. - Fixing Vanishing Points: To prevent accidental movement of a critical vanishing point, you can "fix" it. Select the
Perspective rulersub tool, chooseFix vanishing pointfrom theProcessmenu, and then click on the vanishing point you wish to secure. Fixed vanishing points will appear in gray when theObjectsub tool is active. - Infinitizing Guide Lines: For situations where guides need to extend infinitely, the
Infinitizeoption in thePerspective rulersub tool can be used. Alternatively, holdingShiftwhile dragging a guide line handle can also extend it to infinity. Making a guide line perfectly horizontal or vertical with theObjectsub tool can also "infinitize" it, effectively erasing the vanishing point. - Auxiliary Vanishing Points: When
Change perspective drawing methodis turned off in the Tool Property palette, you can add auxiliary vanishing points to further refine complex perspectives. - Adding and Deleting Guide Lines: New guide lines can be added using the
Add guideprocess in thePerspective rulersub tool. For two-point and three-point perspectives, the direction of these guide lines is previewed as you draw them, aiding in accurate placement. Guide lines can also be deleted using theDelete guideprocess.
Practical Application and Workflow Tips
Illustrators like David Navia and Liz Staley, experienced users of Clip Studio Paint, highlight the transformative impact of the Perspective Ruler on their workflow.
David Navia, an illustrator from Colombia, emphasizes how the Perspective Ruler has been instrumental in his character lineart, coloring, and perspective work. He recommends exploring commented timelapse videos to observe its application in practice. Navia's approach often involves initial doodling and sketching to define ideas and camera angles, followed by the precise creation of perspective lines using the Perspective Ruler. He notes that while the tool is straightforward, creating a set of vanishing points and a horizon line is a fundamental step.
Liz Staley, a long-time CSP user and author of several books on the software, considers the Perspective Ruler one of its coolest features. She points out that while the article focuses on the tool itself, developing the skill of drawing in perspective is critical for any artist, particularly comic and concept artists. For those looking to deepen their understanding of perspective theory, she recommends resources like "Vanishing Point: Perspective for Comics From the Ground Up" by Jason Cheeseman-Meyer. Staley stresses that learning the Perspective Ruler builds upon itself, with two-point perspective construction extending from one-point, and three-point from two-point.
When using the Perspective Ruler, artists often start with a loose sketch to guide the placement of vanishing points and the horizon line. The Add Vanishing Point process is typically the starting point. After setting up the initial perspective, the Operation - Object sub tool is used for fine-tuning.
How to use the perspective ruler | Clip Studio Paint
Working with Figure Tools and Perspective
While Clip Studio Paint's figure tools, such as the Rectangle tool, can be used in conjunction with perspective rulers to speed up the creation of shapes like boxes or buildings, artists sometimes encounter "finicky" results. It can be challenging to get figure tools to perfectly adhere to the desired perspective. In such cases, many artists opt to continue drawing over the sketch lines with pencil or pen tools, especially where shapes intersect. This hybrid approach allows for both the speed of digital tools and the fine control of freehand drawing.
Enhancing the Illustration
Once the foundational perspective lines are established and elements are drawn, artists can add shading and other effects. Simple shading can solidify the sense of form and depth, while techniques like blurs, glow layers, multiply shadows, vignettes, and contrast adjustments can provide the final polish, giving the illustration a professional and compelling look.
Understanding Ruler Properties and Settings
The Tool Property palette is central to customizing your perspective ruler experience. Key settings include:
- Process: This dropdown menu dictates the action you're performing:
Add vanishing point,Add guide,Delete vanishing point,Delete guide,Fix vanishing point, orInfinitize. - Change perspective type: When enabled while adding a vanishing point, this option ensures the canvas's perspective adjusts to accommodate the new vanishing point.
- Fisheye perspective: Toggling this on enables the creation of fisheye rulers.
- Handle Size: In
Preferences > Tool > Handle size, you can adjust the visual size of the handles used to manipulate rulers, improving visibility and ease of use. - Show in All Layers: This setting allows a single perspective grid to apply to multiple layers, offering consistency across your artwork. When this is unchecked, the ruler is linked only to its specific layer.
Interacting with Perspective Layers
Perspective rulers reside on dedicated layers. You can select a perspective layer by clicking its perspective icon. If you wish to preserve the artwork on a perspective layer while temporarily hiding the ruler itself, you can hold down on the perspective icon and uncheck the Show Ruler option.
The Eye Level and Vanishing Points Explained
- Eye Level: This line signifies the height of the viewer's gaze or the camera's position. It typically corresponds to the horizon line. It's the point where lines representing width, depth, and height converge. For objects parallel to the ground, their vanishing points for width and depth are always on the eye level.
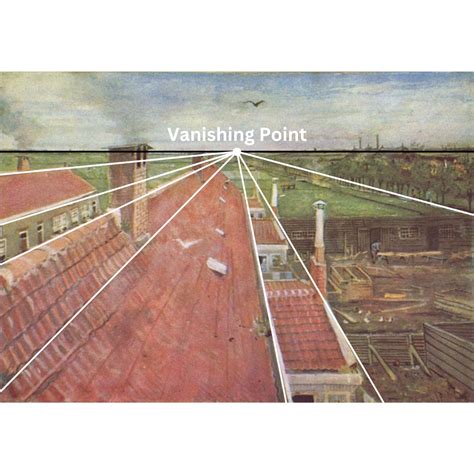
- Vanishing Point: This is the point on the horizon line (or elsewhere in three-point perspective) where parallel lines appear to converge. Lines extending from a vanishing point are always attached to it.
- Auxiliary Line: A vertical line that indicates height. These appear when editing one-point and two-point perspective rulers.
The handles associated with perspective rulers allow for precise adjustments. You can use them to change the angle of a guide line, move a vanishing point along a guide line, move or rotate the eye level, or move and change snap settings for the entire ruler. For fisheye perspective, a specific area indicates the field of view, and a central circle acts as the lens for adjusting the radius.
Conclusion: Embracing the Power of Perspective Rulers
Clip Studio Paint's Perspective Ruler is a remarkably versatile and powerful tool that demystifies the complexities of perspective drawing. By providing intuitive controls for creating, editing, and customizing one, two, and three-point perspective grids, as well as advanced options like fisheye perspective, it empowers artists of all levels to render convincing and dynamic scenes. While mastering its full capabilities may take time and practice, the investment is well worth it for any artist seeking to elevate their background art and overall illustration quality. The ability to align perspective with 3D models, fix vanishing points, and utilize auxiliary lines offers a level of control that significantly enhances creative freedom and efficiency. Ultimately, the Perspective Ruler is not just a tool; it's a gateway to creating more immersive and believable worlds within your artwork.
tags: #clip #studio #paint #perspective #ruler