Adobe Illustrator's artboards are a powerful feature that can significantly streamline the design process, offering a flexible and organized approach to working with multiple design elements within a single document. Often perceived as a mere "sheet of white paper," an artboard is, in fact, a virtual canvas, a fundamental component of the Illustrator workspace that forms the base for your artistic endeavors. This guide delves into the intricacies of artboards, exploring their features, usage, and best practices to help both novice and experienced designers harness their full potential.
The Essence of Artboards in Illustrator
At its core, an artboard in Adobe Illustrator functions as a distinct design area within a larger workspace. Unlike traditional documents where each new page requires a separate file, Illustrator allows for multiple artboards to coexist within a single document. This capability is particularly invaluable for projects that involve variations, multiple screens, or sequential elements. The ability to have multiple canvases within a single document, as highlighted by the provided information, is a significant advantage, fostering a cohesive workflow and enabling easier management of related designs.
The concept of an artboard can be likened to pages in a desktop publishing program like InDesign, but with the added flexibility of being entirely independent entities on a shared canvas. Each artboard can be individually sized, positioned, and managed, allowing for the creation of diverse layouts and formats within one project file. This is especially useful for maintaining design consistency across an entire project, whether it's a series of social media graphics, different versions of a logo, or frames for an animation.
Streamlining Design Workflows with Multiple Artboards
The primary benefit of utilizing multiple artboards lies in their ability to consolidate related design work. Instead of juggling numerous individual files, designers can house all components of a project within a single Illustrator document. This not only simplifies organization but also significantly enhances efficiency. For instance, when designing for various popular devices, you can use the provided presets for common screen dimensions or create custom-sized artboards tailored to specific project requirements. This eliminates the need to repeatedly set up new documents for each device.
Furthermore, the visual proximity of multiple artboards on a single canvas aids in maintaining design continuity. Designers can easily compare and contrast different iterations, ensure consistent spacing, typography, and color palettes, and make small tweaks without the overhead of opening multiple project files. This holistic view is crucial for developing a cohesive visual identity across a project.
Creating and Setting Up Artboards
The journey into artboard utilization begins with their creation. When initiating a new document in Illustrator, you are presented with a pop-up screen offering various options. While this initial screen can seem overwhelming, a few key settings are essential for setting up your artboards effectively.
Initial Document Setup
When you create a document or open a new file in Illustrator, you have the opportunity to select your artboard’s preset and dimensions right from the outset. This is where you can choose from predefined sizes optimized for popular devices or opt for custom dimensions. The "New Document" dialog box provides a "More Settings" button, which unlocks a comprehensive suite of options for artboard setup. Here, you can specify the number of artboards you wish to start with, their dimensions, bleed, and orientation. Crucially, you can also dictate how these artboards are arranged, creating a grid layout with a specified number of columns and defining the initial spacing between them. It's important to note that while you can start with a certain number of artboards, you are not limited to this initial count; you can always add more later.
For those focused on animation or sequential designs, the ability to create multiple artboards at the start is particularly beneficial. This foresight in planning can lay the groundwork for a smoother pre-production phase, a vital component in making animations stand out.
Creating Artboards in Photoshop vs. Illustrator
While the core concept of artboards is shared between Adobe Photoshop and Illustrator, their creation and management workflows exhibit distinct differences.
In Illustrator, when creating a new document, you access the "Preset Details" panel. Here, you input your desired frame width and height, specify the number of artboards you want to begin with, and then click "Advanced Settings." Within "Advanced Settings," you can set the Color Mode (typically RGB Color for screen-based work) and Raster Effects (Screen (72 ppi) is common for digital designs). Completing these steps and clicking "Create" finalizes the document with your specified artboards.
Photoshop, while also offering artboards, has a slightly different initial setup. After entering your desired dimensions in the "Preset Details" panel, you must actively check the "Artboards" checkbox. You also set the Resolution (again, 72 ppi for screen) and Color Mode (RGB Color). This explicit activation of the artboard feature is a key differentiator.
Managing and Manipulating Artboards
Once your document is established, the true power of artboards comes into play through their management and manipulation. Illustrator provides a dedicated tool and panel for these operations, allowing for dynamic adjustments to your layout.
The Artboard Tool in Illustrator
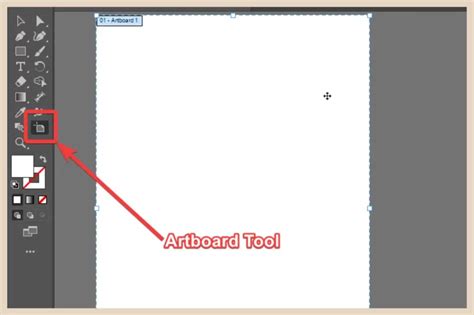
To begin working with artboards in Illustrator, ensuring the Artboards, Properties, and Control panels are readily accessible is recommended. The primary tool for artboard management is the Artboard Tool, which can be activated by selecting its icon from the Tools palette (typically located on the left side of the interface in the default layout) or by using its keyboard shortcut, Shift + O.
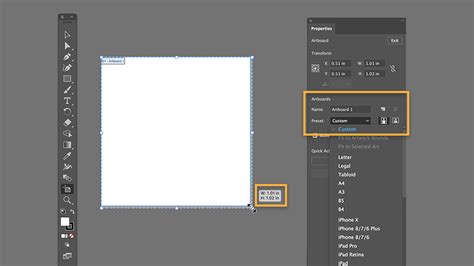
Upon selecting the Artboard Tool, the Properties panel on the right side of the screen will update to display artboard editing options. This panel is crucial for making changes to artboard names, selecting new presets, and creating new artboards. A dedicated "New Artboard" button is often visible within this panel, offering a direct way to expand your canvas.
The Artboard Tool allows for a variety of manipulations:
- Resizing: You can resize any artboard by selecting it and then dragging any of its handles. Alternatively, you can directly input new measurements into the Width and Height fields found in the Control panel or the Properties panel. The artboard will resize around a chosen Reference Point within these panels. You can also select a predefined size from the Preset menu in either panel.
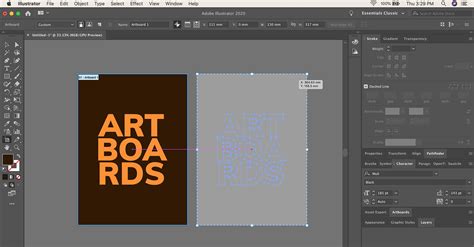
- Moving: Artboards can be moved by clicking and dragging them with the Artboard Tool. Illustrator's Smart Guides feature, typically enabled by default, is invaluable here, providing visual cues to help align artboards with each other or to the document grid.
- Creating New Artboards: You can create a brand-new artboard directly on the canvas by clicking and dragging with the Artboard Tool.
- Duplicating Artboards: A quick way to create a copy of an existing artboard is to Option/Alt-drag it while the Artboard Tool is active. This is exceptionally useful for creating variations or templates.
- Deleting Artboards: To remove an artboard, select it and press the Delete or Backspace key. It's important to note that deleting an artboard removes the artboard itself, but any artwork residing on it remains in its position on the canvas, potentially creating gaps or orphaned elements.
- Arranging Artboards: While you can manually arrange artboards by dragging them, Illustrator also offers options for automatic arrangement. When creating a new document, you can define how artboards are laid out in a grid, specifying the number of columns and spacing. For existing documents, while direct automatic re-arrangement isn't as prominent as in the initial setup, manual positioning with Smart Guides is highly effective.
Artboard Options Dialog Box
For more detailed control over individual artboards, double-clicking an artboard with the Artboard Tool active will open the Artboard Options dialog box. This dialog box provides access to all the settings available during the initial document setup for that specific artboard, including its name, dimensions, orientation, and even video-specific marks if needed. You can also set global options for all artboards within this dialog, such as fading the area outside the selected artboard, which can help focus your attention. If you need to modify multiple artboards simultaneously, you can select them first and then click the "Artboard Options" button in the Control or Properties panel.
The Artboards Panel
Complementing the Artboard Tool and its dialog box is the Artboards panel (accessible via Window > Artboards). This panel lists all artboards within your document, displaying their assigned numbers and names. The Artboards panel offers several functionalities:
- Navigation: Double-clicking an artboard's name in the panel will fit that specific artboard to your window, allowing for quick navigation. Double-clicking to the right of the name allows you to rename the artboard directly.
- Reordering: You can re-arrange the order of artboards in the panel by dragging them or using the up/down arrow buttons. It's crucial to understand that this reordering primarily affects the numbering sequence and doesn't physically move the artboards on the canvas.
- Adding and Deleting: The bottom of the Artboards panel features buttons for adding new artboards and deleting selected ones.
- Orientation: An icon next to each artboard name indicates its orientation (portrait or landscape). Clicking this icon also provides quick access to the Artboard Options dialog box.
Moving Artboards with or without Content
A critical aspect of artboard management, particularly for experienced users, is understanding how artboards interact with their content. By default, when you move an artboard using the Artboard Tool, its associated artwork moves along with it. This is controlled by the "Move/Copy Artwork with Artboard" icon in the Control panel, or the "Move Artwork with Artboard" checkbox in the Properties panel.
This default behavior is highly beneficial for maintaining alignment and preventing design elements from becoming disconnected from their intended artboard. However, there are scenarios where you might need to reposition an artboard independently of its content. This can occur if an artboard was initially misplaced or if you are making significant layout adjustments. In such cases, you would simply disable the "Move Artwork with Artboard" option before dragging the artboard. This allows you to reposition the artboard canvas without disturbing the artwork within it, which can be a lifesaver when correcting alignment errors.
Advanced Artboard Features and Considerations
Beyond the fundamental creation and manipulation, several advanced features and considerations enhance the utility of artboards in Illustrator.
Artboard Background Color
While artboards are virtual canvases, Illustrator allows for the simulation of a colored paper background. This is not a permanent change to the artboard's output but rather an on-screen visual aid. You can access this feature via File > Document Setup, select the "Simulate Colored Paper" checkbox, and then choose a desired color from the color rectangle. This can be helpful for visualizing how designs might appear on different colored backgrounds.
Exporting Artboards
One of the most significant advantages of using artboards is the ability to export each one as a separate file. This is indispensable for projects that require individual assets, such as web graphics, app icons, or individual pages of a print document.
- Export As / Export for Screens: These commands allow you to export each artboard to a distinct file. This is the recommended method for preparing assets for web or screen use.
- Save As: When saving an Illustrator file, you have the option to "Save Each Artboard to a Separate File." This allows you to maintain individual Illustrator files for each artboard, which can be useful for complex projects where each artboard represents a distinct component that might be further edited independently. You can specify whether to save all artboards or a specific range. For exporting non-contiguous artboards, you can separate their numbers with commas (e.g., 1, 3, 5).
The Global Ruler Origin and Workspace
It's important to understand that when you create a new document in Illustrator, you are essentially entering a new "Workspace." This workspace includes a large gray canvas, and the tools you see are part of this workspace. The default artboard is then laid on top of this canvas. Artboards are positioned relative to a point called the "Global ruler origin." This understanding helps in grasping how artboards are placed and managed within the broader Illustrator environment.
Why Multiple Artboards?
A common question for newcomers is: why create multiple artboards when one large artboard could theoretically contain all content, or why not just use layers? The answer lies in organization, exportability, and workflow efficiency.
- Organization: Multiple artboards provide distinct, manageable areas for different design elements or versions. This keeps your canvas clean and focused.
- Exportability: As discussed, each artboard can be exported as an individual file, a capability that layers alone do not offer in the same streamlined manner.
- Workflow: For tasks like creating a set of icons, designing different ad sizes, or preparing multiple screens for a UI project, separate artboards allow for a clear, sequential, and comparative workflow. For instance, when designing a font, each letter could indeed reside on its own artboard, facilitating individual refinement and export. While layers are essential for organizing elements within an artboard, artboards define the boundaries of your final output.
Ultimate Motion Graphics Challenge vs Jake Bartlett
Conclusion
Artboards in Adobe Illustrator are far more than just digital sheets of paper; they are integral tools that empower designers to manage complex projects with unparalleled efficiency and organization. From initial document setup to intricate manipulation and final export, understanding and effectively utilizing artboards is a fundamental skill for any serious Illustrator user. By mastering these features, designers can elevate their workflows, maintain design consistency, and produce professional-quality work across a multitude of applications.
tags: #artboard #tool #illustrator