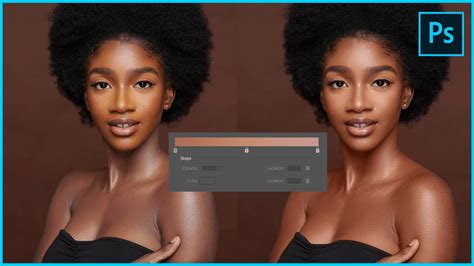
Even skin tones are a cornerstone of professional portraiture, and achieving them in post-processing can elevate a good photograph to a truly exceptional one. Whether you’re capturing subjects in a fashion shoot, spontaneous candid moments, or street photography, you might find that the skin tones in your images don't quite match reality. This tutorial will guide you through various techniques in Adobe Photoshop to address and correct these discrepancies, ensuring your subjects’ skin appears natural and consistent.
Understanding the Nuances of Skin Tone
All skin, regardless of the subject's ethnicity, contains inherent red and yellow tones. For individuals with darker complexions, blue tones also play a significant role and may require careful adjustment. It's crucial to recognize that these color casts can be influenced by a multitude of factors, including makeup application, tanning, natural skin quality, and, most importantly, the quality of lighting during the shoot. These variations, while common, can be aesthetically jarring if not addressed.
Initial Adjustments: Selective Color and Color Channels
A powerful tool for fine-tuning color is the Selective Color panel in Photoshop. This panel allows you to target specific color ranges within your image and adjust their components. You can select the Red, Yellow, or Blue color channels from the drop-down menu and then manipulate the Cyan, Magenta, Yellow, and Black sliders to alter the chosen color range.
- Cyan: Adjusting cyan affects the red tones. Increasing cyan will reduce red, while decreasing it will add red.
- Magenta: Adjusting magenta impacts green tones. Increasing magenta will add red and blue, while decreasing it will shift towards green.
- Yellow: This slider directly influences blue tones. Increasing yellow will reduce blue, and decreasing it will add blue.
While these adjustments can be applied to the entire image, it's often more effective to isolate specific areas. If your image contains background elements with strong colors that you don't want to alter, creating a layer mask over the person in your image is a vital step. This ensures your edits are confined to the skin tones, preserving the integrity of the rest of the photograph.
Advanced Techniques: Camera Raw Filter and Curves
Another highly effective feature for tonal and color adjustments is the Camera Raw Filter within Photoshop. This filter offers a comprehensive suite of tools, including sliders for exposure, contrast, highlights, shadows, whites, blacks, texture, clarity, and dehaze. Crucially, it also provides detailed color correction options that can be invaluable for skin tone refinement. Within the Camera Raw Filter, you can access HSL (Hue, Saturation, Luminance) adjustments, color grading, and calibration tools, all of which can be used to precisely sculpt skin tones.
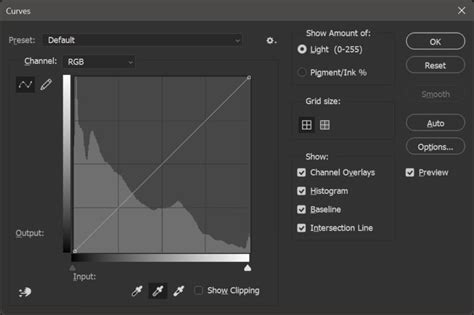
For more precise control, the Curves panel is indispensable. The "On-image adjustment tool" within Curves (represented by a pointing finger icon) is particularly useful. By enabling this tool and then holding down Ctrl+Shift (Windows) or Command+Shift (Mac) while clicking directly on a skin tone swatch in your image, you can isolate that specific tonal range. This allows you to directly manipulate the Red, Green, and Blue channels of that selected area.
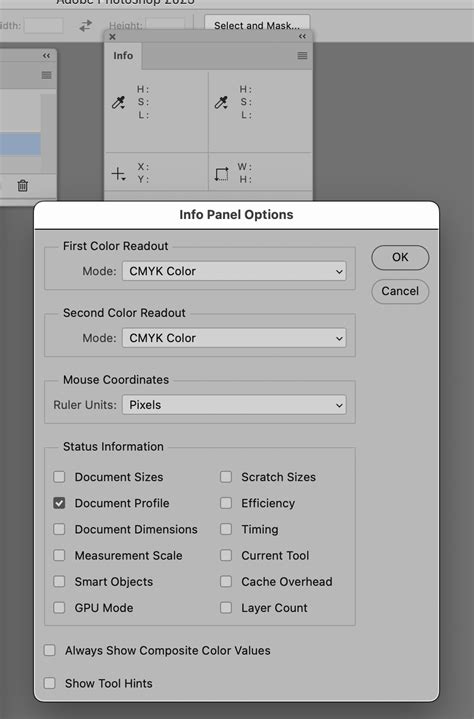
To match skin tones across different images, you can use the Color Sampler tool. This tool, found nested under the Eyedropper tool, allows you to click on specific color swatches within your images. The Info panel will then display the RGB color values for each sampled point. By sampling a target skin tone from one image and then sampling the corresponding area in the image you're editing, you can then use the Curves panel to match the RGB values. Select a midtone point in the Red channel, and adjust the Output value to match the value in the Info box for your sample skin tone. Repeat this process for the Green and Blue channels. This methodical approach helps to achieve an exact skin tone match between images.
Addressing Uneven Skin Tones Within an Image
It's a common occurrence in portrait photography for skin tones to vary across different parts of the subject's body - for instance, between the face and the body, or even between different areas of the face itself. This can be due to factors like makeup, tanning, skin texture, or localized lighting.
One approach to tackle this is by using the Lasso tool to create a selection around the area with the uneven tone. Then, using adjustment layers in conjunction with tools like Levels, HSL sliders, or Curves, you can selectively alter the problematic area. For example, if an arm appears too yellow compared to the rest of the skin, you can select that arm area, create a Hue/Saturation adjustment layer, and reduce the saturation of the yellows specifically in that region.
Another method involves sampling colors and using them as a guide. You can create a new layer, use the Brush tool to paint a color swatch of the desired skin tone, and then sample this swatch using the Eyedropper tool (hold Alt on Windows or Option on Mac to activate the Eyedropper with the Brush tool selected). You can then use this sampled color to paint over areas that need correction, or use it as a reference point for creating adjustment layers.
For more complex unevenness, techniques involving gradient maps and curves, as demonstrated in tutorials by PiXimperfect, can be highly effective. These methods often involve sampling specific skin tones and then using these samples to guide adjustments that bring consistency across the entire subject.
How To Match Skin Tones in Photoshop and Make an Action for it | Perfect Skin Tones
Replicating Skin Tones Across Multiple Photos
Matching skin tones across a series of images, such as those from a photoshoot, is a more advanced task but entirely achievable with a step-by-step approach.
- Bring the Images Together: Open both the "project image" you want to edit and the "sample image" from which you want to borrow the skin tone. With the Move tool selected, drag the sample image onto the tab of your project image. This will open the sample image as a new layer within your project image document.
- Sample the Target Color: Use the Eyedropper tool to sample the desired skin tone from the sample image. To ensure you're getting an average color and not just a single pixel's value, adjust the sample size in the top menu to "5 by 5 Average."
- Create a Color Swatch: Create a new layer above your project image and use the Brush tool to paint a swatch of the sampled color. This swatch will serve as a visual reference.
- Isolate the Skin in the Project Image: Use the Lasso tool to draw a selection around the face or skin area of the subject in your project image that you want to edit. This selection will form the basis of your layer mask.
- Use the Color Sampler Tool for Precision: For a more analytical approach, use the Color Sampler tool. Click on the desired skin tone swatch in the sample image and then click on the corresponding skin tone in your project image. The Info panel will display the precise RGB values for each sample.
- Match RGB Values with Curves: With your selection active on the project image, go to the Curves adjustment layer. Enable the On-image adjustment tool (the pointing finger). Hold
Ctrl+Shift(Windows) orCommand+Shift(Mac) and click on the skin tone swatch in your project image. With the Red channel selected in Curves, match the Output value to the RGB value of the sample image found in the Info panel. Repeat this for the Green and Blue channels. - Refine the Layer Mask: Once the skin tones are closely matched, you may need to refine the layer mask to ensure the edits affect only the intended skin areas. You can fill the mask with black and then use a soft brush with a low opacity to paint back the areas you want to affect, ensuring a seamless blend.
Avoiding Artificiality: The "Less is More" Principle
When undertaking any retouching, especially skin tone correction, it's paramount to remember the adage: "less is more." Overly aggressive adjustments can lead to an unnatural, artificial look that detracts from the photograph's authenticity. Aim for subtle, nuanced changes that enhance the existing tones rather than completely overhauling them. The goal is to correct and refine, not to create an entirely new complexion.
Addressing Specific Issues: Hot Spots and Color Casts
For instances where a highlight on the cheek is "hot" (meaning it's overexposed and clipped to white), recovering detail in an RGB file can be impossible if the information is truly lost. However, if you're working with a RAW file, there's a greater chance that some detail can be salvaged through careful exposure and highlight recovery adjustments.
When dealing with a slight yellow hue on an arm, for example, you can select the arm area and use the Selective Color panel to decrease the Yellow slider within the Yellow channel, or increase the Cyan slider within the Red channel. Conversely, if a hand has a bluish cast and appears darker, you might need to increase the Yellow slider in the Yellow channel or adjust the overall brightness and contrast of that specific area using a Curves or Levels adjustment layer.
The Role of Video Tutorials and Professional Guidance
The visual medium of video tutorials can be incredibly beneficial for learning Photoshop techniques. Resources like those from Phlearn and PiXimperfect offer in-depth, step-by-step guidance on a wide range of retouching tasks, including skin tone correction. These tutorials often break down complex processes into manageable steps, making them accessible even for those relatively new to Photoshop. They frequently cover essential techniques such as removing blemishes, evening out skin texture, and, of course, achieving consistent and natural-looking skin tones.
How To Match Skin Tones in Photoshop and Make an Action for it | Perfect Skin Tones
By combining the knowledge gained from these resources with the practical application of Photoshop's powerful tools, you can confidently address even the most challenging skin tone issues, leading to polished and professional-looking portraits. Remember to experiment with different adjustments, always keeping the natural appearance of skin in mind, and to practice the "less is more" philosophy for the most aesthetically pleasing results.