The Paint application, a staple within the Windows operating system, has evolved from its humble beginnings as a simple drawing tool into a surprisingly capable graphics editor. For users of Windows 11, Paint, particularly with recent updates, offers a streamlined and accessible method for image manipulation, including the powerful feature of background removal. This capability allows for quick edits and the creation of visually striking compositions by isolating subjects from their original settings.
The Evolution of Paint: AI-Powered Background Removal
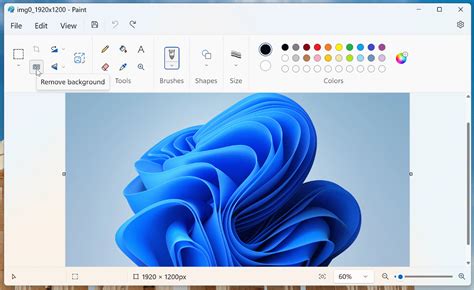
Microsoft is actively enhancing the Paint experience, rolling out updates that introduce sophisticated functionalities. For users with Paint version 11.2412.271.0 and higher, especially those in the Windows Insider program channels (Canary, Dev, Beta, and Release Preview), a significant advancement is the integration of the Copilot menu. This menu acts as a gateway to intelligent features designed to accelerate image generation and editing tasks. By clicking the Copilot icon on the toolbar, users can access a drop-down menu that includes options such as Cocreator, Image Creator, Generative erase, and the highly anticipated "Remove background" feature. It's important to note that the Cocreator functionality is currently exclusive to Copilot+ PCs, underscoring Microsoft's commitment to leveraging AI across its software ecosystem.
Effortless Background Removal: The One-Click Solution
The primary method for removing backgrounds in the updated Paint application is remarkably straightforward, designed for speed and ease of use.
- Access the Tool: Launch Microsoft Paint on your Windows 11 PC.
- Open Your Image: Navigate to "File" and then "Open" to import the image you wish to edit.
- Locate the Feature: On the toolbar, you will find the "Remove background" button.
- Execute the Removal: Click or tap on the "Remove background" button.
- Wait for Processing: The application will take a brief moment to analyze the image and compute the background removal.
- View the Result: The background will be automatically removed, leaving a clean cutout of the main subject.
This automated process is designed to deliver a smooth cutout, making it ideal for users who need to quickly isolate elements from an image without extensive manual editing.
Refining the Cutout: Using Layers for Transparency
Once the background has been removed, the resulting image might have a solid color background, or the transparency might be implied. For true transparency, which allows the subject to be placed seamlessly onto any other background, the Layers feature can be utilized.
- Access Layers: If the Layers feature is available in your version of Paint, locate and activate it.
- Hide Background: Within the Layers panel, you should find an option to "Hide background" or a similar function that makes the background layer transparent.
This step ensures that the cutout is truly transparent, ready for integration into other designs or projects.
Targeted Background Removal: Selecting Specific Areas
For situations where you only want to remove the background from a particular section of an image, Paint also provides a more targeted approach.
- Select the Area: Click or tap on the rectangle "Select" button on the toolbar.
- Define the Region: Draw a selection box around the specific area of the image from which you want to remove the background.
- Initiate Removal: With the area selected, click on the "Remove background" button on the toolbar.
- Observe the Outcome: The background within the selected region will be removed, leaving the specified area clear.
This method offers a degree of control for more complex images or when only a portion of the background needs to be addressed.
Understanding the Limitations: Custom Background Colors
While the "Remove background" feature in Paint is powerful, it's important to understand its current capabilities. As of now, this specific feature does not offer the ability to pre-select a custom background color directly during the removal process. The primary function is to remove the existing background, effectively making it transparent or replacing it with a default.
For users who require more granular control over background colors, Microsoft offers an alternative solution within its software suite.
A Workaround with Paint 3D
Paint 3D, a more advanced graphics application that comes pre-installed with Windows 11, provides enhanced capabilities for image editing, including greater flexibility with backgrounds.
- Launch Paint 3D: Open the Paint 3D application on your PC.
- Import Image: Click on "Menu" in the top left corner, then select "Open" and "Browse files" to add your image.
- Utilize Magic Select: Locate and click on the "Magic Select" option in the toolbar. This tool is designed to intelligently identify and isolate objects within an image.
- Define and Refine: Adjust the selection area to precisely fit around the object you wish to keep. After clicking "Next," the tool will attempt to isolate the subject. The "Add" and "Remove" icons can then be used to fine-tune the selection, ensuring accurate isolation.
- Confirm and Delete: Once satisfied with the selection, click "Done." You can then delete the remaining parts of the image to isolate your subject.
- Enable Transparent Canvas: To make the canvas itself transparent, navigate to the "Canvas" tab in the toolbar and toggle the "Transparent Canvas" option.
- Save as PNG: To preserve the transparency, go to "Menu" > "Save As" > "Image," and choose the ".png" file format. Save your cutout with a descriptive name.
Paint 3D, with its "Magic Select" and "Transparent Canvas" features, offers a more robust workflow for achieving precisely colored or transparent backgrounds.
Remove Background from a Photo using free Paint 3D
Simplifying Background Removal with Dedicated Photo Editors
While Paint and Paint 3D offer built-in solutions, the reality is that for some, the process of manual selection or intricate edge refinement can be time-consuming. For those seeking maximum efficiency, especially for tasks like background transparency, dedicated photo editing applications leveraging Artificial Intelligence can be a game-changer.
AI-powered photo editing apps are specifically designed to streamline such tasks. By uploading an image, these tools can automatically detect the subject and remove the background with remarkable accuracy. This approach eliminates the need for detailed manual adjustments and can be performed on various devices, not just a PC with specific software installed.
Example Workflow with an AI Photo Editor (e.g., Photoroom):
- Access the Tool: Download a mobile app like Photoroom or visit its web-based platform.
- Upload Image: Use the "Remove Background" option or "Start from Photo" to upload your image.
- Automatic Processing: The AI will automatically identify and remove the background.
- Choose Background: Select the "Transparent background" option or choose from a variety of other background choices provided by the app.
- Download: Save your edited image.
These AI tools handle the complex processing, allowing users to achieve professional-looking results in a matter of seconds.
The Practicality of Transparent Backgrounds
The need for transparent backgrounds extends far beyond mere aesthetics; it serves numerous practical purposes, particularly in professional and commercial contexts.
Logos and Digital Assets
Transparent backgrounds are the industry standard for logos and other digital branding elements. This allows a logo to be placed on any colored background, image, or texture without clashing. Consistent branding across various platformsâfrom websites and social media to print materialsâis significantly enhanced when logos and icons are free of distracting backgrounds. This ensures that the focus remains squarely on the brand identity.
E-commerce Product Showcasing
For online retailers, displaying products effectively is paramount. Transparent backgrounds enable product images to be placed on diverse backgrounds, ideal for creating visually appealing listings on platforms like Etsy or for use in marketing campaigns. Imagine a bakery showcasing cupcakes; a transparent background allows these images to be overlaid onto seasonal or holiday-themed backdrops for targeted promotions. Similarly, for items like handmade jewelry or home decor, a transparent background ensures the product is the sole focus, preventing cluttered or distracting elements from deterring potential buyers. This versatility also extends to suggesting complementary products; a transparent image of a table lamp can be easily placed alongside an image of a matching table, creating a cohesive visual without requiring a staged photoshoot.

Custom Merchandise and Print Materials
Businesses looking to create branded merchandise, such as mugs or t-shirts, benefit immensely from transparent backgrounds. A design with a transparent background can be effortlessly placed on merchandise of any color or texture, avoiding the unsightly white square that often surrounds non-transparent graphics. This freedom allows for creative experimentation with different color schemes and materials, ensuring brand consistency across all products.
For print materials like flyers and posters, transparent images are invaluable. A pizza shop owner, for instance, can easily incorporate their logo and appealing product shots into a flyer design without worrying about matching backgrounds. This results in professional-looking promotional materials that are cost-effective and visually impactful, often negating the need for a professional graphic designer for basic layout tasks.
AI-Driven Background Removal in Paint 3D and Paint
Microsoft has further integrated AI into its creative tools, bringing advanced background removal capabilities directly to Paint 3D and the standard Paint application. These updates mean that users no longer need to rely on third-party software for this common editing task.
Updating Your Applications:To access these features, ensure you have the latest versions of Paint or Paint 3D installed from the Microsoft Store.
Steps for Background Removal in Microsoft Paint:
- Open Paint: Launch the Microsoft Paint application.
- Import Image: Open the image you intend to edit.
- Locate "Remove Background": In the Command bar, find and click the "Remove Background" option.
- AI Processing: Paint will utilize its AI to analyze the image, identify the subject, and remove the background.
- Review and Refine: The edited image will be displayed without its original background. For more precise control, use the selection tool to highlight specific areas before clicking "Remove Background."
- Save: Go to "File" > "Save as" and choose either PNG or JPEG format. Saving as PNG is recommended for maintaining transparency.
Steps for Background Removal in Microsoft Paint 3D:
- Open Paint 3D: Launch the Paint 3D application.
- Import Image: Open your desired image.
- Select "Magic Select": Navigate to the toolbar and click on the "Magic Select" option.
- Define Area and Proceed: Customize the focus area around your subject and click "Next."
- Preview and Adjust: Preview the cutout to ensure accuracy. Use the "Add" and "Remove" tools for any necessary adjustments.
- Confirm: Once satisfied, click "Done."
- Enable Transparency: Go to the "Canvas" tab and toggle "Transparent Canvas."
- Save as PNG: Select "Menu" > "Save As" > "Image" and choose the PNG format to preserve transparency.
These integrated AI features represent a significant step forward for Microsoft's built-in editing tools, making advanced image manipulation more accessible to all Windows users.