Understanding how to effectively compare your original image with its edited version is a cornerstone of proficient photo editing. Adobe Lightroom, a powerful suite of tools for photographers, offers several intuitive ways to visualize these transformations. The "Before and After" comparison feature is not merely a cosmetic addition; it's an essential tool that allows you to quickly assess the impact of your creative decisions, from initial cropping to intricate adjustments. This article will explore the various methods Lightroom provides for viewing these comparisons, offering insights into how they can enhance your workflow and prevent over-processing.
Accessing the Before and After Tools in Lightroom
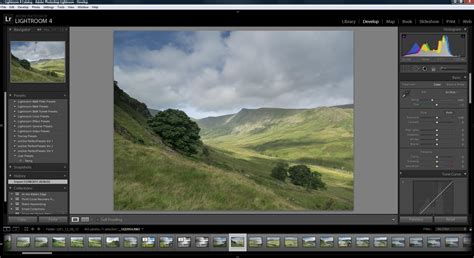
To engage with Lightroom's "Before and After" comparison tools, you must first navigate to the Develop module. Once in this module, the primary visual cue for these functions is often a button displaying "Y|Y" located on the bottom left. Should this button not be immediately visible, a small triangle situated beneath the image preview can be clicked, revealing a "View Modes" menu where the comparison options can be accessed.
The "Y" Keyboard Shortcut: Instant Comparison
One of the most immediate and frequently used methods for viewing your original image is through a simple keyboard shortcut. Pressing the "Y" key on your keyboard will instantly present a full-sized view of how your image appeared before any editing commenced. This allows for a rapid assessment of the changes made.
Navigating Through Lightroom's Menu System
For those who prefer a more deliberate approach, the Lightroom menu system offers a clear pathway to the "Before and After" views. By navigating through the appropriate menu options, you can access the various comparison modes. This method, while perhaps less immediate than a keyboard shortcut, provides a structured way to engage with the comparison tools, ensuring you understand each step of the process.
Utilizing the Toolbar for Visual Comparisons
Below the image preview in the Develop Module, a toolbar offers direct access to editing functions. If this toolbar is not visible, pressing the "T" key on your keyboard will toggle its display. Within this toolbar, you will find controls that enable different "Before and After" viewing modes. The appearance of the "Y|Y" button on this toolbar can vary, as it often reflects the last viewing mode that was active.
Diverse Viewing Modes for Enhanced Analysis
Lightroom offers a variety of viewing modes to suit different editing needs and preferences, allowing for nuanced comparisons between the original and edited states of an image.
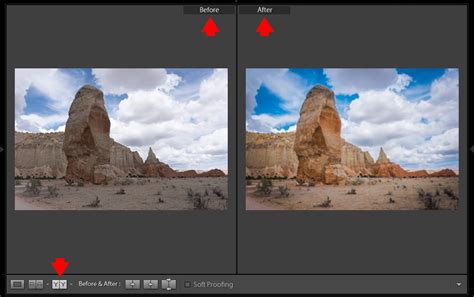
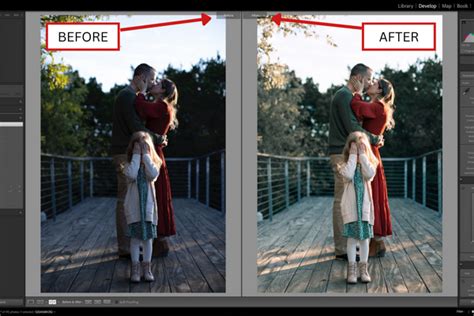
Side-by-Side Comparison: The Left/Right View
A highly effective method for comparing the original and edited images is the side-by-side view. This mode presents both versions of the photograph next to each other, enabling a direct and immediate contrast of the alterations. The keyboard shortcut "Y" can also be used to quickly switch to this Left/Right image comparison, making it an efficient part of your editing workflow.
Top/Bottom View: Vertical Comparison
Another useful visual arrangement is the Top/Bottom view. In this mode, your original, unedited image is displayed on the top half of the screen, while your current edited version occupies the bottom half. This vertical split can be particularly helpful for analyzing changes in specific areas of the image, such as the sky or foreground.
Split Screen View: Blending Original and Edited
The Split Screen view offers a unique way to compare your image. This mode displays your entire image, but with one half remaining unedited and the other half showcasing your edits. This creates a striking visual where the transition from original to edited is seamless across the dividing line. The Split Screen view can also be configured in a Top to Bottom orientation, mirroring the Top/Bottom view but with the edit line dividing the image horizontally. This flexibility allows photographers to choose the orientation that best highlights the specific changes they have made.
Full-Sized Original View: A Focused Look
While some versions of Lightroom, particularly Lightroom CC, may have a more limited selection of comparison tools, they generally allow for viewing a full-sized version of your original image. This is crucial for understanding the raw data you started with and the extent to which you have transformed it.
Advanced Comparison Techniques and Workflow Enhancements
Beyond the basic "Before and After" views, Lightroom provides more sophisticated tools and techniques to manage and compare image states, especially for complex editing projects.
The Versions Tool: Tracking Editing Progress
The Versions tool, accessible at the bottom right of the Edit panel, is a powerful feature for managing your editing journey. It allows you to create and save distinct versions of your image at various stages of the editing process.
Named Versions: Creating Virtual Copies
The "Named" option within the Versions tool enables you to create a "virtual copy" of your image in its current edited state. You can then name this version descriptively. By clicking on a named version at any time, you can revert to that specific editing stage and compare it against your current progress. This is invaluable for experimenting with different editing styles or recovering from a particular adjustment.
Auto Versions: Automatic Saving of Progress
The "Auto" option automatically saves different versions of your photo at regular intervals as you work. This acts as a safety net, ensuring that you have a record of your editing progression without requiring manual intervention. If you make a series of edits that don't yield the desired result, you can easily revert to an earlier auto-saved version.
My Lightroom (Cloud Version) Workflow
Reference View: Setting a Custom "Before" State
Sometimes, the default "Before" state (which is typically the imported image) is not the specific point you wish to compare against your final edits. Lightroom Classic's Reference View, accessed via the keyboard shortcut Shift+R, allows you to set a custom "Before" state. You can drag a desired state from the History panel into the "Before" preview area, or right-click on a Snapshot and choose "Copy Snapshot Settings to Before." This provides immense flexibility in defining your comparison baseline.
Compare View: Selecting and Candidate Images
The Compare View (C keyboard shortcut) is designed for evaluating multiple images side-by-side. It allows you to designate one image as the "select" (your primary focus) and others as "candidates" for comparison. This is particularly useful when trying to decide between slightly different edits or when culling images.
The History Panel: A Chronological Record of Edits
The History panel in the Develop Module provides a chronological log of every adjustment made to an image. Clicking on the very first entry in the History list will display your unedited photo, effectively serving as a "Before" view. This panel is fundamental for understanding the sequence of your edits and for pinpointing when a particular change was made.
Customizing the "Before" State with History
As mentioned, the History panel is not just for viewing the initial state. You can drag and drop specific history states into the "Before" preview area of the Reference View. This allows you to compare your current edits against any intermediate stage of your editing process, offering a highly granular level of control.
Snapshots: Saving Specific Editing Milestones
Snapshots are another powerful feature for managing editing states. They allow you to save specific configurations of adjustments at any point in your editing workflow. You can then easily switch between these snapshots to see how different sets of edits affect the image. Right-clicking on a Snapshot and selecting "Copy Snapshot Settings to Before" is a direct way to use a saved snapshot as your comparison point.
Avoiding Over-Processing: The Importance of Stepping Away
A crucial aspect of effective editing, and one where "Before and After" comparisons are vital, is avoiding over-processing. When you spend extended periods working on an image, your eyes can become accustomed to the changes, leading to a skewed perception of color and contrast.
The Perils of Prolonged Exposure
During the editing process, we become so immersed in the image that our visual perception adapts. Colors that might appear jarring or overly saturated to a fresh pair of eyes can seem normal to us after prolonged viewing. This can lead to subtle or even drastic over-editing without us realizing it.
The Power of a Fresh Perspective
One of the most effective strategies to combat over-processing is to simply step away from the computer. Even a short break, a few minutes or hours, can reset your visual perception. When you return to your editing, you'll often see the image with a renewed perspective, more readily identifying areas that may have been pushed too far. This is where the "Before and After" tools become indispensable for a quick reality check.
Lightroom Classic vs. Lightroom CC: Evolving Comparison Tools
It's important to note that the feature set can vary slightly between different versions of Lightroom. Lightroom Classic, the more feature-rich desktop application, generally offers a broader range of comparison tools. Lightroom CC, the cloud-based version, while continually evolving, may have a more streamlined set of options. For instance, as noted, Lightroom CC currently offers the full-sized original image view and relies more heavily on the Versions tool for tracking edits.
Real-World Examples: Demonstrating the Power of Lightroom Edits
To truly appreciate the capabilities of Lightroom's editing tools, examining "Before and After" examples is essential. Many photographers showcase their transformations, highlighting how they achieve vibrant, dream-like, or dramatically altered images using Lightroom exclusively or in conjunction with Photoshop.
Mushroom Duo: From Forest Find to Dreamy Scene
Consider a photograph of a mushroom duo captured during a forest walk. The original image might be well-composed but lack a certain magical quality. Through Lightroom edits, warm tones can be introduced to specific areas, enhancing the earthy feel. Further adjustments might involve subtle color grading and contrast enhancements to bring out the textures and details of the mushrooms and their surroundings. The "Before and After" view would clearly illustrate the shift from a good photograph to an enchanting one.
Freezing Bubbles: Capturing Golden Hour Magic
Another compelling example involves photographing freezing bubbles during sunset. The initial capture might be bright but lack the desired golden hour warmth. Lightroom edits can introduce this warmth through presets and selective adjustments. Masking techniques can be employed to control the brightness of individual elements, like the bubbles themselves, ensuring they don't appear overexposed. Adjustments to the background can further refine the mood, perhaps by subtly darkening it to make the illuminated bubbles stand out more dramatically. The "Before and After" comparison would reveal the transformation from a well-lit but ordinary scene to a captivating, atmospheric photograph imbued with the magic of the setting sun.
The Impact of Presets and Layered Editing
Some photographers utilize a workflow that involves applying multiple presets, even across different editing sessions. A common technique to overcome the limitation of applying only one preset at a time in Lightroom is to export the image after the first preset application, and then re-import it to apply a second preset. This layered approach, combined with further manual adjustments in Lightroom or Photoshop, can lead to dramatic color transformations and unique stylistic outcomes. The "Before and After" views are crucial for monitoring the cumulative effect of these layered edits.
Clearing History: Optimizing Your Catalog
An advanced tip for Lightroom Classic users involves managing the History panel. Clearing the history of edits can help reduce the size of your catalog, which in turn can improve performance, decrease memory usage, and shorten backup times and sizes. This can be done for individual photos or batched for multiple selected photos. While this action clears the detailed editing log, the "Before" state is still accessible through other means, such as saved Snapshots or the initial import state.
The Creative Journey: Experimentation and Personal Style
Ultimately, the "Before and After" comparison tools in Lightroom are more than just technical aids; they are integral to the creative process. They empower photographers to experiment, to push boundaries, and to refine their unique artistic vision. By understanding and utilizing these comparison features effectively, you can gain confidence in your editing, avoid common pitfalls, and consistently transform good photographs into truly compelling images that resonate with your personal style. The ability to clearly see the journey from raw capture to final artwork is a testament to the power of digital editing.