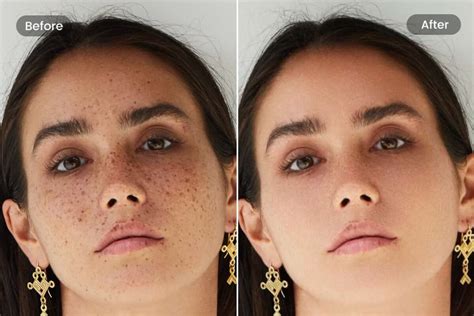
Removing blemishes and imperfections from photographs is a fundamental skill in digital retouching, enhancing the overall aesthetic of an image and presenting a polished final product. Adobe Photoshop offers a suite of powerful tools designed for this purpose, with the Healing Brush and Spot Healing Brush tools being paramount among them. This tutorial will guide you through the efficient removal of blemishes, from minor spots to more significant imperfections, ensuring a natural and seamless result. We will delve into the functionalities of both the Spot Healing Brush and the Healing Brush, exploring how to leverage their unique capabilities for optimal outcomes.
Setting Up Your Workspace for Blemish Removal
Before diving into the retouching process, establishing a non-destructive workflow is crucial. This ensures that your original image remains untouched, allowing for easy revisions or a complete reset if needed. The provided tutorial emphasizes opening a file, specifically Blemish.jpeg, and immediately implementing a layer-based approach.
The first step involves creating a new layer, which will be designated for your adjustments. This layer is aptly titled Blemish Adjusted. Simultaneously, it is recommended to rename your background layer to Blemish Original. By locking the Blemish Original layer, you safeguard the integrity of your source image while dedicating your editing efforts to the new Blemish Adjusted layer. This practice is a cornerstone of professional retouching, ensuring flexibility and preserving the original quality of the photograph.
What is Non-Destructive Editing? | Photoshop Tutorial | PHLEARN
The Spot Healing Brush Tool: Effortless Imperfection Eradication
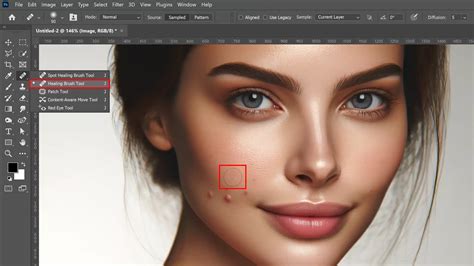
The Spot Healing Brush Tool is often the first line of defense against minor blemishes. Its primary advantage lies in its automated nature; Photoshop intelligently samples surrounding pixels and blends them to conceal the imperfection. This tool is readily accessible within the same gallery as the Healing Brush Tool, typically found by clicking and holding on the icon.
To effectively use the Spot Healing Brush Tool, adjusting its size is paramount. The general guideline is to set the brush size slightly larger than the blemish you intend to remove. This ensures that Photoshop has ample surrounding pixels to sample from for a natural blend. For many common blemishes, a size around 50 proves effective, though this will vary depending on the image resolution and the size of the imperfections.
To get a closer look at the areas you'll be working on, zooming into the image is essential. This can be achieved using the keyboard shortcut Ctrl + Plus (+). Once zoomed in, you can navigate the image by holding Ctrl and using your mouse wheel to scroll up and down or right and left.
With the Spot Healing Brush Tool selected and appropriately sized, the application is straightforward: simply click over a blemish. Photoshop then takes over, analyzing the surrounding area and applying a healed texture. For smaller blemishes, individual clicks are sufficient. For larger or more elongated imperfections, you can click and drag the Spot Healing Brush Tool over the area. Photoshop will then attempt to blend the sampled pixels to conceal the blemish.
It's important to remember that while the Spot Healing Brush Tool offers convenience, its direct application on a layer can be considered destructive if not managed properly. However, by working on a separate layer, as outlined in the setup, you mitigate this risk. If you need to revert a change, you can always undo it using Ctrl + Z (or Command + Z on Mac) or by navigating through the History panel. Toggling the visibility of your adjustment layer allows you to quickly compare the retouched area with the original, demonstrating the impact of your edits.
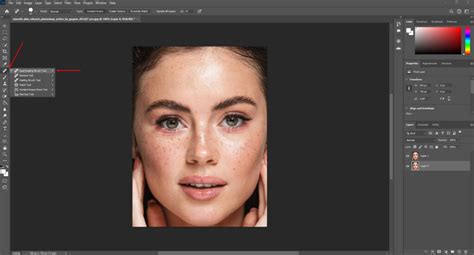
The Healing Brush Tool: Precision Control for Complex Edits
While the Spot Healing Brush Tool excels at quick fixes, the Healing Brush Tool offers greater control, particularly for larger or more complex blemishes where specific source areas need to be defined. This tool is located in the same group as the Spot Healing Brush Tool.
The fundamental difference between the two tools lies in their sampling method. The Healing Brush Tool requires you to manually define a source point from which Photoshop will sample pixels. Without this explicit definition, attempting to use the tool will yield no results.
To define a source point, you need to press and hold the Alt key (or Option key on Mac) and then click on an area of the image that possesses the desired texture, color, and tone. This sampled area will serve as the source for healing. Your cursor will transform into a target reticle, indicating the sampled area.
Once a source point is established, you can move to the blemish you wish to correct. As you hover over the blemish, you will see a preview of how the sampled pixels will be applied. Clicking and dragging slightly allows Photoshop to blend the sampled pixels, effectively healing the imperfection.
For optimal results, it is often necessary to select new source points frequently. This is especially true when working on areas with varying skin tones or textures. If a particular healing attempt results in an unnatural appearance, such as a patch that is too light or too dark, simply use Alt + Click again to select a more appropriate source area. The flexibility of the Healing Brush Tool allows for meticulous control, ensuring that the healed areas blend seamlessly with the surrounding skin.
When dealing with larger blemishes or areas that require extensive retouching, clicking and dragging with the Healing Brush Tool can be effective. However, be mindful that Photoshop may repeat pixels from the sampled area. Adjusting your source point regularly will help maintain a natural appearance.
Advanced Techniques and Considerations
Beyond the core functionalities of the Spot Healing Brush and Healing Brush Tools, several advanced techniques and considerations can elevate your blemish removal process.
Content-Aware Mode: For the Spot Healing Brush Tool, setting the "Type" option in the Options bar to Content-Aware often yields superior results. This mode allows Photoshop to analyze the surrounding content and generate a more intelligent blend, effectively removing the blemish while preserving the underlying texture and detail.
Sample All Layers: When working on a separate layer for adjustments, ensuring that the Sample All Layers option is checked in the Options bar is crucial. This allows the Spot Healing Brush Tool to sample pixels from all visible layers, including your original background layer, ensuring that the healing is based on the complete image context.
Blend Modes: For skin retouching, experimenting with different blend modes for the Spot Healing Brush Tool can be beneficial. The Lighten blend mode is particularly useful for removing darker blemishes, as it will only replace pixels that are darker than the sampled texture. Conversely, if a blemish is lighter than the surrounding skin, the Darken blend mode can be employed.
The Patch Tool: For larger, more irregular areas that need correction, the Patch Tool can be an invaluable asset. This tool allows you to select a flawed area and then drag that selection to a clean area of the image, effectively replacing the selected imperfection with the sampled texture. To use the Patch Tool effectively, it's often recommended to first create a merged layer by pressing Ctrl + Alt + Shift + E (or Command + Option + Shift + E on Mac). Then, select the Patch Tool, draw a selection around the blemish, and drag the selection to a suitable source area.
Zooming and Observation: Throughout the blemish removal process, consistent zooming in and out is essential. Zooming in allows for precise work on individual blemishes, while zooming out provides a broader perspective to assess the overall impact of your edits and identify any areas that may require further attention. It's also important to distinguish between blemishes and natural features like birthmarks. Close inspection is key to making informed decisions about what to remove.
Fine-Tuning with the Spot Healing Brush: After utilizing the Healing Brush Tool for larger corrections, it's often beneficial to revisit the Spot Healing Brush Tool for final fine-tuning. This allows you to address any remaining small spots or subtle imperfections that may have been overlooked.
Saving Your Work: As you progress, remember to save your work regularly. It is highly recommended to save your Photoshop file with an appended title, such as "Blemish Adjusted," to clearly distinguish it from the original. Opting to maximize compatibility when saving can be beneficial for broader usability.
Understanding the Underlying Principles
The effectiveness of Photoshop's blemish removal tools stems from sophisticated algorithms that analyze image data. The Spot Healing Brush, in particular, acts as a texture replacement tool. It identifies problematic texture in a selected area and replaces it with desirable texture sampled from the surrounding pixels. This sampled texture is then blended with the original tone and color of the problem area, creating a seamless "healing" effect.
The Healing Brush Tool operates on a similar principle but requires explicit user guidance for the source sampling. This manual control is advantageous when precise replication of specific skin tones or textures is necessary. The Spot Healing Brush streamlines this process by automating the sampling, making it significantly faster for general retouching tasks.
When retouching skin, the goal is to remove imperfections while preserving the natural texture and subtle variations that give skin its realistic appearance. Tools like the Spot Healing Brush are designed to analyze and replicate these subtle details, preventing the overly smooth or artificial look that can result from less sophisticated editing techniques.
Conclusion: A Path to Polished Portraits
Mastering blemish removal in Photoshop is an attainable skill that significantly enhances portrait photography and other image-editing workflows. By understanding and effectively utilizing the Spot Healing Brush Tool and the Healing Brush Tool, along with complementary tools like the Patch Tool, you can achieve professional-grade results. Remember the importance of a non-destructive workflow, meticulous attention to detail, and regular practice to refine your technique. The ability to subtly correct imperfections allows for the presentation of subjects in their best light, creating images that are both aesthetically pleasing and true to life.