Achieving perfect focus in photography is paramount, but not every shot lands with pinpoint accuracy. Whether it's a slight miss on the eyes of a portrait subject or a bird's head that isn't as sharp as its wings, out-of-focus images can be a photographer's frustration. While the ideal scenario is to "get it right at the source" with precise camera settings and focus, sometimes the moment is unrepeatable, and we need to rely on post-processing to salvage our images. Fortunately, Adobe Lightroom offers a powerful suite of tools to address issues of focus and enhance image detail, allowing you to bring attention to the most important elements of your photograph. This tutorial delves into the various methods within Lightroom to adjust focus, sharpen details, and even create the perception of perfect focus where it might have been slightly missed.
Understanding the Nuances of Sharpening and Focus Adjustment
Sharpening is a crucial post-processing technique that helps your picture have a little more punch and can allow details to pop and draw attention. It works by increasing edge definition, making details appear crisper. However, it's vital to understand that sharpening is not a magic bullet for fixing truly out-of-focus images. If a subject is significantly blurred, global sharpening will merely make everything uniformly sharper, including the already in-focus sections, and can even exacerbate noise artifacts. The key to effective sharpening, especially when dealing with imperfect focus, lies in selective application.
Image noise, which includes luminance (grayscale) noise that makes an image look grainy and chroma (color) noise, usually visible as colored artifacts, can degrade image quality. Sharpening can sometimes amplify these unwanted artifacts, particularly when zooming in close. To avoid creating these artifacts, you can sharpen only those areas that have interesting detail and those to which you want to draw attention. This selective approach is where Lightroom's local adjustment tools truly shine.
Leveraging Local Adjustments for Precision Sharpening
Lightroom Classic provides powerful local adjustment tools that allow you to apply specific effects, like sharpening, to only the most important areas of a photo. These tools include the Adjustment Brush, the Radial Filter, and the Graduated Filter.
The Adjustment Brush: Your Go-To for Targeted Edits
The Adjustment Brush is an indispensable tool for photographers looking to fine-tune specific areas of their images. It allows for precise application of edits, ensuring that only the desired parts of your photograph receive the treatment.
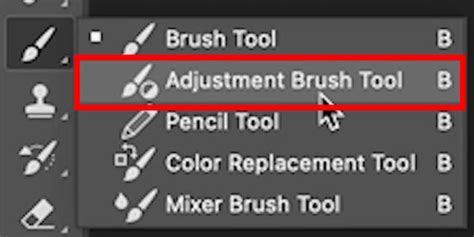
To begin using the Adjustment Brush, open the Adjustment Brush tool by pressing the letter 'K' on your keyboard, or by navigating to the Develop module and clicking the brush icon located under the Histogram. To visualize your brush strokes, press the letter 'O' to activate the overlay. This will show you the areas you are painting on, often in a red tint.
A crucial setting within the brush panel is "Auto Mask." Check the box for Auto Mask, or press the letter 'A'. This feature is incredibly useful for maintaining clean edges. When Auto Mask is active, Lightroom attempts to detect edges and confine your brush strokes to distinct areas. You can see that even though I used a very large brush to paint on the steeple, only the steeple is affected because I kept the center of the brush on the steeple. It’s markedly darker than the sky so Lightroom has an easy time separating the two. This intelligent masking prevents the brush from bleeding into adjacent areas, ensuring a more professional and polished result. Now, just paint the subject you wish to refine.
When you adjust the Sharpening slider within the brush panel, it is imperative that you zoom in to view the photo at 100% first. Only at 100% can you see the complete effect of sharpening. If you view from farther away, you’ll probably overdo it, leading to an unnatural and artifact-ridden appearance.
Since you’ve painted with the brush, there may be other effects you’d like to apply, too. For instance, you might want to adjust exposure, contrast, or texture in conjunction with sharpening. Simply right-click on the brush button and choose "duplicate." This creates a new brush instance with the same brush size and mask but allows you to apply different settings. As you can see, the Adjustment Brush is simple to use and allows you to apply specific effects, like sharpening, to only the most important areas of a photo.
Other Selective Adjustment Tools
While the Adjustment Brush is excellent for freehand selections, the Radial Filter and Graduated Filter offer alternative ways to apply selective edits. The Radial Filter creates an elliptical or circular area of adjustment, perfect for drawing attention to a subject or a specific part of the scene. The Graduated Filter applies a gradual transition of effects, ideal for skies or landscapes where you want a smooth blend of adjustments. These filters also allow you to adjust sharpening, texture, clarity, and many other parameters selectively.
Fine-Tuning Detail with the Detail Panel
The Detail panel in Lightroom Classic is where you can globally alter the sharpness of a photograph. This panel contains four main sliders: Sharpening, Radius, Detail, and Masking.
- Sharpening: This slider directly adjusts edge definition. An increase in this value enhances sharpness. A value of zero (0) turns off sharpening. In general, set the Amount to a lower value for cleaner images. The amount you specify is applied globally across the image.
- Radius: This setting controls how much effect the sharpening has on the edges. Photos with larger details may be able to use a larger radius. Lower settings primarily sharpen edges to remove blurring, while higher settings can introduce halos.
- Detail: This slider controls the level of detail that is enhanced. Higher settings will bring out finer details but can also accentuate noise and artifacts.
- Masking: This is a crucial slider for controlling where sharpening is applied. When you hold down the Alt (Windows) or Option (Mac) key while sliding the Masking slider, the image will display a black and white overlay. Areas that are white will receive sharpening, while areas that are black will be unaffected. This allows you to selectively sharpen only edges and details, preventing sharpening from being applied to smooth areas like skies or skin tones, thereby minimizing noise amplification.
Lightroom Detail Panel Explained
Advanced Techniques for Tackling Out-of-Focus Images
While global sharpening in the Detail panel can enhance images that are already in focus, it won't fix a fundamentally out-of-focus shot. For example, if the eyes of your dog are not sharp but the muzzle is, applying global sharpening will only further sharpen the muzzle and also sharpen the eyes, not truly solving the problem. This is where a more nuanced approach is required.
The "Blurring to Focus" Paradox
It may sound counterintuitive, but sometimes blurring your photo might actually help save an out-of-focus shot. Instead of just sharpening the out-of-focus areas, try to use global and selective adjustments to make the areas that are in focus slightly more blurred. The idea is to create a perception of focus by strategically reducing detail in the surrounding areas.
You can achieve this by using the Adjustment Brush with a balance of the sharpness, texture, and clarity sliders. Apply a reduction in these sliders to the areas that are already in focus, just enough to blend in with the surrounding environment. Overdo it, and it will look unrealistic. If you don't use enough, you'll still have the same issue. For instance, one might try a significant reduction in sharpness (-80), texture (-52), and a touch of clarity (-4) for the results to blend in with the rest of the frame.
After all, our eyes can only reference what's in the photo. If the rest of it is blurry but one section isn't, then our eyes will adjust, and our brains will tell us that this is where the focus point lies. By reducing the detail in the in-focus areas and increasing it elsewhere in a shot, you can give the perception that you've captured focus.
Utilizing Texture and Clarity
Beyond the Sharpening slider, the Texture and Clarity sliders can be valuable allies when dealing with focus issues, especially when used with local adjustments.
- Texture: This slider enhances texture and not just the sharpness of pixels. It's less fine-tuned than the sharpness slider and is therefore better for overall texture enhancement. Think of it like using a dough scraper to smooth an area rather than a precise scalpel.
- Clarity: This slider increases midtone contrast around larger edges, doing a good overall job at improving the perceived clarity of a photo, but it doesn't inherently make things sharp. It works on a larger scale than the Texture slider.
When used selectively with the Adjustment Brush, these sliders can help to either enhance the details in the desired focal area or subtly blend less focused areas into the background, guiding the viewer's eye.
Lightroom's Lens Blur Tool: Simulating Optical Bokeh
The new Lens Blur tool in Lightroom Classic adds an aesthetic blur effect to any part of your photo. This tool is particularly useful for creating a shallow depth of field or for intentionally blurring backgrounds to make a subject stand out. It allows you to easily apply optical blur and bokeh through an interactive and customizable experience.
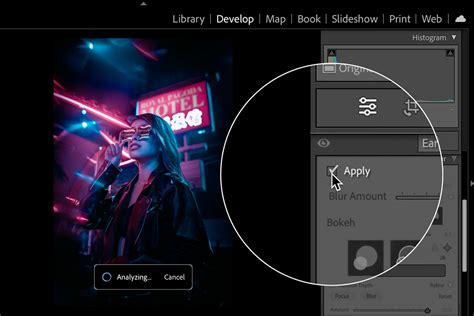
To use the Lens Blur tool:
- Select to Apply Lens Blur: Navigate to the Lens Blur section within the Develop module.
- Select the Effect: You can choose to apply the blur globally or selectively.
- Adjust the Focus Range: The Depth slider allows you to control the depth at which you want the blur effect. You can expand or contract the slider box by holding and dragging it from either side to increase or decrease the range of the effect.
- AI Subject Detection: You can also select the "Subject Focus" icon to set a focus range automatically using AI subject detection. Lightroom will analyze the image and identify the primary subject, setting the focal plane accordingly.
- Brush Refinement: For more precise control, select "Brush Refinement." Here, you can use the "Focus" brush to paint over areas you would like to remain in focus, and the "Blur" brush to paint over areas you want to blur out within the image. This offers immense control over the depth map.
- Presets: Selecting "Presets > Adaptive: Blur Background" can apply Lens Blur to an image with just one click, intelligently blurring the background. You can then adjust the intensity of the blur using the "Preset Amount" slider.
- Creating Custom Presets: You can create your own Lens Blur presets by selecting the plus icon in the Presets tab, then choosing Lens Blur along with any other settings you wish to include, and clicking "Create."
Batch Copying and Pasting Edits
Once you have applied Lens Blur adjustments to a particular photo, you can easily batch copy and paste these edits to one or multiple other images. Right-click on the picture and select "Copy Edit Settings." If you have multiple files selected, the "Sync" button lets you choose which current settings to paste from the currently selected photo onto the other selected photos. "Auto Sync" adjusts other selected photos automatically when changes to the photo are made.
Addressing Lens Imperfections: Lens Corrections
Camera lenses can exhibit different types of defects at certain focal lengths, f-stops, and focus distances. Lightroom's Lens Corrections panel is designed to automatically detect and correct these common lens issues.
- Vignetting: This causes the edges of an image, especially the corners, to be darker than the center. The "Remove Chromatic Aberration" and "Enable Profile Corrections" checkboxes in the Lens Corrections panel can help mitigate this.
- Chromatic Aberration: This appears as a color fringe along the edges of objects. It's caused by the failure of the lens to focus different colors to the same spot. Lightroom 4.1 and later provides slider controls to correct purple/magenta and green aberration (axial chromatic aberration). The "Defringe" slider, along with the "Hue" and "Green Hue" sliders, allows you to fine-tune the correction of these color fringes. You can adjust the range of affected colors and move the hue range to precisely target and remove unwanted color fringing, even using the local adjustment brush for targeted defringing.
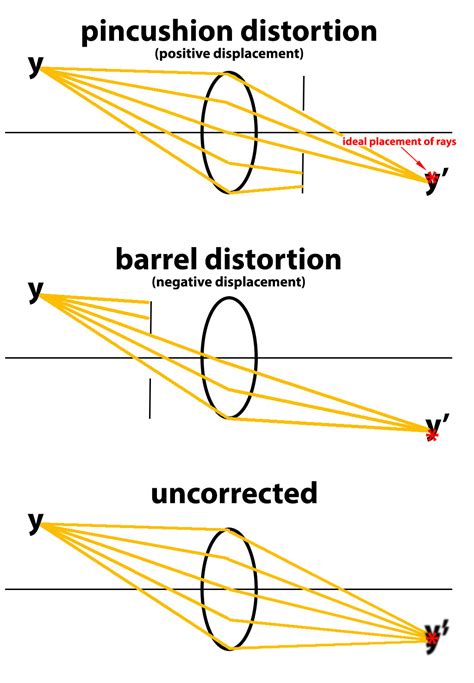
- Distortion: This refers to how lines that should be straight appear curved. Lightroom can correct for barrel distortion (lines bend outward from the center) and pincushion distortion (lines bend inward toward the center). The "Upright" tool in the Lens Corrections panel can also automatically correct for perspective distortions and camera tilt, adjusting the image scale up or down to straighten horizons and vertical lines. This can also help correct for distortions that appear in the edges of areas caused by perspective corrections.
Enhancing Mood and Atmosphere: Dehaze and Vignetting
While not directly related to focus correction, the Dehaze and Vignetting sliders can significantly impact the perceived sharpness and overall mood of an image, influencing how the viewer perceives focus.
- Dehaze: Moved from the Effects panel to the Basic panel in Lightroom Classic CC 7.3 (April 2018 release), the Dehaze slider lets you easily decrease or increase the amount of haze or fog in a photograph. Increasing Dehaze can add contrast and punch to images, making details appear more defined. Notably, Dehaze is also available as a local adjustment within the Radial Filter, Graduated Filter, or Adjustment Brush, allowing for targeted application.
- Post-Crop Vignetting: This feature in the Effects panel allows you to apply a dark or light vignette for artistic effect. Negative values darken the corners of the photo, while positive values lighten them. The "Midpoint" slider controls the area away from the corners affected by the vignette, and "Roundness" adjusts how oval the vignette effect is. The "Feather" slider controls the smoothness of the vignette’s surrounding pixels, creating a subtle or pronounced effect. Vignettes can be used to draw the viewer's eye towards the center of the image, where the main subject, hopefully in focus, resides.
The Role of Noise Reduction
It's important to remember that sharpening can amplify image noise. Therefore, judicious use of noise reduction is often necessary, especially when sharpening images that were shot in low light or at high ISO settings. The Detail panel also houses sliders for Luminance and Color noise reduction.
- Luminance Noise: Controls the luminance noise threshold. Lower values maintain more detail but might result in noisier images, while higher values reduce noise but can remove some detail.
- Color Noise: Controls the color noise threshold. Lower values remove color speckles but may result in color bleeding, while higher values are better for thin, detailed color edges but may result in color speckling.
By balancing sharpening and noise reduction, you can achieve crisp, clean images without introducing distracting artifacts.
When Perfect Focus is Unattainable
Ultimately, while Lightroom offers powerful tools to enhance sharpness and create the perception of focus, it's essential to manage expectations. You can't magically change the focus point of a photograph that was fundamentally missed, with the exception of some advanced camera technologies or proprietary software. However, by skillfully applying sharpening, adjusting texture and clarity, and strategically using local adjustments and the Lens Blur tool, you can significantly improve the visual impact of your images and guide the viewer's eye to where you want it to be. The ability to selectively edit allows you to make specific areas pop, drawing attention to the most compelling details, even if the initial focus wasn't perfect.
Photographers are passionate about making photographs and helping others make their pictures better. Whether you're shooting portraits, landscapes, or action shots, understanding these tools in Adobe Lightroom empowers you to refine your images and achieve professional-looking results, turning potentially problematic shots into compelling visual stories.