Instagram has become a powerhouse for photographers to showcase their work, but achieving that perfect, crisp image on the platform can be a frustrating endeavor. Many photographers have experienced the disappointment of uploading a beautifully edited photo from Lightroom, only to find it appearing blurry or pixelated on Instagram. This is particularly painful for those running a photography business who rely on high-quality visuals to represent their brand. While Lightroom is a premier photo editing and management platform, the quality of your Instagram uploads hinges on using the best export settings. Fortunately, optimizing your exports for Instagram is simpler than you might think. This guide will break down the process to ensure your Instagram uploads are sharp and retain their original quality.
The Root of the Problem: Instagram's Image Compression
Instagram compresses images to reduce file sizes, ensuring faster loading times and efficient server management. When you upload an image, the platform automatically resizes it to fit specific dimensions and then applies compression algorithms. This process, while necessary for the platform's functionality, can lead to a noticeable loss of image quality, particularly affecting sharpness and fine details. Understanding why Instagram compresses images is the first step in mitigating its impact.
Key Export Settings for Instagram
To combat Instagram's compression and ensure your photos look their best, several export settings in Lightroom are crucial. These include file format, resolution, color space, compression, and aspect ratio.
File Format: JPEG is Your Friend
When exporting for Instagram, the JPEG file format is both acceptable and recommended. This is especially important if you shoot in RAW, as RAW files cannot be directly uploaded to Instagram. JPEG offers a good balance between quality and file size, thanks to its compression capabilities. While Instagram supports other formats like PNG, BMP, and non-animated GIFs, JPEG is the most common and efficient choice for this platform.
Resolution and Image Sizing: Finding the Sweet Spot
The resolution of your exported image plays a significant role in its final appearance on Instagram. While it might seem intuitive to export at the highest possible resolution, Instagram actually compresses all images to a maximum width of 1080 pixels. Therefore, setting an excessively high resolution in Lightroom can work against you, forcing Instagram to compress it further and potentially degrade quality.
For optimal results, it is recommended to set your resolution to 1080 pixels on the shortest side. This ensures that Instagram doesn't need to perform additional resizing and compression, leading to a sharper and clearer image. While exporting a fairly high resolution and large image is generally advisable to give your photo the best chance against compression, aiming for 1080 pixels on the shortest side is a practical approach. Some users opt for the "JPG (Large)" preset in Lightroom, which often exports in the image's original size, assuming a high-resolution camera was used. This method preserves 100% of the JPG quality before Instagram's compression.
Color Space: sRGB for Consistency
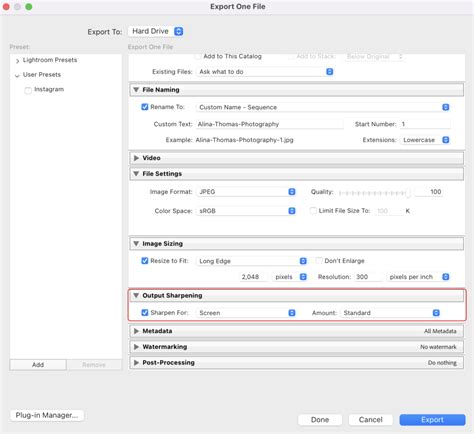
The color space determines the range of colors an image can display. For Instagram, it is crucial to use the sRGB color space. Instagram is designed to display images in sRGB, and using a different color space (like Adobe RGB) can lead to color distortion or inaccurate color reproduction on the platform and across different devices. Ensuring your exports are in sRGB guarantees that the colors you see in Lightroom are the colors that your audience will see on Instagram.
Compression and Image Quality: Maintaining Detail
When exporting JPEGs, the quality setting directly impacts the balance between file size and image detail. For Instagram, a quality level of 80-100 is recommended. This range helps maintain good image quality while keeping the file size manageable for uploads. While Instagram will inevitably compress the image, starting with a high-quality export minimizes the loss of sharpness and fine details.
Aspect Ratios: Framing Your Content for Impact
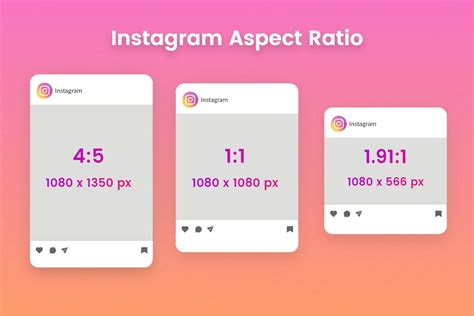
The aspect ratio of your image is critical for how it is displayed on Instagram, preventing unwanted cropping or stretching. Instagram supports several aspect ratios:
- 1:1 (Square): The default aspect ratio for Instagram posts, ideal for a classic, balanced look.
- 4:5 (Vertical): Recommended for portrait orientation, this taller format takes up more vertical screen space, drawing more attention to your subject. It's excellent for portraits and showcasing details.
- 1.91:1 (Horizontal/Landscape): For landscape orientation, this wider format is suitable for sweeping vistas, cityscapes, and wide-angle shots.
- 9:16 (Vertical/Stories & Reels): This is the standard aspect ratio for Instagram Stories and Reels, offering a full-screen, immersive experience.
Choosing the right aspect ratio depends on your content. For example, close-up portraits often benefit from a 4:5 ratio, while a breathtaking landscape might be best suited for a 1.91:1 ratio. In Lightroom, you can adjust aspect ratios using the Crop & Straighten tool.
Streamlining Your Workflow with Export Presets
To simplify the export process and ensure consistency, Lightroom's Export Preset feature is invaluable. You can save your preferred export settings and apply them with a single click. It's highly recommended to create a dedicated folder for your Instagram exports to keep your files organized.
To create a preset:
- Navigate to the Export dialog (File > Export, or click the Export button in the top right corner).
- Configure your desired settings for File Settings (File format: JPEG, Quality: 80-100, Color Space: sRGB), Image Sizing (Set resolution to 1080 pixels on the shortest side, or ensure "Original Size" is selected if using the JPG (Large) preset), and any other relevant options.
- Under the "Presets" panel on the left, click "Add" or the "+" icon and choose "Add Preset."
- Give your preset a descriptive name (e.g., "Instagram 1080px") and save it.
The "Export With Previous" Option
If you've already exported some photos and want to export more using the same Lightroom export settings, you can use the Export With Previous option. As the name suggests, if you choose this option, Lightroom will use the same settings as the last time and add your photos to the ones you had exported earlier. This is a great time-saver for batch exports.
Selecting Your Destination
When you export photos from Lightroom, whether it's to a location on your computer or to an external drive, you will have to specify where you want to export your photos to. If you want to keep things organized, you can create different folders for each export. For example, you can export all your images into a "Finals" folder and within that folder, create specific folders for social media, another for high-resolution images (for printing), and another for SEO optimization.
Create Export Presets and save time in Adobe Lightroom
Transferring Photos to Your Phone
Once your photos are exported, you'll need to get them to your phone for uploading.
For Apple Users (MacBook to iPhone):
- Find the exported photos on your computer.
- Right-click on the photos and select "Share" > "AirDrop."
- Unlock your iPhone's screen.
- Your iPhone should appear in the AirDrop window on your Mac. Click on your iPhone.
- You may receive a notification on your iPhone asking if you want to accept the AirDrop. Confirm, and the high-quality exported images will appear in your Photos album.
While this guide focuses on Lightroom export settings for Instagram, remember that the overall quality of your images on the platform also depends on the original capture and your editing prowess. By carefully selecting your export settings, you can significantly enhance how your photographs appear on Instagram, ensuring your work is presented in the best possible light. For those exporting for print, ensure your resolution is set to at least 300ppi (pixels per inch) to avoid pixelated images and low-quality prints.