The sky is a fundamental element in photography and graphic design, often setting the mood and narrative of an image. An uninspiring or poorly captured sky can detract from an otherwise compelling composition. Fortunately, Adobe Photoshop offers powerful tools to overcome these limitations, allowing for both seamless sky replacement and subtle color enhancement. This guide delves into the capabilities of Photoshop's Sky Replacement feature, powered by Adobe Firefly generative AI, and explores various techniques for enriching the sky's color, transforming ordinary photographs into visually captivating scenes.
The Power of Sky Replacement in Photoshop
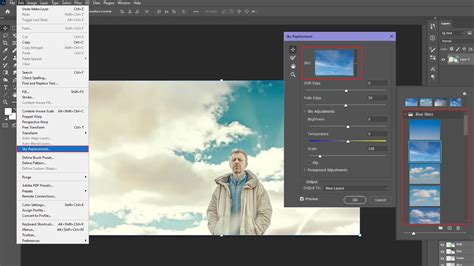
Photoshop's Sky Replacement feature provides an intelligent and efficient way to swap out a mundane sky for something more dramatic or fitting. This advanced tool leverages Artificial Intelligence to automatically detect the original sky in your image and seamlessly blend in a new one. The technology behind this feature is Adobe Firefly generative AI, an intelligent system designed to understand and manipulate image elements with remarkable accuracy.
When you access Sky Replacement, you'll find a curated collection of skies organized into three distinct categories: Blue Skies, Spectacular, and Sunset. This built-in library offers a variety of options to suit different photographic styles and moods. The process begins by opening any image that features a less-than-ideal sky. From there, navigate to Edit > Sky Replacement. This action will present you with a gallery of available skies to choose from.
Once a new sky is selected, Photoshop's AI automatically analyzes the original scene. It then intelligently adjusts the lighting and shadows of the new sky to match the existing illumination and perspective of your photograph, ensuring a more natural integration. A key advantage of this feature is that the changes are fully editable. This means you aren't locked into the initial replacement; you can further refine the result to achieve your desired aesthetic.
The AI-based Sky Replacement feature in Photoshop allows for significant customization. You can import your own sky images, providing an endless array of possibilities beyond the pre-set library. Furthermore, you can fine-tune various settings to precisely match the lighting conditions and overall mood of your photo. For optimal results, the AI-powered sky replacement tool generally performs best on photos with a clearly defined horizon and a distinct separation between the sky and the foreground elements.
The fundamental steps to replace the sky in Photoshop are straightforward:
- Pick an Image: Select the photograph you wish to edit.
- View the Gallery: Access the Sky Replacement feature and browse the available sky options.
- Let Adobe Sensei do the Work: The AI automatically detects and replaces the sky.
- Customize and Refine: Adjust settings, import your own skies, and fine-tune the integration.
Why Enhance Sky Color in Photoshop?
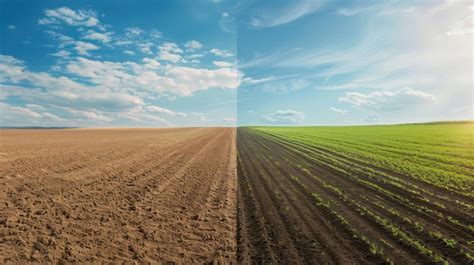
Beyond outright replacement, enhancing the existing sky's color is a crucial aspect of image editing that can dramatically elevate a photograph's impact. Color is a fundamental element in visual communication, capable of making or breaking an image. Have you ever captured an image that is perfectly composed with correct exposure, yet it feels like something is missing? It might lack that eye-catching quality or the power to truly engage your audience.
Consider two images: one with a muted, uninspired sky, and another with a sky that boasts vibrant, captivating colors. The latter almost invariably steals attention immediately. This is because color is a powerful visual language that we process subconsciously. It draws our attention, influences our emotions, and guides our perception before we even consciously understand why. Color has always been a vital tool in graphic design, advertising, and artwork for this very reason. By learning to effectively use color to enhance your images, you unlock a potent tool for storytelling and aesthetic appeal.
This tutorial will guide you through several methods to digitally enhance the color of the sky in your images, transforming ordinary photos into scenes that feel more alive and dynamic. While the examples are demonstrated in Adobe Photoshop, the underlying principles can be applied to most image editing software.
Methods for Enhancing Sky Color
Photoshop offers a variety of tools and adjustments that can be used to enhance sky color. Each method produces slightly different results, so experimenting with all of them is recommended to discover which best suits your workflow and artistic vision.
1. Contrast Adjustment
Increasing the contrast within the sky is a simple yet effective way to add depth and vibrancy. Contrast makes the bright areas of the sky brighter and the dark areas darker, leading to a more defined and visually interesting sky. While applying contrast directly to the sky will inevitably affect the foreground to some extent, this can be managed using layer masks.
Several methods within Photoshop can be employed for contrast adjustment:
- Brightness/Contrast Adjustment Layer: Accessible from the Adjustments panel, this layer allows for straightforward control over brightness and contrast. Slide the contrast adjustment bar to the right to increase contrast. It's crucial to monitor your image to avoid clipping highlights (losing detail in bright areas) or shadows (losing detail in dark areas). Ensure the "Use Legacy" box is not checked, as this can shift pixel values and increase the likelihood of clipping.
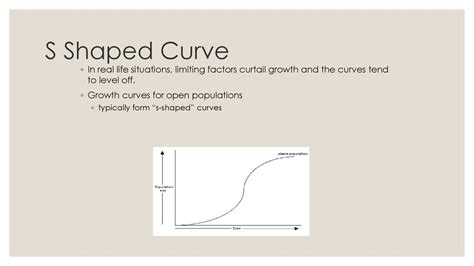
- Curves Adjustment Layer: Curves is an exceptionally versatile tool favored by many editors. After adding a Curves adjustment layer, you can create an "S-shape" curve. This shape involves subtly lowering the highlights and raising the shadows, which effectively boosts contrast. Alternatively, you can directly manipulate the curve by dragging points to achieve the desired contrast effect.
- Levels Adjustment Layer: Another powerful tool for contrast adjustment is the Levels layer. Upon selecting it, you'll see a histogram representing the tonal distribution of your image. At the bottom of this histogram are three small triangles: the left controls shadows, the right controls highlights, and the middle controls midtones. Experiment by slightly moving the left and right triangles towards the center to darken shadows and brighten highlights, respectively. Then, adjust the middle triangle to fine-tune the midtone contrast.
2. Hue/Saturation Adjustment
The Hue/Saturation adjustment layer is beneficial because it primarily targets color intensity without significantly altering the sky's brightness or darkness. Similar to contrast adjustments, applying a layer mask can prevent these changes from affecting the foreground.
Here are key tools within this category:
- Vibrance Adjustment Layer: This layer offers two sliders: Vibrance and Saturation. Increasing Vibrance selectively boosts the intensity of muted colors while having a minimal impact on already saturated colors. This feature is particularly useful for preserving natural skin tones if they are present in the image. Saturation, on the other hand, increases the intensity of all colors globally. Overusing Saturation can lead to clipped colors and loss of detail.
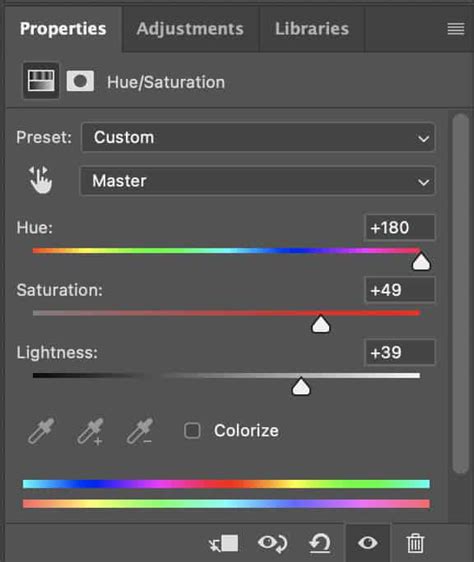
- Hue/Saturation Adjustment Layer: This is another highly favored tool. You can increase saturation globally or select specific colors to adjust. Clicking directly on a color within the image and dragging allows for targeted adjustments. Changing the blend mode to "Soft Light" can produce a more subtle and pleasing effect.
- Selective Color Adjustment Layer: This offers a more freestyle approach. You can choose a specific color range from a dropdown menu and then adjust its Cyan, Magenta, Yellow, and Black components to achieve a desired look. Experimentation with these sliders can yield unique and artistic results.
3. Photo Filter
The Photo Filter adjustment layer provides one of the quickest methods for enhancing sky color. By selecting a filter from the dropdown menu, you can instantly impart a specific color cast. Warming filters are commonly used for skies, offering different levels of warmth. Once a filter is applied, you can increase its density to amplify the color saturation.
It's advisable to check the "Preserve Luminosity" box to ensure the brightness of the sky is not adversely affected by the color shift. To soften the effect and create a more natural blend, experimenting with different blend modes is recommended. For instance, using a warming filter (like filter 85) with a density of 85 and a "Soft Light" blend mode can create a beautiful, subtle enhancement. As with other adjustments, a layer mask can be used to isolate the effect to the sky.
4. Gradient Tool
The Gradient tool offers another rapid approach to enhancing sky color, mirroring the effect of using a graduated neutral density (ND) filter in traditional photography. The advantage in Photoshop is the ability to choose any color for your digital graduated filter.
To maintain non-destructive editing practices, always create a new layer before applying the gradient. Select the Gradient tool, and ensure "Linear Gradient" and "Foreground to Transparent" are chosen. Position the gradient at the top of the image and drag downwards towards the middle in a straight line, holding the Shift key for precision. Repeat this process until you achieve a satisfactory result. Changing the blend mode to "Soft Light" and using a layer mask to exclude the foreground or unwanted cloud areas can refine the effect. Reducing the opacity of the gradient layer also allows for a more subtle outcome.
Retouching Gradient Skies - Photoshop Tutorial
5. Brush Tool
The Brush tool is frequently employed to enhance sky colors, particularly during sunset, offering a subtle and natural-looking effect. The core technique involves painting over the sky with its existing colors to intensify them.
For example, if a sunset sky contains both blue and orange tones, you can enhance each color separately. Create a new layer, select the Brush tool, and use the Alt/Opt key to activate the eyedropper tool. Click on the desired color in the sky (e.g., orange). Adjust the brush size to be slightly larger than the area you want to paint, set the opacity to around 50% to start, and begin painting over the clouds or sky areas.
After painting, change the layer's blend mode to "Soft Light" or "Multiply" and reduce the opacity to achieve your desired intensity. You can repeat this process for different colors, such as enhancing the blue tones of the sky. Experimenting with blend modes and opacity levels is key to achieving a natural look.
6. Luminosity Mask
The Luminosity Mask technique is a favorite for selectively enhancing colors, and it's particularly effective for skies. Luminosity masks are created based on the brightness values of an image, allowing for precise targeting of specific tonal ranges.
To enhance sky color, you'll typically want to select a "brights" mask. For instance, "Brights 2" might select most of the sky while effectively masking out the foreground, ensuring that any adjustments made are confined to the sky area.
The process involves:
- Creating the appropriate luminosity mask (e.g., Brights 2).
- Creating a Hue/Saturation adjustment layer.
- Increasing the global saturation to its maximum without clipping.
- Filling the Hue/Saturation layer's mask with black.
- Selecting the luminosity mask (e.g., Brights 2) from the Channels panel.
- Returning to the Layers panel, clicking on the Hue/Saturation adjustment layer's mask.
- Using the Brush tool with white foreground color, 50% opacity, a large size, and 0% hardness to paint over the mask. This reveals the saturation adjustment only in the areas defined by the luminosity mask (i.e., the sky).
Integrating Realistic Skies with 3D Workflows
The process of adding a realistic sky to your graphic design can significantly impact the overall effect of your image. By combining techniques like alpha channels, photo textures, and software like Adobe Photoshop and Cinema 4D, you can achieve impressive results efficiently.
Main Insights for 3D Integration
- Photo Textures: Utilizing high-quality photo textures can significantly increase the detail and realism of your scenes.
- Careful Editing: Meticulous editing of all image elements is crucial for achieving a harmonious and believable final composition.
- Layer Masks and Transparency: These are indispensable tools for seamlessly integrating new elements, such as skies, into your design.
Step-by-Step Guide to Integrating a Sky Texture
Starting Point and Texture Selection
Begin by downloading several high-resolution sky photo textures from reputable sources like CG Textures (which requires registration for downloads). Opt for the largest available sizes (e.g., "huge") to ensure the best quality.
Start a new project in Cinema 4D. Turn off the default background texture if one is present. Ensure that your chosen sky textures are visible for reference.
Import and Initial Adjustments
Drag the primary sky texture into your image and position it as the background. Pay close attention to the perspective and scale to ensure it matches the scene. Maintain the image's original proportions while adjusting its position to avoid distortion.
Before proceeding, check if the sky is obscuring any important elements of your original image. If so, adjust its position or scale to minimize the view of distracting objects like unwanted trees or buildings.
Fine-tuning and Light Adjustments
This is where the integration truly comes to life. You can add a second sky texture specifically for light adjustments. Using the Control key (or Command key on Mac) in conjunction with the texture allows you to manipulate its position and integrate it into the desired area, ensuring the lighting conditions appear harmonious.
To create soft, natural transitions between elements, edit the edges of the light using a layer mask. Employ a soft, round brush to blend the edges with the surrounding tones, ensuring a seamless integration.
Mood and Atmosphere
A sky texture alone may not be sufficient to create a compelling atmosphere. Consider integrating additional light and shadow effects. For instance, adding a light effect on one side of the image can help define cloud shading details and add depth.
If different colors and tones within the sky appear distracting, use the luminance settings of your layers to harmonize the color palette, making the entire composition look more natural and cohesive.
Final Touches and Optimizations
With the sky largely integrated, perform final adjustments. Use a layer mask to remove any remaining distracting elements, such as stray plants or unwanted objects. If certain areas appear overly bright, a subtle application of a dark blue or gray color can help balance the luminance.
Once you are confident that everything looks harmonious, group all the sky-related layers. This organization allows you to apply global adjustments simultaneously and can save storage space by cropping out unnecessary texture areas.
Creating the Final Composition
With the sky seamlessly integrated, you can now focus on designing other elements of your image. Observe how the sky influences the overall mood and consider how it connects with more comprehensive scenes to achieve your desired artistic effect.
Frequently Asked Questions
- How do I download the photo textures?You can download photo textures from platforms like CG Textures, which offer both free and paid subscription options. Ensure you select the highest resolution available for best results.
- What do I do if the edges of the texture don't look perfect?Use a layer mask with a soft brush to gently blend the edges. This technique creates a seamless transition between the sky texture and your image, making the integration appear natural.
- Do I need special skills in Photoshop or Cinema 4D?A basic understanding of image editing software like Photoshop and 3D software like Cinema 4D is helpful. The instructions provided aim to guide users through the process, but familiarity with the tools will enhance the learning experience.
- What are alpha channels and how do I use them?Alpha channels are used in image editing to define areas of transparency or opacity within an image. They are crucial for precisely controlling where effects are applied or how elements blend together, especially when working with complex compositions and masks.
By mastering these techniques, you can transform any photograph, turning ordinary skies into captivating vistas that enhance the storytelling and aesthetic appeal of your work. Whether you're replacing a dull sky or subtly enhancing its colors, Photoshop provides the tools to achieve professional-grade results.
tags: #sky #background #for #photoshop