This guide provides a detailed walkthrough for setting up your XPPen Deco 01 V3 drawing tablet on a macOS system. We will cover everything from initial connection and driver installation to advanced customization of device and pen settings, ensuring you can harness the full potential of your tablet for digital art and design.
1. Introduction to the XPPen Deco 01 V3
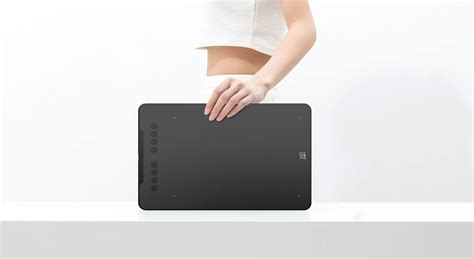
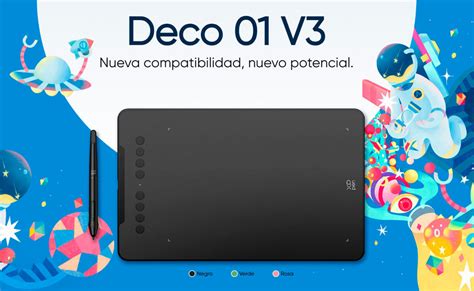
Thank you for choosing the XPPen Deco 01 V3 Drawing Tablet. This user manual is specially designed to detail the product’s functions and features. Please read this manual before using the product to ensure safe and proper use. Due to the latest product improvements, content may differ from the final product and is subject to change without prior notice.
1.1 Product Overview
The XPPen Deco 01 V3 is designed for artists and designers seeking a responsive and intuitive digital drawing experience. Key components include:
- Shortcut keys: Programmable buttons on the tablet that can be customized for frequently used functions or application shortcuts.
- Indicator light: This light provides visual feedback on the stylus's proximity and contact with the active area:
- Flashing: The stylus is in range but not touching the active area.
- Always On: The stylus is in contact with the active area.
- Off: The stylus is beyond the active area.
- USB-C port: The primary connection port for power and data transfer to your computer or mobile device.
- Active area: The surface of the tablet where your stylus input is registered.
1.2 Included with Your Product
The XPPen Deco 01 V3 package typically includes:
- 1 x Stylus
- 1 x Stylus Stand
- 1 x Glove
- 1 x USB-C to USB-A Cable
- 1 x Protective Film
- 8 x Nibs
- 1 x USB to USB-C Adapter
The list is for illustrative purposes only. Please refer to the actual product for the definitive contents.
2. Connection and Compatibility
Proper connection and compatibility are crucial for the tablet to function correctly with your macOS system.
2.1 Connect to Computer
To connect your XPPen Deco 01 V3 to your Mac, please connect the USB-C to USB-A cable by plugging the USB-A end into your Mac's available USB port and the USB-C end into the tablet's USB-C port. This connection provides both power and data transfer for the tablet.
2.2 Connect to Android Phone or Tablet
For mobile use, you can connect the XPPen Deco 01 V3 to a compatible Android phone or tablet. Please connect the USB-C cable with the provided OTG adapter to your Android device and the drawing tablet respectively. This feature allows for on-the-go creativity.
3. Compatibility
The XPPen Deco 01 V3 is designed to work with a range of operating systems. For macOS users, ensure your system meets the following requirements:
- macOS: 10.12 (or later)
Other compatible operating systems include:
- Windows 7 (or later)
- Android 10.0 (or later)
- Chrome OS 88 (or later)
- Harmony OS
- Linux
4. Product Settings and Driver Installation
The XPPen driver is essential for unlocking the full functionality of your tablet. Proper installation and configuration are key.
4.1 Driver Installation on macOS
Before installing the driver, it is highly recommended to perform the following preparatory steps:
- Disable Antivirus Software: Temporarily turn off all antivirus software and any other graphics software that might interfere with the installation process.
- Uninstall Existing Drivers: If you have previously installed drivers for other drawing displays or tablets, uninstall them completely before proceeding. This prevents potential conflicts.
- Restart Your Computer: After the installation is completed, restart your Mac. This ensures all system changes are applied correctly.
- Install Latest Driver: For the best performance and to ensure all features are supported, we recommend downloading and installing the latest driver version from the official XPPen website.
Installation Steps for macOS:
- Download and Unzip: Download the macOS driver file from the XPPen website and unzip the downloaded file.
- Run the Installer: Locate the unzipped driver file (typically a
.dmgfile). Double-click to open it and run the installer application. Follow the on-screen prompts to complete the installation. - Grant Permissions: After installation, you will need to grant specific permissions for the driver to function correctly.
- Navigate to System Settings > Privacy & Security > Accessibility.
- Ensure that PenTabletDriver is checked. If it is not listed, you may need to manually add it.
- To manually add the driver, go to Resource Library > Application Support > PenDriver and add the driver application.
- You may also need to check System Settings > Privacy & Security > Bluetooth and ensure the PenTabletDriver option is checked.
Failure to grant these permissions may result in the device and driver not functioning properly.
How to install XP-PEN driver on macOS Big Sur(11.0)
4.2 Introduction to the Driver Interface
The XPPen driver is designed to be user-friendly and comprehensive. It will typically run automatically after installation. If it does not launch automatically, you can run it manually from your Applications folder.
Upon launching the driver, you will see a status indicator. If the device is not connected or the connection fails, a prompt will appear. In such cases, try restarting your computer or the driver, or contact XPPen customer support for assistance.
If the device is connected successfully, the device name (e.g., "Deco 01 V3") will be displayed in the upper left corner of the driver window. The driver also supports connecting multiple devices simultaneously. You can customize settings for each connected device individually by switching between them within the driver interface. All changes made will only apply to the currently selected device.
4.3 Device Settings
The Device Settings section of the driver allows for extensive customization of your tablet's behavior.
4.3.1 Work Area
The Work Area settings define the mapping between the tablet's active area and your computer's display area. This is crucial for ensuring accurate cursor movement.
Screen Mapping:
- Single Monitor: You can choose to map the tablet's active area to the entire screen of your selected monitor or a customized portion of it.
- Full Screen: Maps the entire tablet area to the entire selected monitor.
- Customize Screen Area: Allows for more granular control. You can:
- Drag to select an area: Click and drag on the screen to define a custom rectangular work area.
- Click to set screen area: Click on the upper-left and then the lower-right corner of the desired area on the monitor.
- Coordinates: Manually input the X, Y coordinates for the top-left corner and the Width (W) and Height (H) of the desired area.
- Multiple Monitors (Duplicate Mode): If your Mac is in duplicate display mode, the tablet's work area will be mapped across all monitors simultaneously. Moving the stylus on the tablet will move the cursor across all duplicated screens.
- Multiple Monitors (Extend Mode): In extend mode, you must select which of your connected monitors the tablet's work area will map to. You can then use the same "Full Screen" or "Customize Screen Area" options as described for a single monitor, but applied to the chosen extended display.
- Identify Monitors: The "Identify" button helps you distinguish between your connected monitors by displaying a numeric identifier in the lower-left corner of each screen.
Drawing Tablet Mapping:
This section allows you to define how the physical drawing tablet's active area is utilized.
- Full Area: The entire physical work area of the drawing tablet is available for input.
- Customize Active Area: Similar to screen customization, you can define a specific portion of the tablet's surface to be active.
- Drag to select an area: Define a custom area by dragging on the tablet's surface.
- Click to set active area: Use the stylus to click the top-left and bottom-right corners of the desired area on the tablet.
- Coordinates: Manually input the X, Y, W, and H values for the custom area.
Proportion:
Enabling the "Proportion" setting ensures that the aspect ratio of your drawing on the tablet is maintained on the screen. For instance, if you draw a circle on the tablet, it will appear as a circle on your display. If this setting is disabled, drawing a circle might result in an ellipse on the screen, as the aspect ratios of the tablet's active area and the selected screen area might differ.
Rotation:
You can rotate the tablet's active area by 0°, 90°, 180°, or 270° clockwise. This is particularly useful for adapting the tablet's orientation to your workflow or for enabling left-handed use.
- Left-handed mode: Selecting this option effectively rotates the tablet's orientation by 180°, making it suitable for left-handed users.
4.3.2 Shortcut Key Customization
The XPPen Deco 01 V3 features programmable shortcut keys that can significantly speed up your workflow.
- Customizing Functions: Click on any of the shortcut key representations within the driver interface to assign a new function.
- Keyboard Shortcuts: You can assign standard keyboard shortcuts (e.g., Ctrl+C, Alt+Z) or more complex key combinations. For example, setting a key to "Alt+A" in 3D MAX can instantly activate the alignment tool.
- Multiple Groups: The driver allows for multiple groups of shortcut key settings. You can assign a sequence of commands (e.g., Ctrl+C, Ctrl+V) to a single button, and pressing it will execute all commands in the sequence.
- Windows (Command) Shortcuts: For Windows users, you can create shortcuts that include system keys like the Windows key (Win) or Command key (Cmd). For example, to trigger "Win+Shift+3" (a common screenshot shortcut on some systems), you can assign "Shift+3" to a shortcut key, and the driver will automatically include the Win key.
- Mouse Control: You can assign mouse clicks and scroll actions to the shortcut keys, often combined with modifier keys like "Shift." This is useful for applications that support such key combinations for specific tools.
- Precision Mode: This function allows you to limit the device's work area to a smaller, more precise zone. This can be incredibly helpful for detailed work, such as intricate line art or pixel-level adjustments.
- Run Application: Assign a shortcut key to launch a specific application directly.
- Customized Name: You can give a custom name to your current shortcut key configuration for easier identification.
4.4 Application-Specific Settings
One of the most powerful features of the XPPen driver is its ability to apply different settings for different applications. This means you can have custom shortcut keys and pen button assignments that only activate when a particular software is in focus.
- Adding Applications:
- Click the "+" icon in the application bar within the driver settings.
- Select an application from the list of currently running programs or browse your computer to add an installed application.
- Click "OK" to add the selected application to the list.
- Customizing Settings: Select an added application from the list. Any changes you make to shortcut keys, pen buttons, or other settings will now only apply when that specific application is active.
- Deleting Applications: To remove an application from the list, select it and click the "-" icon.
- All Other Applications: You can also set a default configuration that applies to any application not specifically listed. This ensures a consistent experience across your software.
The driver typically allows you to add up to 7 applications for custom profiles.
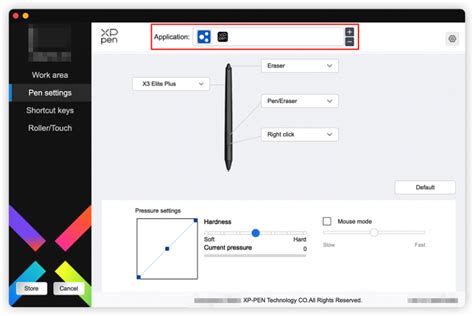
4.5 Pen Settings
The Pen Settings section allows you to fine-tune the behavior of your stylus.
- Pen Keys: The function of the buttons on the stylus can be customized in the same way as the shortcut keys on the tablet (refer to section 4.3.2).
- Pressure Sensitivity:
- Pressure Curve: You can adjust the pressure curve to control how the stylus's pressure input translates to line opacity or thickness. A steeper curve means a more sensitive response to light pressure, while a flatter curve requires more pressure for maximum effect.
- Preset Options: The driver may offer preset pressure curves optimized for different drawing styles.
- Current Pressure: A testing area allows you to visualize the current pressure sensitivity as you apply varying force with the stylus.
- Pressure Sensitivity Toggle: You can disable pressure sensitivity entirely by toggling it off. This will make the stylus behave more like a standard mouse, with a consistent line weight regardless of how hard you press.
- Tilt Sensitivity: Similarly, you can disable the tilt functionality of the stylus if it's not needed for your workflow.
- Mouse Mode: When enabled, this mode changes how the cursor behaves when the stylus moves outside the tablet's active area. In mouse mode, the cursor will remain at its last position when the stylus is lifted, mimicking a traditional mouse. You can also adjust the cursor speed in this mode. By default, without mouse mode enabled, the pen mode applies, where the cursor follows the stylus's movement relative to the active area.
- Windows Ink (for Windows only): This setting is specific to Windows operating systems. If you need to utilize handwriting functions or pressure sensitivity in applications like Microsoft Office, Whiteboard, or other compatible software, ensure Windows Ink is enabled. For macOS users, this option will not be present.
4.6 Driver Settings
The Driver Settings menu contains options for managing your driver configuration and accessing support.
- Import & Export Config: This feature allows you to save your current driver settings as a configuration file and import it later. This is extremely useful for backing up your customized profiles or transferring them to another computer running the same operating system.
- Diagnostic Tool: If you encounter any issues with the tablet or driver, the diagnostic tool can help identify potential problems.
- Feedback: If you have any questions, suggestions, or encounter bugs, you can use the feedback option to report them to XPPen support.
- Default: This button will reset all driver settings to their original factory defaults, including all customized shortcut keys, work area settings, and pen configurations.
- Prompt: When this option is turned off, the on-screen prompts that appear when you press the device's shortcut buttons will be disabled.
- Shortcut Keys: Disabling this option will disable all button functions on the device itself (both the tablet and the stylus). This is useful if you want to prevent accidental input.
4.7 Driver Uninstallation
If you need to uninstall the XPPen driver from your Mac, follow these steps:
- Locate Applications Folder: Go to your Mac's Applications folder.
- Find XPPen: Look for the XPPen folder or the Uninstall PenTablet application.
- Run Uninstaller: Click on "UninstallPenTablet" (or a similarly named uninstaller application) and follow the prompts to remove the driver and its related components from your system.
For Linux systems, the uninstallation process typically involves using specific terminal commands:
- Debian-based systems (.deb):
sudo dpkg -r XPPenLinux - RPM-based systems (.rpm):
sudo rpm -e XPPenLinux - Tar.gz files: Unzip the file, open a terminal in that directory, and execute
sudo ./uninstall.sh.
5. Frequently Asked Questions (FAQs)
This section addresses common issues users might encounter.
Computer fails to recognize the device.
- Check USB Port: Ensure that the USB port on your Mac is functioning correctly. Try connecting another USB device to confirm. If the port is faulty, use a different USB port on your Mac.
- Check Cable: Verify that the USB-C to USB-A cable is securely connected at both ends. Try using a different USB cable if available.
- Driver Installation: Confirm that the XPPen driver is installed correctly and is the latest version. Reinstalling the driver might resolve recognition issues.
- Restart: A simple restart of your Mac can often resolve temporary connection glitches.
Stylus does not work.
- Correct Stylus: Make sure you are using the stylus that originally came with your XPPen Deco 01 V3. Third-party styluses may not be compatible.
- Driver Installation: Ensure the driver is installed correctly and running. Check the driver's "Pen Settings" to confirm pressure sensitivity and other functions are enabled.
- Stylus Nib: Check if the stylus nib is worn out or damaged. Replace it with a new nib if necessary.
- Stylus Range: Ensure the stylus is within the active range of the tablet. The indicator light on the tablet can help you gauge this.
- Pen Settings: In the driver's "Pen Settings," verify that pressure sensitivity is enabled and that the stylus is recognized. If you are using a stylus with buttons, ensure the button functions are not interfering.
By following this comprehensive guide, you should be able to set up and customize your XPPen Deco 01 V3 drawing tablet on your Mac, ensuring a smooth and productive digital art experience.