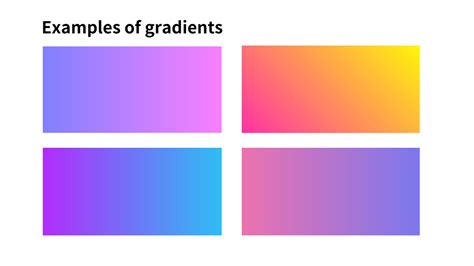
Gradients are a fundamental and versatile tool within Adobe Photoshop, enabling users to create smooth transitions between colors or images, add depth to designs, and achieve a myriad of visual effects. Whether you're filling text and shapes, creating subtle color shifts in photographs, or designing intricate backgrounds, understanding how to effectively utilize Photoshop's gradient features is essential. This tutorial will guide you through the core functionalities of drawing and applying gradients using the Gradient Tool, exploring its various presets, styles, and essential options, with a focus on practical application for users of Photoshop 2023 and beyond.
Understanding the Gradient Tool's Role
The Gradient Tool is a powerful instrument in Photoshop, offering multiple avenues for gradient application. It allows for the creation of gradients directly across layers or selections, facilitating seamless transitions. Furthermore, gradients can be applied to layer masks for soft blending effects, used to fill text and shapes with dynamic color blends, or incorporated into image adjustments like Gradient Maps for color correction and creative tinting. Layer styles, such as Gradient Overlay, also leverage gradients to add depth and visual interest to elements.
This tutorial, however, will concentrate on the most straightforward and arguably the most frequently used aspect of Photoshop's gradient capabilities: the Gradient Tool itself. We will delve into the fundamental techniques of drawing gradients and navigating Photoshop's extensive library of preset gradients, including how to load additional gradient sets that come bundled with the software. In subsequent tutorials, we will explore the more advanced techniques of editing and saving custom gradients using Photoshop's Gradient Editor.
Setting Up Your Workspace
Before we begin drawing, it's crucial to set up a suitable document. Let's start by creating a new Photoshop document. The "New" dialog box will appear, offering various customization options. For the purpose of this tutorial, the specific dimensions are not critical. If you are following along, feel free to use a document size that suits your project. We will leave the "Resolution" value at its default of 72 pixels/inch. Ensure that "Background Contents" is set to "White."
Locating and Activating the Gradient Tool
The Gradient Tool is conveniently located within the Tools panel, typically found on the left side of the Photoshop interface. To select it, simply click on its icon. Once the Gradient Tool is active, you'll notice changes in the Options Bar at the top of the screen, which will now display gradient-specific settings.
Choosing and Loading Gradients: The Gradient Picker
With the Gradient Tool selected, the next logical step is to choose the gradient you wish to apply. Photoshop offers two primary methods for this: the Gradient Picker and the more comprehensive Gradient Editor. The Gradient Picker is ideal for quickly selecting from a range of pre-designed, preset gradients. The Gradient Editor, on the other hand, provides a powerful interface for creating and modifying your own custom gradients, a topic we will cover in a future tutorial.
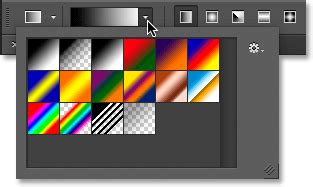
For this session, we will focus on the Gradient Picker. To access it, click on the small arrow located to the right of the gradient preview bar within the Options Bar. This action opens the Gradient Picker, presenting you with a visual array of thumbnails representing all available preset gradients. To select a gradient, click on its thumbnail. You can then close the Gradient Picker by pressing Enter (on Windows) or Return (on Mac), or by clicking on any empty space in the Options Bar.
By default, Photoshop displays a limited selection of preset gradients. However, the software includes numerous additional gradient sets, categorized by themes such as color harmonies, metals, and pastels. To access these, look towards the bottom half of the menu that appears when you click the arrow next to the gradient preview bar. You'll find a list of these additional gradient sets. To load any of them, simply click on its name. For instance, selecting "Photographic Toning" will bring up a prompt asking if you wish to replace the current gradients with the new set. Choosing "Append" will add the new gradients below the existing ones, rather than overwriting them. If you opt to replace, the Gradient Picker will then display only the newly loaded gradients. For the purposes of this foundational tutorial, we will revert to the original default gradients by selecting that option when prompted.
The Foreground to Background Gradient: A Versatile Default
A particularly useful and fundamental gradient is the "Foreground to Background" gradient. As its name suggests, this gradient dynamically derives its colors from your current Foreground and Background color swatches. These swatches are visible near the bottom of the Tools panel; the upper-left swatch indicates the Foreground color, and the lower-right swatch represents the Background color. Because it is directly tied to your chosen colors, the Foreground to Background gradient offers unparalleled ease of customization and often proves to be the most practical choice for various design tasks.
Drawing Your First Gradient
Applying a gradient with the Gradient Tool in Photoshop is remarkably intuitive: it's as simple as clicking and dragging your mouse. Begin by clicking within your document to establish the starting point of your gradient. Then, while holding down the mouse button, drag away from this starting point to define the endpoint of the gradient. As you drag, a thin line will visually indicate the direction and extent of the gradient being drawn. For example, clicking on the left edge of your document and dragging across to the right edge will create a horizontal gradient.
Refining Gradient Direction and Precision
To assist in creating perfectly straight horizontal or vertical gradients, you can utilize the Shift key. Press and hold the Shift key as you drag; this will constrain the angle of your gradient to precise increments. For a horizontal gradient, hold Shift while dragging left or right. For a vertical gradient, hold Shift while dragging up or down. It's important to release the mouse button first, and then release the Shift key to ensure the gradient is applied correctly.
When you release the mouse button, Photoshop renders the gradient based on the path you've drawn. The "Reverse" option in the Options Bar allows you to flip the direction of the gradient. If you draw the same gradient with "Reverse" enabled, the colors will appear in the opposite order. Gradients are not limited to horizontal or vertical orientations; they can be applied at any angle. Clicking and dragging diagonally, for instance, will create a diagonal gradient. It's worth noting that drawing a new gradient with the Gradient Tool automatically replaces any existing gradient on the active layer without the need to undo or delete the previous one.
Customizing Gradient Colors
The beauty of the Foreground to Background gradient lies in its direct link to your chosen Foreground and Background colors. To alter the gradient's colors, simply select new colors for your Foreground and Background swatches. Clicking on a color swatch will open Photoshop's Color Picker, allowing you to choose any hue, saturation, and brightness. Once new colors are selected, drawing a gradient will apply this new color combination.
If you need to quickly reset your Foreground and Background colors to their default settings (black for Foreground, white for Background), press the 'D' key on your keyboard. This is a handy shortcut for returning to a neutral starting point.
Working with Layers for Better Control
While drawing gradients directly on the Background layer might suffice for simple tasks, best practices in Photoshop advocate for the use of layers. Placing each element, including gradients, on its own separate layer provides greater flexibility and non-destructive editing capabilities. To create a new layer, you can click the "New Layer" icon at the bottom of the Layers panel. Alternatively, holding the Alt (Windows) or Option (Mac) key while clicking the "New Layer" icon will bring up the "New Layer" dialog box, allowing you to name the layer before it's created. For this tutorial, let's create a new blank layer named "Gradient" above the Background layer.
Understanding Transition Area and Gradient Length
The distance you drag with the Gradient Tool not only defines the direction but also the size of the transition area between colors. A shorter drag distance results in a more abrupt, compressed transition, while a longer drag distance creates a more gradual, spread-out blend. To illustrate, let's use the default black and white Foreground to Background gradient. Drawing a gradient from near the left edge to near the right edge of the document will create a wide, smooth transition. If you were to undo this gradient (Edit > Undo Gradient) and then draw a gradient over the same distance but starting and ending closer together, the transition would appear much more sudden and defined.
The Foreground to Transparent Gradient: Unique Behavior
Another highly useful gradient is the "Foreground to Transparent" gradient. This gradient behaves distinctly from others. It derives its color from the current Foreground color, meaning you can easily change its appearance by selecting a different Foreground color. Its unique characteristic is the absence of a defined second color; instead, it transitions to transparency.
To demonstrate, let's select the Foreground to Transparent gradient from the Gradient Picker (often found by double-clicking its thumbnail). Choose a distinct Foreground color, for example, purple. Now, draw a gradient on your "Gradient" layer. Initially, it might appear as a purple to white gradient. However, the white you observe is actually the Background layer showing through. To truly see the transparency, you can hide the Background layer by clicking the eye icon next to it in the Layers panel. You will then clearly see the purple gradient transitioning to complete transparency.
A key difference with the Foreground to Transparent gradient is that drawing a new one over an existing one does not overwrite it. Instead, Photoshop adds the new gradient to the existing one, creating composite transparency effects. This makes it incredibly useful for tasks like darkening the edges of a photograph or subtly enhancing a sky in an image.
Navigating Preset Gradients
While we've focused on the default and Foreground to Transparent gradients, Photoshop offers a vast array of presets. If you need a specific black-to-white gradient and your current Foreground and Background colors aren't set accordingly, you can simply select the "Black, White" preset from the Gradient Picker (typically the third thumbnail from the left in the top row). Taking the time to explore the various preset categories within the Gradient Picker can reveal useful starting points for your projects.
Exploring Gradient Styles
Beyond the color and transparency of gradients, Photoshop provides five distinct "Gradient Styles" that dictate how the gradient is rendered. These styles are located to the right of the gradient preview bar in the Options Bar. To experiment with these, it's best to start with a fresh, white document. Reset your Foreground and Background colors to black and white by pressing 'D'.
Linear Gradient: This is the classic gradient style, drawing a straight line from the starting point to the endpoint based on your drag direction. We've already seen numerous examples of this style.

Radial Gradient: This style creates a gradient that emanates outwards from a central starting point in a circular or spherical pattern. The color transitions from the center outwards.
The 3 BEST Ways To Use Gradients In Photoshop
Angular Gradient: Similar to the Radial style, the Angular gradient uses the starting point as its center. However, instead of radiating outwards, it sweeps the colors in a counterclockwise arc around the starting point, creating a cone-like effect.
Reflected Gradient: This style generates a mirror image of a standard linear gradient on both sides of the starting point. It essentially creates a symmetrical blend.
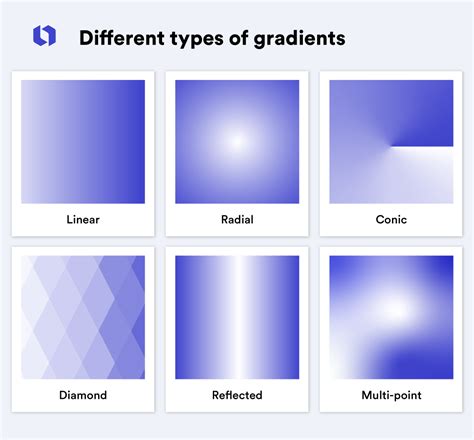
Diamond Gradient: This style creates a gradient that emanates outwards from the starting point in a diamond shape.
Experimenting with these styles is crucial to understanding their unique rendering capabilities. Remember to undo previous gradients (Ctrl+Z on Windows, Command+Z on Mac) to clear the canvas for each new style demonstration.
The Dither Option: Smoothing Transitions
One final, yet important, option in the Options Bar is "Dither." When enabled, Dither introduces a small amount of noise into your gradients. This subtle addition helps to smooth out transitions between colors, effectively reducing or eliminating "banding" â those visible, stair-step lines that can appear when color transitions are not smooth enough. For subtle gradients or those with smooth color shifts, enabling Dither can significantly improve the final visual quality.
Beyond the Basics: Mode and Opacity
The Options Bar also contains "Mode" (short for Blend Mode) and "Opacity" settings for the Gradient Tool. While these go beyond the absolute basics, they are worth mentioning. The "Mode" option functions similarly to layer blend modes, controlling how the gradient interacts with the existing content of the layer. The "Opacity" option, as expected, controls the overall transparency of the gradient being applied. Understanding these settings allows for more sophisticated integration of gradients into your designs, enabling subtle color overlays and complex blending effects.
Gradients are not merely for creating aesthetically pleasing color fades; they are powerful tools for generating any form of transition or blending effect. They can be used in conjunction with transparency layers to seamlessly merge two images or elements. Gradients can also be applied over text to add visual flair or used as background elements to create depth and atmosphere.
Creating and Managing Custom Gradients
To create a gradient in Photoshop, select the Gradient Tool. You can then define a custom gradient. Click and drag across the area where you want the gradient to appear.
The Gradient Tool is accessible on the toolbar, often sharing a space with the Paint Bucket Tool. If you don't see it, click and hold the Paint Bucket icon to reveal the fly-out menu and select "Gradient Tool."
Photoshop offers two main ways to apply gradients:
- Gradient Fill Layer: This method adds a new, non-destructive gradient fill layer. This is highly recommended as it allows you to easily update the gradient's color, position, and opacity at any time by simply double-clicking the layer thumbnail.
- Classic Gradient (Destructive): This method applies a gradient directly to the active layer, making it a "destructive" edit. While you cannot change the gradient's settings after it's applied, you can still add multiple adjustments and effects on top of it.
In the Options Bar, next to the gradient preview, you'll find the gradient style icons. You'll also see a drop-down menu for selecting presets. Clicking this drop-down menu opens the Gradient Editor, where you can modify existing gradients or create new ones.
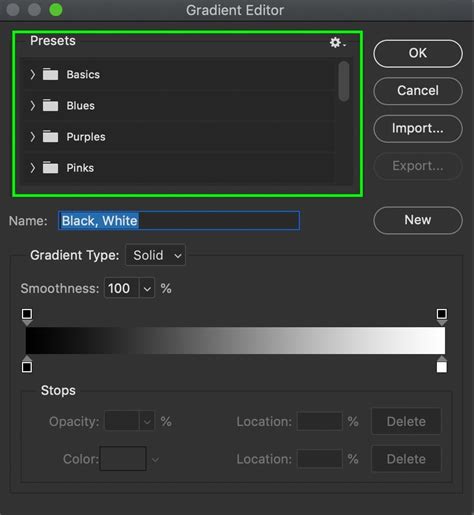
Within the Gradient Editor:
- Color Stops: These are the colored squares or dots that define the colors within your gradient. Double-clicking a color stop allows you to select a new color using the Color Picker. You can add new color stops by clicking directly below the gradient bar. To delete a color stop, select it and click the "Delete" button.
- Opacity Stops: Located at the top corners of the gradient bar, these control the transparency of the gradient at specific points. Similar to color stops, you can adjust, add, or delete opacity stops.
- Midpoints (Diamonds): The diamond icons between color stops control the transition point between colors, determining how quickly or slowly one color blends into the next. Adjusting their position or typing a value in the "Location" box refines this blend.
- Smoothness: This setting influences how smoothly the colors transition.
Once you've created a custom gradient you're happy with, you can save it for future use by naming it within the Gradient Editor and clicking "New." This adds your custom gradient to the presets.
You can also find and download numerous "Gradient Preset Packs" online, offering thousands of ready-to-use gradients to expand your creative options.
By mastering the Gradient Tool, its presets, styles, and the Gradient Editor, you unlock a powerful dimension of visual creation within Photoshop, enabling sophisticated blending, subtle transitions, and dynamic color applications across all your design projects.
tags: #best #gradient #background #photoshop