Achieving a compelling black and white aesthetic in digital video goes far beyond simply desaturating an image. While the ultimate goal is to remove all color, initiating the process by immediately reducing saturation to zero can inadvertently limit creative possibilities and hinder nuanced control during post-production. Fortunately, DaVinci Resolve offers sophisticated tools that empower users to craft striking monochrome visuals with greater flexibility and artistic intent. This tutorial delves into the most effective workflows for rendering black and white footage within DaVinci Resolve, moving from foundational principles to advanced techniques.
The Pitfalls of Premature Desaturation
A common, yet ultimately counterproductive, approach to creating black and white footage is to immediately drag the saturation slider all the way down. This method, while seemingly straightforward, has a critical drawback: it discards all the valuable color information at the very outset of the grading process. Color information, even if destined to be removed, plays a crucial role in how we perceive luminance and contrast. By eliminating it early, we lose the ability to leverage subtle color differences that can be manipulated to enhance texture, detail, and mood in the final monochrome image. This early-stage desaturation effectively "ties our hands," preventing us from utilizing the rich data present in the original color image for more sophisticated adjustments later in the workflow.
Effective Workflow 1: The End-of-Tree Saturation Adjustment
A more robust and artistically sound method in DaVinci Resolve involves deferring the complete removal of saturation until the final stages of your color grading tree. This approach allows you to perform all necessary color corrections and creative adjustments on the original saturated image, retaining full control over the color information.
The core of this workflow is to create a dedicated node at the very end of your node tree. On this final node, you will set the saturation to zero. Crucially, all other color adjustments and creative grading decisions should be made on nodes that precede this final desaturation node. This ensures that you are working with the full spectrum of color data for your primary and secondary corrections, while the final output is a pure black and white representation.
This method offers significant advantages:
- Preservation of Color Data: You can utilize color information for precise adjustments like skin tone enhancement, contrast shaping, and color cast removal before the image is rendered in monochrome.
- Flexibility: You can easily go back to earlier nodes to tweak color balance or contrast without redoing the entire desaturation process.
- Creative Control: It allows for more nuanced control over luminance and contrast, as these are intrinsically linked to color perception.
Consider this workflow when you need to perform extensive primary corrections or when you want to experiment with different color looks before committing to a monochrome output.
Effective Workflow 2: Leveraging Resolve's Monochrome Mode
DaVinci Resolve offers a specialized tool that emulates the functionality of Photoshop's Black and White adjustment layer: Monochrome mode. This mode provides a distinct and powerful way to achieve black and white conversions, offering a different set of controls and considerations.
Accessing Monochrome Mode:
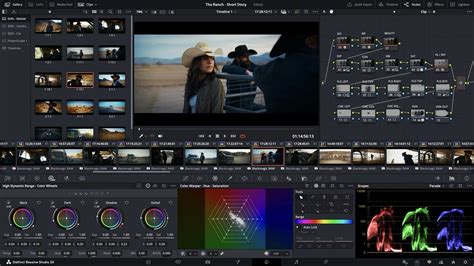
Monochrome mode is accessed within the Color Page. Navigate to the RGB Mixer tab. Within this tab, you will find a drop-down menu where you can select "Monochrome" from the available options.
Key Considerations for Monochrome Mode:
When using Resolve's Monochrome mode, it's essential to understand its unique characteristics:
- Preserve Luminance: For the most favorable and natural-looking results, ensure that the "Preserve Luminance" option is selected. This setting helps to maintain the perceived brightness of the image, preventing drastic shifts in tonal range that can occur otherwise. Without this, the conversion might produce a less pleasing or accurate representation of the original image's light and shadow.
- Remixing Color Channels: A significant limitation of Monochrome mode is that the remixing of individual color channels does not function as it does in standard RGB Mixer operations. This means you cannot directly manipulate how the red, green, and blue channels contribute to the final monochrome image within this specific mode.
- Pre-Correction Impact: Critically, any color corrections you have made to the image before engaging Monochrome mode will not be applied to the final monochrome output. This is a crucial distinction from the end-of-tree saturation method. The Monochrome mode essentially takes the raw image data and converts it to black and white, disregarding prior color manipulations.
Working with Monochrome Mode:
If you are using a control panel, it's important to note that color adjustments made through the panel will still be applied to the saturated image before it enters the Monochrome conversion. This can lead to unexpected results if not accounted for.
The true power of Monochrome mode lies in its ability to simulate different lighting conditions and film stocks by effectively controlling the luminance contribution of each original color channel. While direct remixing isn't available within Monochrome mode itself, the underlying principle of how different colors translate to different shades of gray is what you're manipulating.
The Art of Channel Mixing for Monochrome
The underlying principle of creating compelling black and white images, regardless of the specific tool used, lies in understanding how different colors translate into shades of gray. In traditional black and white film photography, different color filters were used in front of the lens to manipulate how colors were rendered. Red filters, for instance, would darken the sky (making blue appear darker) and lighten skin tones (making reds appear lighter). This principle is directly applicable in DaVinci Resolve.
Even when not using the dedicated Monochrome mode, but rather working with nodes before a final saturation cut, you can achieve similar effects by manipulating the individual color channels. The RGB Mixer in DaVinci Resolve allows you to adjust the contribution of the Red, Green, and Blue channels to the overall image.
- Enhancing Skin Tones: To achieve more pleasing skin tones in a black and white conversion, you will often want to increase the value in the red slider. This is because skin tones have a significant red component. Conversely, decreasing the blue slider can also contribute to a warmer, more flattering skin tone rendition.
- Controlling Contrast and Texture: Experimenting with the green and blue sliders can dramatically alter the perceived contrast and texture of different elements in your scene. For example, increasing the green slider might bring out more detail in foliage, while decreasing it could create a moodier, more subdued look.
A Practical Approach to Channel Mixing:
- Base Correction: Before diving into creative monochrome grading, it's essential to perform a solid base correction. This involves balancing the image, addressing any color casts (e.g., a green cast from fluorescent lights, a blue cast from daylight), and ensuring the overall luminance of the image is well-exposed and balanced. Pay particular attention to the luminance of the image overall. This initial balancing act provides a neutral foundation upon which to build your monochrome aesthetic.
How to Color Grade in DaVinci Resolve for Beginners!
- Introduce Monochrome: Once you have a balanced image, create a new node. This is where you will introduce your monochrome conversion. You can either apply the saturation reduction here or switch to Monochrome mode in the RGB Mixer as described earlier.
- Refine with Channel Manipulation: Now, using nodes before your final desaturation or Monochrome mode node, you can begin to manipulate the individual color channels.
- Create an additional node before the monochrome node.
- Use the RGB Mixer on this node to adjust the Red, Green, and Blue sliders.
- Play around with processing the separate color channels. Youâll see that increasing the value in the red slider, or decreasing blue, tends to enhance a subjectâs skin tones.
- You can create additional nodes before the monochromatic node that separate specific details you want to affect. For example, you might create a node to isolate the sky and adjust its luminance independently.
Advanced Techniques and Potential Pitfalls
As you gain confidence with channel mixing, you can push the creative boundaries further. However, it's important to be aware of potential issues.
- Artifacts: When you pull certain color channels too far, or push them to extreme values, you can introduce artifacts into the image. These can sometimes resemble a "swarm of ants" â a digital noise pattern that appears when the luminance values become too disparate or when there's insufficient detail in the original image to support such extreme manipulation. This is a visual cue that you may have over-processed a particular channel.
- Artistic Intent: The goal is not just to make things black and white, but to create a specific mood and emphasize certain elements. For instance, increasing the blues might lend a cool, dramatic, or melancholic feel to a scene, while increasing reds could enhance dynamism and passion.
- Illustrative Example: Consider an image that starts with vibrant saturation in all three primary colors (red, green, and blue). By carefully adjusting the R, G, and B channels in the RGB Mixer, you can transform this colorful scene into a dramatically different black and white image. For example, increasing the red channel might make certain objects pop, while decreasing the blue could deepen shadows. Hereâs a look achieved by increasing the blues â notice how it imparts a distinct mood. Sometimes the effect using Monochrome can be quite striking.
Shortcuts and Tricks for Great Black and White in DaVinci Resolve
Beyond the core techniques, several shortcuts and tricks can elevate your monochrome grading:
- Node Structure: Always maintain a logical node structure. A common setup is:
- Primary Corrections (Balance, Exposure, Contrast)
- Creative Color Adjustments (if any, before desaturation)
- Channel Mixer Adjustments (for monochrome conversion)
- Final Touches (Sharpening, Grain, Vignette)
- Optional: Final Desaturation Node (if not using Monochrome mode)
- Using Scopes: The scopes (Waveform, Vectorscope, Parade) are invaluable for black and white grading. They help you analyze the luminance and contrast of your image without being distracted by color. Focus on achieving smooth tonal transitions and proper black and white points.
- Adding Grain: Film grain is a classic element of black and white imagery. DaVinci Resolve's built-in effects, particularly the "Film Grain" effect, can add a cinematic texture and help to mask any subtle digital artifacts.
- Vignetting: A subtle vignette can help to draw the viewer's eye to the center of the frame and enhance the mood. This can be achieved using power windows or dedicated vignette effects.
- Experimentation: The best way to learn is to experiment. Take a colorful clip and try both the end-of-tree saturation method and the Monochrome mode. See how adjusting the R, G, and B channels affects the final output in each scenario. Pay attention to how different subjects and lighting conditions respond to these adjustments.
- Reference Images: Look at classic black and white films and photography for inspiration. Analyze how they use contrast, shadow, and light to convey emotion and tell stories. Try to emulate those looks in Resolve.
By understanding these principles and employing the powerful tools within DaVinci Resolve, you can move beyond simplistic desaturation and create truly captivating black and white visuals that resonate with depth, mood, and artistic intent.