DaVinci Resolve has rapidly ascended to become a cornerstone of modern post-production, coveted by both seasoned professionals and aspiring creators. Its robust free version, coupled with continuous feature development, makes it an exceptionally versatile and powerful tool. Whether you're embarking on your video editing journey or seeking to migrate from other software, this tutorial will guide you through the essential functionalities of DaVinci Resolve 18, enabling you to achieve a professional workflow with efficiency and creative flair. We will explore the software's multifaceted workspaces, from organizing media and crafting edits to enhancing visuals with effects, perfecting color, and mastering audio, culminating in the preparation of your project for final delivery.
Project Setup and Media Management
The initial step in any video project is establishing a well-organized foundation. DaVinci Resolve 18 offers a streamlined approach to project management, utilizing a disk database for centralized storage rather than scattering individual project files. This ensures that your projects are neatly cataloged and easily accessible.
Upon launching DaVinci Resolve, you are greeted by the Project Manager. To initiate a new endeavor, select "New Project" and assign a descriptive name. For instance, naming it "Iceland" based on the provided footage, allows for immediate project identification.
Crucially, enabling automatic saving is paramount to safeguarding your progress. Navigate to "DaVinci Resolve Preferences," select the "User" tab, and then "Project Save and Load." Within "Save Settings," ensure "Live Save" is checked. This feature diligently saves your work with every modification. Additionally, activating "Project Backups" provides incremental auto-saves at user-defined intervals. Setting backups to occur every five minutes, with hourly and daily archives, offers a robust safety net. The "Browse" option within this section reveals the designated location for your project backups.
DaVinci Resolve is structured into seven distinct workspaces, each dedicated to a specific aspect of post-production. For new users, the primary focus will be on the "Edit" workspace.
- Media Workspace: This is your central hub for organizing and importing all project assets, including footage, audio files, and graphics.
- Cut Workspace: Designed for rapid assembly and quick edits, this workspace functions similarly to simpler editing applications.
- Edit Workspace: The core environment for detailed editing, timeline manipulation, and scene arrangement.
- Fusion Workspace: Dedicated to advanced visual effects and motion graphics creation.
- Color Workspace: Where the art of color correction and grading is meticulously applied.
- Fairlight Workspace: The professional audio post-production suite for sound editing, mixing, and mastering.
- Deliver Workspace: The final stage, where your completed project is rendered and exported.
To import your media, transition to the "Media" workspace. In the top-left corner, under "Media Storage," you can navigate to the location of your files. If your media isn't immediately visible, right-click within the media storage area and select "Add New Location" to broaden the search. Once your footage and assets are located, you can select them and drag them into the "Media Pool" within DaVinci Resolve.
A common prompt you might encounter is the "Change Project Frame Rate" notification. This occurs when your imported clips possess a different frame rate than the project's default setting. While this prompt offers the option to change the timeline frame rate, it's important to note that this action cannot be undone. It's often more advantageous to create a custom timeline with your desired settings. For beginners, selecting "Change" is acceptable, but understanding how to create custom timelines offers greater control.
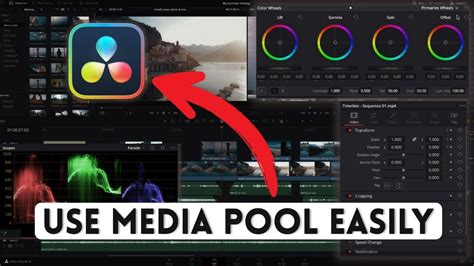
Within the Media Pool, organization is key. You can create "bins," which function as folders, to categorize your assets. For instance, create a "Footage" bin for video clips and a "Music" bin for audio tracks. Dragging your imported assets into these respective bins will maintain a tidy workspace.
Crafting Your Edit on the Edit Page
The "Edit" workspace is where the narrative of your video truly takes shape. Before diving into editing, customizing the interface can significantly enhance your workflow. Switching from "Thumbnail View" to "List View" in the media pool provides a more detailed overview of your assets. Right-clicking on the column headers allows you to select the metadata you wish to display, such as "File Name," "FPS," and "Resolution," creating a personalized view. You can then save this custom layout for future use.
DaVinci Resolve's NEW Edit Page... for NOOBS!
A critical aspect of editing is setting up your timeline correctly. While DaVinci Resolve has default project settings, creating a custom timeline offers precise control. Go to "File > New Timeline." Here, you can name your timeline and, importantly, uncheck "Use Project Settings." This unlocks a plethora of options, including the "Format" tab where you can define your resolution (e.g., 1920x1080 HD) and frame rate (e.g., 23.976 fps).
Once your custom timeline is created, you can begin populating it. Dragging clips from your "Footage" bin onto the timeline will arrange them sequentially. Zooming in and out of the timeline is easily achieved with keyboard shortcuts: Command/Control + Plus to zoom in, and Command/Control + Minus to zoom out.
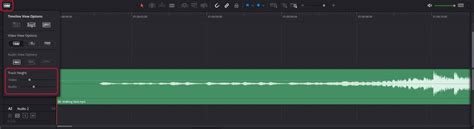
The "Video View Options" under the timeline provide different ways to visualize your clips. "Film Strip View" is particularly useful as it displays changing thumbnails, offering a visual cue of the content within each clip. For audio, ensure "Audio Waveform" is selected in the "Audio View Options" to visualize the sound. You can also adjust the height of your audio and video tracks for better clarity and organization. Renaming tracks, such as "Dialog" or "B-roll," further enhances organization.
When working with multiple clips, you can stack them on the timeline. Dragging a "B-roll" clip above a "Dialog" clip will ensure that the audio from the dialog clip plays while the B-roll footage is displayed. If a clip has unwanted audio, you can delete just the audio track by holding "Alt" or "Option" on your keyboard, selecting the audio, and pressing "Delete."
Adjusting clip speed is straightforward. Right-click a clip, select "Change Clip Speed," and input your desired percentage. A small clock icon will appear on the clip, indicating a speed modification. This is ideal for creating slow-motion effects from footage shot at higher frame rates.
Trimming clips is done by hovering over the edges of a clip on the timeline and dragging inward. Audio volume can be adjusted by clicking and dragging the horizontal line on the audio track up or down. Fades, both at the beginning and end of audio clips, can be created by hovering over the top edge of the audio region and dragging inward, creating a smooth transition.
The "Blade Tool" (keyboard shortcut 'B') allows you to cut clips, creating edit points. After making a cut, switch back to the "Selection Tool" (keyboard shortcut 'A') to select and delete unwanted sections or close gaps between clips.
Enhancing Your Edit with Effects and Transitions
DaVinci Resolve 18 offers a rich array of built-in effects and transitions to elevate your projects. The "Effects Library," accessible from the top-left of the interface, houses these tools.
Transitions like "Cross Dissolve" can be dragged and dropped between clips on the timeline. The "Inspector" window allows for fine-tuning transition durations and characteristics.
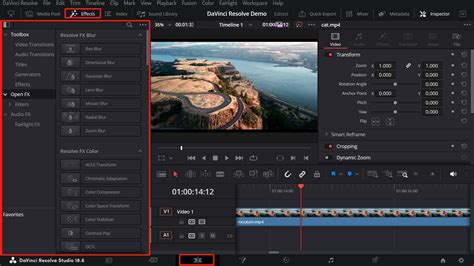
Beyond transitions, DaVinci Resolve includes numerous high-quality plugins. While some of the most advanced effects are reserved for the Studio version, the free version still provides ample creative options. Within the "Effects Library," you'll find "OpenFX" categories, offering effects like "Vignette." For applying effects to an entire section of your timeline, an "Adjustment Clip" can be dragged onto a new layer in the timeline.
DaVinci Resolve 18 also introduces powerful tools for more complex visual enhancements. The "Text+" tool, based on Fusion, offers extensive titling possibilities, though it can be more resource-intensive and has a steeper learning curve than the simpler "Text" tool.
The "Dynamic Zoom" feature, found within the clip's transform options, allows for smooth, automated zooming effects. By defining a starting (green border) and ending (red border) zoom area, you can create compelling visual movement within a static shot.
Multicam Editing in DaVinci Resolve
For projects involving footage from multiple cameras, DaVinci Resolve 18 offers advanced multicam editing tools. These features, including improved syncing options and proxy handling, significantly streamline the process of editing multi-camera content, making it more efficient for collaborative and remote workflows. The "Editor Panel" is specifically designed for multi-cam editing, with dedicated buttons for rapid camera selection and editing, ideal for news cutting and live sports replays.
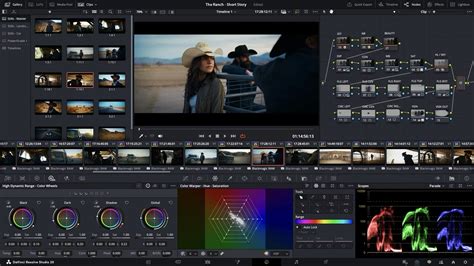
The Power of the Color Page
Color grading is an art form that can dramatically alter the mood and impact of your footage. The "Color" workspace in DaVinci Resolve provides a comprehensive suite of tools used by Hollywood colorists to achieve cinematic looks.

Every clip on your timeline appears as a thumbnail in the "Tool Belt" on the Color page. To begin, select the first clip you wish to grade.
- Black Balance Tool: This tool, represented by a crosshair with a black box, helps set the black levels of your image. Select an area in your shot that should be pure black.
- Lift Slider: If your shot is too dark, dragging the "Lift" slider (located beneath the trackball) can restore detail in the shadows.
- White Balance Tool: Similar to the Black Balance tool, this helps set white points. Select an area that should be pure white.
- Gain Slider: If your shot is too washed out, the "Gain" slider can bring back detail in the highlights.
- Saturation (Sat) Value: This slider (defaulting to 50) controls the intensity of colors in your image.
Advanced tools like the "Magic Mask" now support object selection and tracking, making it easier to isolate and adjust specific elements within a scene. For those looking to explore further, DaVinci Resolve offers tutorials specifically focused on advanced color grading techniques.
Exploring the Fusion Page for Visual Effects
The "Fusion" workspace is where you can unleash your creativity with advanced visual effects and motion graphics. It provides a node-based compositing environment, allowing for complex visual constructions.
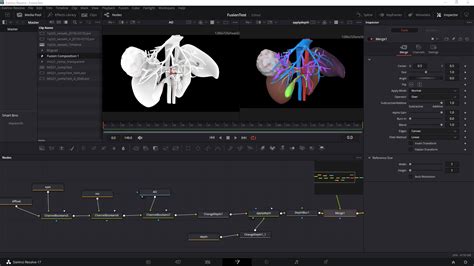
You can perform common compositing tasks, create cinematic visual effects, and even work within a true 3D workspace. DaVinci Resolve Studio's features, such as 3D camera tracking and Universal Scene Descriptor (USD) nodes, facilitate a smoother transition from 2D to 3D compositing. This training guide offers a practical introduction to these advanced tools and techniques, enabling you to create visual effects directly within DaVinci Resolve without the need for external applications.
Mastering Audio with Fairlight
The "Fairlight" workspace is DaVinci Resolve's dedicated audio post-production suite, offering powerful tools for sound editing, mixing, and mastering. Recent updates have introduced features like automation curve editing and FlexBus integration, significantly enhancing its audio editing capabilities.
DaVinci Resolve's NEW Edit Page... for NOOBS!
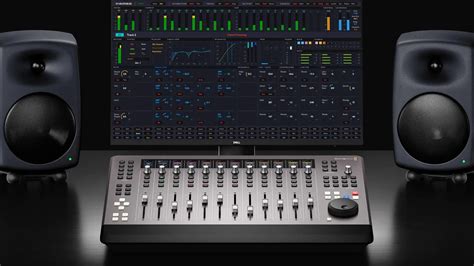
Fairlight is designed for incredibly fast audio editing, catering to sound engineers working under tight deadlines. The large consoles, used by Hollywood and broadcasters, simplify mixing complex projects with a vast number of channels and tracks. These consoles can be configured with legs at different angles for optimal working surfaces.
You can record a simple voiceover track directly within Fairlight and utilize ADR (Automated Dialogue Replacement) tools to replace existing dialogue. Working with channel mapping and linked groups is also supported. For immersive audio experiences, DaVinci Resolve's tools allow you to explore the world of Dolby Atmos.
Preparing for Delivery
Once your editing, visual effects, color grading, and audio mixing are complete, the final step is rendering and exporting your project. Head back to the "Cut" page or the "Edit" page and navigate to the "Deliver" workspace.
DaVinci Resolve 18 offers an expanded range of formats for direct export, which is particularly beneficial for social media creators. You can select your desired output format, resolution, and other settings. During the export process, a status window will display the render progress, informing you when your movie is ready to be shared with the world.
Blackmagic Design Certified Training and Partner Program
Blackmagic Design offers certified training programs designed to equip both new users and established professionals with the skills needed to excel in DaVinci Resolve. These hands-on training guides and practical exercises cover a comprehensive range of topics, from editing interviews and dramatic scenes to mastering color correction, visual effects, and audio post-production.
The "Training Partner Program" is established to collaborate with skilled training organizations and educational institutions. Blackmagic Design works with strategically chosen onsite training companies, online partners, and academic institutions to deliver high-quality DaVinci Resolve education. These trainers are passionate ambassadors for DaVinci Resolve, possessing direct contact with a wide range of customers and a deep understanding of the software's capabilities.
The DaVinci Resolve Mini Panel and the larger Fairlight and color consoles are designed to enhance workflow efficiency and creative control. The Mini Panel, with its large search dial and essential editing keys, allows for faster editing. The dedicated editor panel for multicam editing, the powerful color panel for refined grading, and the large Fairlight consoles for complex audio mixing all contribute to a more intuitive and productive post-production experience. These hardware solutions, combined with the software's extensive features, make DaVinci Resolve a truly comprehensive solution for editing, visual effects, motion graphics, color correction, and audio post-production on Mac, Windows, and Linux.
tags: #blackmagic #davinci #resolve #18