Blend modes, also known as mixing modes, are fundamental tools in digital art and design, dictating how multiple layers or elements interact and combine to create a final visual output. In Blender, understanding these modes is crucial for achieving nuanced and sophisticated rendering effects, whether you're working with 2D elements like Grease Pencil or complex 3D shader setups. This article delves into the concept of blend modes, exploring their historical context within Blender, their practical applications, and how to leverage them for both simple opacity adjustments and intricate shader compositions.
The Evolution of Opacity and Blending in Blender
Historically, Blender has seen shifts in how it handles transparency and layer interaction. In versions around 2.79 and earlier, specific "additive" and "multiplicative" alpha blend modes were directly available. These modes offered distinct ways for transparent elements to combine. An additive blend mode, for instance, would increase the brightness of overlapping areas, often used for effects like glows or light sources. A multiplicative mode, conversely, would darken overlapping areas, useful for shadows or darkening effects.
The transition to Blender 2.8 and later versions introduced a simplified setup, moving away from explicit additive/multiplicative alpha modes in some contexts. This change aimed to streamline the user experience but has presented a learning curve for those accustomed to the older system. A common observation for newer users, particularly with Grease Pencil objects, is that simply turning down the opacity using an opacity modifier can lead to overlapping strokes becoming darker. This behavior deviates from the expectation of a single, uniformly transparent image and highlights the need for a deeper understanding of how Blender interprets and combines transparency values.

Deconstructing Blend Modes: A Categorical Approach
Blend modes can be broadly categorized based on their effect on the "base color" (the color of the layer underneath) and the "blend color" (the color of the layer being applied). While the terminology might vary slightly across different software, the underlying principles remain consistent.
Darker Blend Modes: Amplifying Shadows and Depth
These modes are designed to emphasize or introduce darker tones into the composition.
- Multiply: This is a widely used blend mode that preserves the darker colors of the blend layer and reduces the opacity of lighter colors. When applied, it effectively "multiplies" the color values of the base and blend layers. This is excellent for creating shadows, darkening images, or integrating textures that should appear to recede into the base layer. For example, if you were to multiply a dark shadow texture over a colorful image, the colors of the image would be darkened where the shadow texture is darker, and less affected where the shadow texture is lighter.
- Color Burn: This mode uses the colors from the blend layer to darken the base layer, significantly increasing the contrast between the two. The effect is more intense than a simple multiply, often resulting in richer, deeper blacks and more pronounced shadows. It can be useful for achieving dramatic lighting effects or for adding a gritty, aged look to an image.
- Darker Color: This mode compares the color information of the base and blend layers pixel by pixel and retains the darker of the two. It's a straightforward way to ensure that the darkest elements from both layers are preserved, without complex mathematical operations.
Lighter Blend Modes: Enhancing Brightness and Highlights
Conversely, lighter blend modes focus on amplifying the lighter tones and creating luminous effects.
- Lighten: Similar to "Darker Color," but it compares pixel values and retains the lighter of the two. This is useful for compositing bright elements or for creating a soft, airy feel.
- Screen: This mode is the inverse of Multiply. It keeps only the white and lighter colors of the blend layer, making black or dark colors less opaque. When applied, it effectively "screens" the base layer through the blend layer. This is a popular choice for creating glows, lens flares, light leaks, or for simulating the effect of projecting light onto a surface. If the blend color is lighter than 50% gray, the image is lightened, as if it were screened. If the blend color is darker than 50% gray, the image is darkened, as if it were multiplied. This dual behavior, depending on the blend color's lightness, allows for a dynamic range of effects.
- Color Dodge: This mode uses the colors from the blend layer to lighten the base layer, reducing the contrast between them. The effect is similar to shining a diffused spotlight on the image. It can create soft, ethereal glows or brighten areas without introducing harsh highlights. If the blend color is lighter than 50% gray, the image is lightened by increasing the brightness.
Contrast Blend Modes: Dynamic Interactions
These modes create a more dynamic interplay between the base and blend layers, often by increasing or decreasing contrast.
- Overlay: This mode is a combination of Multiply and Screen. It multiplies dark areas and screens light areas, preserving the highlights and shadows of the base color. Patterns or colors overlay the existing pixels while preserving the highlights and shadows of the base color. The effect is that the blend layer's colors interact with the base layer's colors based on the base layer's luminosity. If the blend color is lighter than 50% gray, the image is lightened; if darker, it's darkened. This makes it excellent for adding texture, enhancing details, or creating a sense of depth without losing the underlying image information.
- Soft Light: Similar to Overlay, but with a softer effect. It's as if a diffused spotlight is shining on the image. If the blend color is lighter than 50% gray, the image is lightened; if darker, it's darkened. This offers a more subtle enhancement compared to Overlay.
- Hard Light: This mode is also a combination of Multiply and Screen, but the effect is harsher, akin to shining a harsh spotlight. If the blend color is lighter than 50% gray, the image is lightened, as if it were screened. If the blend color is darker than 50% gray, the image is darkened, as if it were multiplied. This can be used to create strong highlights and deep shadows.
- Vivid Light: This mode burns or dodges the colors by increasing or decreasing the contrast, depending on the blend color. If the blend color is lighter than 50% gray, the image is lightened by decreasing the contrast.
- Linear Light: This mode burns or dodges the colors by decreasing or increasing the brightness, depending on the blend color. If the blend color is lighter than 50% gray, the image is lightened by increasing the brightness.
- Pin Light: This mode replaces colors based on the blend color. If the blend color is lighter than 50% gray, pixels darker than the blend color are replaced, and pixels lighter than the blend color do not change.
Comparative Blend Modes: Inversion and Subtraction
These modes often involve comparing color values and can be used for unique effects like color inversion.
- Difference: This mode subtracts the blend color from the base color, or vice versa, depending on which is brighter. The result is an image that highlights the differences between the two layers. Pure white in the blend layer will invert the base layer's colors, while black will leave the base layer unchanged. This is useful for aligning layers, creating abstract effects, or for specific compositing tasks.
- Exclusion: Similar to Difference, but with lower contrast. It produces a less intense result.
Color Blend Modes: Hue, Saturation, and Luminosity Manipulation
These modes work by manipulating the color components (hue, saturation, and luminosity) of the base layer using the blend layer.
- Hue: This mode uses the hue of the blend layer while retaining the luminosity and saturation of the base layer. It's like applying a tint.
- Saturation: This mode uses the saturation of the blend layer while retaining the hue and luminosity of the base layer. This can be used to increase or decrease the intensity of colors.
- Color: This mode uses the hue and saturation of the blend layer and the luminosity of the base layer. This is excellent for recoloring an image or object without altering its tonal values. For example, you could take a grayscale image and apply a vibrant color layer using the "Color" blend mode to give it a new hue.
- Luminosity: This mode uses the luminosity of the blend layer while retaining the hue and saturation of the base layer. This is the inverse of the "Color" blend mode and can be used to transfer lighting information between layers.
Applying Blend Modes in Blender: Practical Scenarios
Understanding the theoretical aspects of blend modes is one thing; applying them effectively in Blender is another.
Grease Pencil and Opacity Issues
The issue of overlapping Grease Pencil strokes becoming darker when opacity is reduced is a common point of confusion. Pure alpha blending, as might be expected in a 2D image editor, doesn't always translate directly to how Grease Pencil layers interact in Blender's 3D space. The "darker overlap" effect often arises because each stroke, when rendered, has its own alpha channel. As these semi-transparent strokes overlap, their alpha values are essentially multiplied. If the goal is to have the entire Grease Pencil object behave as a single, uniformly transparent entity, one common workaround is to render the Grease Pencil object to an image texture first, and then apply that texture with a standard alpha blend to a plane or other geometry. Alternatively, exploring different material settings and alpha modes within Blender's Eevee or Cycles render engines might offer more control. For instance, in the Principled BSDF shader, the "Alpha Blend" or "Alpha Hashed" modes can be experimented with for different transparency behaviors.
Shader Mixing for Complex Effects
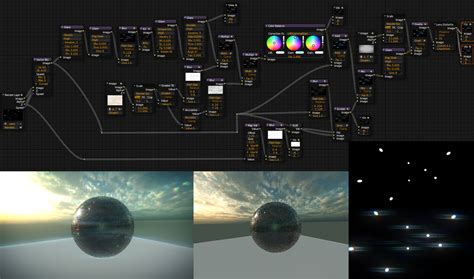
The user's attempt to create a sun disk with a halo in the same shader and failing to mix shaders points to a common challenge in node-based material creation. Achieving such effects often involves using blend modes within the shader editor itself, rather than simply mixing entire shader nodes.
For a sun disk with a halo, a nodal approach would likely involve:
- Creating the Sun Disk: Use an Emission shader or a Principled BSDF with increased Emission Strength. The color and intensity would define the sun.
- Creating the Halo: This can be achieved by using a fresnel node or a layer weight node to control the falloff of another emission shader, or even a transparent shader with a subtle emission. The halo's effect is often dependent on the viewing angle.
- Combining with Blend Modes: Instead of directly mixing two shader outputs, you would typically use the "Mix Shader" node. The "Fac" (Factor) input of the Mix Shader node is where blend mode principles come into play, though not directly labeled as "Multiply" or "Screen" in the same way as in 2D image editors. The Mix Shader node allows you to blend between two shaders based on a factor. To simulate blend mode effects, you would drive this factor using mathematical nodes (like Math, Multiply, Add, etc.) or texture nodes that output values between 0 and 1. For instance, to achieve a glow effect for the halo, you might use a texture with soft edges and control its influence on the emission strength of the halo shader.
To achieve the effect of a sun disk with a halo in the same shader, one would typically use the "Mix Shader" node. The "Fac" (Factor) input of this node controls the blending between the two shaders. To simulate blend mode behaviors like "add" or "screen" for the halo, you would use mathematical nodes. For example, to create an additive glow effect for the halo, you could:
- Have one shader for the sun disk (e.g., an Emission shader).
- Have another shader for the halo (e.g., a slightly different Emission shader with a larger radius or a more diffuse falloff).
- Use a node setup that combines their outputs. For an additive effect, you could potentially add their emission strengths together or use a node setup that effectively "screens" the halo over the sun disk.
A common technique for creating glows and atmospheric effects in shaders involves using the "Add Shader" node (though this is less common now and often replaced by principled BSDF with emission and careful alpha control) or by mathematically combining emission values. For instance, you might use a "Layer Weight" or "Fresnel" node to control the intensity of the halo based on the viewing angle, and then use a "Mix Shader" node to blend it with the sun disk shader, driven by a texture that defines the halo's shape and falloff.
Distributing Objects: Beyond Manual Placement
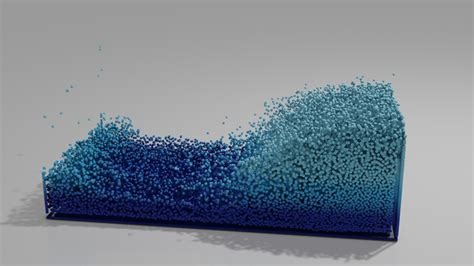
The user's desire to place 1000 roses on a 3D heart without manual positioning is a classic use case for Blender's instancing and procedural distribution tools.
- Linked Duplicates (Alt+D): While the user can make a rose and link duplicate it (using
Alt+D), this still implies manual placement. - Particle Systems: This is a powerful tool for scattering objects. You can set up a particle system on the surface of the heart object and configure it to emit instances of the rose model. You can control the density, randomness, rotation, and even scale of the roses, achieving a natural-looking distribution.
- Geometry Nodes: For more advanced and procedural control, Geometry Nodes are the modern and highly flexible solution. You can create a node tree that distributes instances of the rose object onto the surface of the heart. This allows for complex rules, randomization, and even animation of the distribution. For example, you could use a "Distribute Points on Faces" node to scatter points on the heart's surface and then use an "Instance on Points" node to place roses at those points. You can further refine this by using noise textures to control density or rotation.
Mastering Blend Modes for Creative Control
Blend modes are not just technical settings; they are creative tools that can elevate your designs from ordinary to extraordinary. By understanding how each mode affects color and light, you can achieve a vast array of visual styles.
- Achieving Smooth Transitions: Good design is often about smooth transitions, and blend modes can help you achieve that with ease. For instance, using "Overlay" or "Soft Light" can help seamlessly integrate textures or photographic elements into your scene without harsh edges.
- Adding Depth and Dynamism: Contrast blend modes are particularly effective for adding depth and dynamism to your images. Combining them with effects like Gaussian blur can create soft glows or atmospheric effects that make your renders more visually engaging.
- Photo Editing and Color Grading: Color blend modes are invaluable for photo editing and color grading within Blender. You can use "Hue," "Saturation," or "Color" to adjust the mood and aesthetics of your rendered images.
- Artistic Expression: The comparative blend modes, like "Difference," can be used for abstract art or for creating unique visual glitches and effects.
The key to mastering blend modes lies in experimentation. Apply different modes to your layers and observe the results. Consider the underlying principles: are you trying to darken, lighten, increase contrast, or manipulate color? Answering these questions will guide you toward the appropriate blend mode.
Ultimately, blend modes offer a powerful way to control how elements interact in your Blender projects. Whether you are adjusting the transparency of a Grease Pencil drawing, compositing complex shaders for a sun and halo effect, or procedurally distributing thousands of objects, a solid understanding of blend modes will significantly enhance your creative capabilities and the visual fidelity of your work.