Have you ever marveled at photographs that seem to transcend reality, possessing an almost magical quality that pulls you into their narrative? These images often evoke a sense of wonder, appearing as if lifted from the pages of a fairy tale or a cherished dream. This ethereal aesthetic, commonly referred to as a "dreamy effect," is not solely the domain of professional photographers; with the right techniques in Adobe Photoshop, this captivating style is now more accessible than ever. By combining clever digital manipulation with a touch of artistic intuition, you can unlock a world of creative possibilities and imbue your own photographs with a unique, otherworldly atmosphere. This tutorial will guide you through various methods to achieve these enchanting results, transforming ordinary images into extraordinary visual experiences.
The Foundation of the Dreamy Aesthetic
The creation of a dreamy effect often begins with an understanding of its core visual components. These typically include soft lighting, a subtle blur that softens sharp details, and a harmonious color palette that enhances the mood. The goal is to move beyond stark realism and introduce an element of gentle abstraction, inviting the viewer to linger and interpret the scene. This approach can be particularly effective for portraits, landscapes, and still-life photography, where the emphasis is on emotion and atmosphere rather than sharp, documentary-style clarity.
Before diving into specific Photoshop techniques, it's crucial to select a suitable base image. The provided text suggests that this effect "works best with well-exposed pictures." Therefore, it's advisable to start with an image that is already competently exposed, or to perform initial adjustments to brightness and contrast. Any fundamental post-processing adjustments that you intend to make to your photo can and should be done prior to applying these dreamy effect techniques. This ensures that the subsequent manipulations build upon a solid foundation, leading to more cohesive and impactful results.
Layering for Softness: The Gaussian Blur Approach
One of the most fundamental techniques for achieving a dreamy look involves the strategic application of blur. A common and effective method begins by duplicating your primary image layer. In Photoshop, this is easily accomplished by selecting your background layer and then navigating to Layer > Duplicate Layer, or by using the keyboard shortcut Ctrl + J (Windows) or Cmd + J (Mac). This creates an exact copy of your original image, which will serve as the basis for your blur effect.
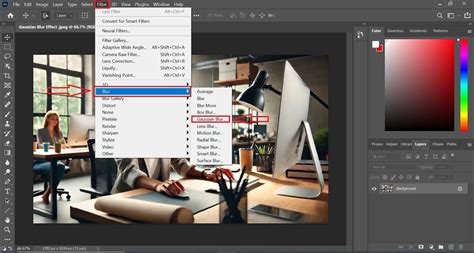
Once you have this duplicated layer, the next step is to apply a Gaussian Blur filter. With this new layer selected, go to the Filter menu, then select Blur, and finally Gaussian Blur. A dialog box will appear, allowing you to control the intensity of the blur. The key here is to find a balance: the blur should be sufficient to "hide the details" and soften the image, but not so extreme that the subject becomes unrecognizable. A good starting point, as suggested by the provided information, is a radius of around 5.0 pixels. You can then adjust this value incrementally, observing the effect in real-time, until you achieve the desired level of softness. For instance, in the provided example of a swan photo, a value of 5.0 pixels was selected.
After applying the Gaussian Blur, the next critical step is to manipulate the blending mode of this blurred layer. Changing the blend mode to Multiply can instantly transform the image, as described: "From an ugly duckling to a glamorous swan, your photo has entered the world of dreams." This blending mode creates a darker, richer effect by multiplying the color information of the blurred layer with the layer below. The result is a subtle softening and a deepening of tones, contributing significantly to the dreamy aesthetic.
This technique, by itself, can often yield a satisfactory dreamy image. However, the intensity of the effect can be further refined by adjusting the opacity of the blurred layer. The default opacity is typically 100%, but reducing this value will lessen the impact of the blur and the Multiply blend mode, allowing more of the original image's detail to show through. Experimenting with opacity is essential for fine-tuning the dreaminess to match your specific vision for the photograph.
Enhancing Light and Atmosphere with Iris Blur and Smart Objects
While Gaussian Blur is a powerful tool, Photoshop offers more nuanced blur options that can be particularly effective for creating a dreamy glow. One such technique involves utilizing the Iris Blur filter, found within the Blur Gallery. To employ this method, you first need to convert your color image layer into a Smart Object. This is achieved by right-clicking on the layer in the Layers palette and selecting Convert To Smart Object. The primary advantage of using Smart Objects is that they allow for non-destructive editing, meaning you can re-edit or remove filters at any time without permanently altering the original pixel data.
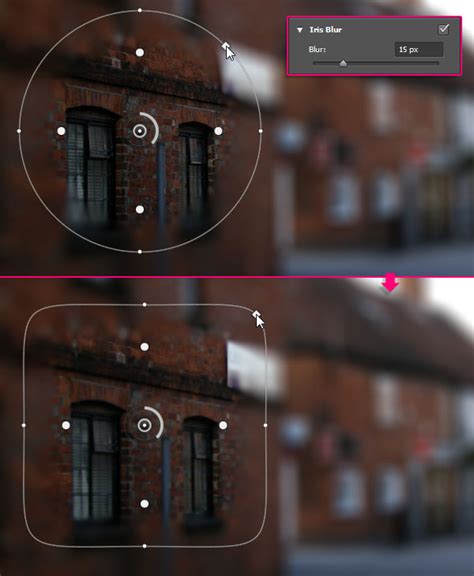
Once your layer is a Smart Object, navigate to Filter > Blur Gallery > Iris Blur. This dialog box provides a circular or elliptical selection area, within which the image remains sharp, and an outer area that can be blurred. You can precisely control the amount of blur by sliding a dedicated blur slider, typically located on the right side of the dialog. This allows you to selectively soften specific parts of the image, drawing attention to a focal point while gently blurring the surroundings, a characteristic often found in dreamy photography.
Following the application of Iris Blur, a further step can enhance the luminous quality often associated with dreamy images. The idea here is to isolate and then blur the light sources within the photograph. After applying the Iris Blur, you can create a new layer. A common approach is to fill this new layer with white or to duplicate the selected area from the background, effectively isolating the brighter parts of the image.
To further refine this light layer, it's again beneficial to convert it into a Smart Object. Right-click on this new layer and select Convert To Smart Object. This enables the use of Smart Filters, allowing for flexible adjustments. Now, apply a blur to this light layer, typically a Gaussian Blur (Filter > Blur > Gaussian Blur). Adjust the radius of this blur to expand the light, creating a soft, diffused glow. The amount of blur will determine how widely the light spreads, contributing to the ethereal atmosphere.
The Art of Color and Blend Modes for Mood
The emotional impact of a dreamy image is heavily influenced by its color palette and the interplay of blending modes. After applying initial blur effects, fine-tuning the colors is often necessary to achieve the desired mood. The provided text emphasizes this, stating, "Feel free to play around with Color, each image is unique and requires Color toning specific to that image." This suggests that a universal color adjustment might not suffice, and that personalized color grading is key.
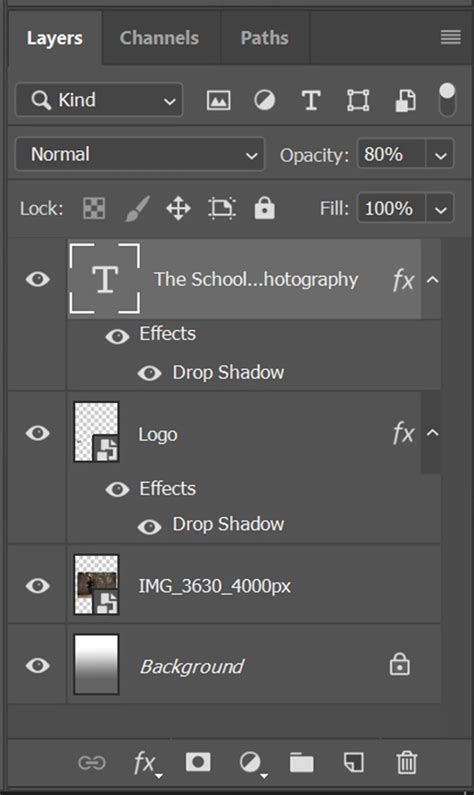
One effective way to manage color and saturation is by using a Hue/Saturation adjustment layer. To ensure this adjustment specifically targets the blurred elements and contributes to the dreamy effect without over-processing the entire image, it's recommended to "clip" the Hue/Saturation layer to the blurred layer beneath it. This is done by holding down the Alt key (or Option key on a Mac) and hovering the mouse cursor between the Hue/Saturation layer and the blurred layer in the Layers palette. Clicking at this point will create a clipping mask, indicated by an arrow pointing down to the layer below. With the layer clipped, you can then reduce the saturation "as you see fit," softening the colors and enhancing the ethereal quality.
Another powerful blending mode for creating a soft, hazy effect is Lighten. After applying various blur filters, changing the blend mode of a specific blurred layer to Lighten can produce a subtle, ethereal glow. This mode compares the pixels of the active layer with the pixels of the layers below and displays the lighter pixels. When used with a softly blurred layer, it can effectively enhance highlights and create a gentle diffusion of light, contributing to a dreamy, atmospheric quality.
The choice of blend mode is highly dependent on the specific image and the desired outcome. While Multiply and Lighten are frequently used for dreamy effects, other modes like Screen or Soft Light can also produce unique and captivating results. Experimentation is key. By combining different blur techniques with carefully chosen blend modes and opacity adjustments, you can build up layers of subtle effects that coalesce into a truly dreamy image.
Advanced Techniques: Gradient Maps and Layer Masks
For more sophisticated control over the dreamy effect, particularly in achieving specific color tonalities and atmospheric depth, gradient maps offer a powerful avenue. A gradient map replaces the luminance values of an image with colors from a gradient. By selecting a gradient that complements your desired mood â perhaps soft pastels for a gentle dreamscape or muted blues and purples for a mystical feel â you can profoundly alter the image's color scheme.
Creating Custom Gradients in Photoshop.
To apply a gradient map, create a new Gradient Map adjustment layer. Then, select or create a gradient that aligns with your artistic vision. The key to integrating this effectively into a dreamy effect is often to blend this gradient map layer with other adjustment layers or blurred layers. You might, for example, use a gradient map to establish a base color mood and then layer a soft blur on top, adjusting opacity and blend modes to achieve a harmonious integration.
Layer masks are indispensable tools for selective application of effects. After applying a gradient map or a blur, you can add a layer mask to the adjustment layer or the blurred layer. This mask allows you to "paint" the effect on and off. For instance, you could mask out certain areas to keep them sharp and in focus, while allowing the dreamy effect to permeate the rest of the image. This provides granular control, ensuring that the dreaminess enhances, rather than detracts from, the core elements of your photograph.
Beyond the Basics: Fine-Tuning and Creative Exploration
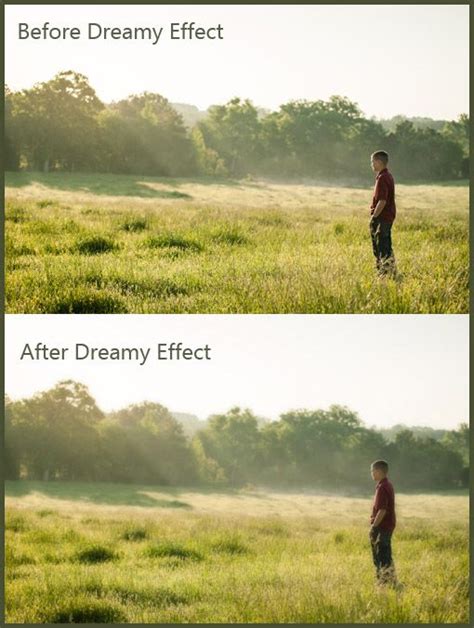
The journey to a perfect dreamy effect is often iterative. After applying initial filters and adjustments, it's essential to "minimize all your layers to see the final result." This allows for an objective assessment of the overall impact. You should observe a dreamy image characterized by "soft colors, a subtle blur effect, and a touch of mystery."
Remember that each photograph is unique. The techniques described here serve as a robust framework, but the specific parameters â blur radius, opacity levels, blend modes, and color choices â will need to be adapted to the individual image. What works for a brightly lit landscape might not be ideal for a dimly lit portrait. The provided text rightly points out that "this technique offers a unique way to transform your photos and create an otherworldly atmosphere."
Consider the implications of your choices. A heavier blur might evoke a stronger sense of fantasy, while a lighter touch can add a subtle, almost imperceptible airiness. The "hints of light that gently touch elements on the photograph" are crucial. By selectively enhancing these luminous details, you can guide the viewer's eye and deepen the emotional resonance of the image. Ultimately, the goal is to create a photograph that "touches something inside of you," making the viewer feel as though they are experiencing not just a picture, but a moment suspended in time, a captivating dream made visible.