Creating realistic blood visuals in digital art and photo manipulation is a powerful technique that can add a dramatic or horrifying touch to your work. Fortunately, you can achieve these convincing bloody visuals without any real-world harm, relying instead on the versatile tools and techniques within Adobe Photoshop. This tutorial will guide you through the process, from setting up your image to adding the final, subtle details that make fake blood look real. Whether you're looking to enhance a portrait, create a horror-themed graphic, or simply explore advanced photo editing, understanding how to simulate blood effectively is an invaluable skill.
Selecting Your Canvas: The Foundation of Your Blood Effect
The first crucial step in creating any convincing visual effect is choosing the right base image. The quality and composition of your photograph will significantly impact the final outcome. A well-lit image with clear subject definition will offer more opportunities for seamless integration of your blood effects. Consider the context of your desired outcome. For instance, if you're aiming for a dramatic portrait, an image with good contrast and defined facial features will work best. If you're creating a horror scene, a darker, more atmospheric image might be more suitable.
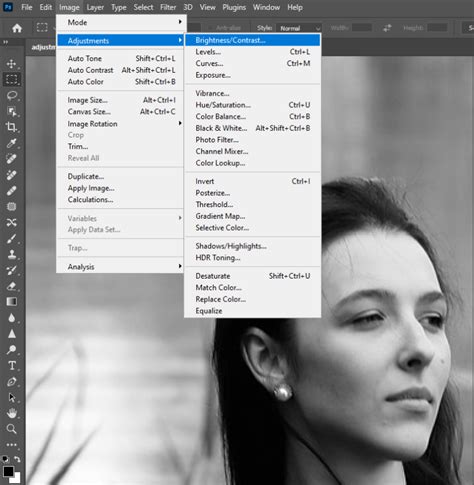
When working with Photoshop, it's often beneficial to prepare your image with some initial color grading. This can involve adjusting brightness, contrast, and saturation to set the overall mood. A Selective Color adjustment layer, affecting specific color ranges like Reds, Yellows, Whites, Naturals, and Blacks, can subtly refine the image's tone before you even begin adding the blood. This initial color grading ensures that your blood effects will blend harmoniously with the existing image palette.
Layering the Foundation: Building Your Blood Base
In Photoshop, the concept of layers is fundamental to non-destructive editing and complex effect creation. To begin simulating blood, you'll need to create a new layer. This dedicated layer will house all your blood elements, allowing for easy manipulation and adjustment without affecting the original image. It's good practice to name this layer something descriptive, like "Blood," to keep your Layers Panel organized.
If you're continuing from a previous tutorial, such as one on creating "Black Eyes in Photoshop," ensure your new "Blood" layer is positioned correctly within the layer stack. Often, effects like color grading are applied via adjustment layers. If your image appears too dark while you're working on the blood, you can temporarily disable the "Color Lookup" layer (or similar adjustment layers) and re-enable it once your blood effect is complete.
Sketching the Flow: Drawing Your Blood Shapes
With your new "Blood" layer active, you'll use selection tools to define the areas where the blood will appear. The Lasso Tool is a versatile option for this, allowing you to draw freehand shapes that mimic dripping blood. Don't be afraid to start with simple shapes; the realism comes from subsequent detailing. To add more blood elements without losing your current selection, hold down the "Shift" key while drawing additional shapes. This appends to your existing selection.
Once you have your initial blood shapes outlined, it's beneficial to refine their edges. Accessing the "Select and Mask" workspace provides precise control over edge properties. Feathering the selection slightly, perhaps around 15 pixels, can soften the hard lines of the lasso tool. Increasing the "Contrast" value in this panel, around 75%, can help maintain a defined edge while still achieving a smooth transition. Using a "Black & White" selection mask in "View Mode" allows you to visualize the mask's effect clearly.
Painting the Crimson: Adding Depth and Realism
Now, it's time to bring your blood shapes to life with color. Select your "Brush Tool" (B). For the base color, choose a deep, rich red. Experiment with brush settings to achieve a naturalistic appearance. A brush size of around 80 pixels can be a good starting point. Setting the brush's "Mode" to "Multiply" helps to blend the color naturally with the underlying layer, creating a sense of depth. A "Flow" of 12% allows for subtle build-up of color, preventing a flat, painted look. Within the "Brush" menu, adjust "Hardness" and "Spacing" to 25% for a slightly textured, organic feel.
To add further variation and a sense of dynamic application, explore the "Shape Dynamics" and "Transfer" settings. Setting "Size Jitter" to 100% in "Shape Dynamics" will introduce variations in brush stroke thickness, mimicking the irregular flow of liquid. A "Scattering" of 40% can help create a more organic, less uniform distribution of paint. In the "Transfer" settings, an "Opacity Jitter" of 30% will lead to subtle variations in color intensity, adding to the realism.
With these brush settings, begin painting within your selected blood shapes. You can hide your selection temporarily by pressing "Command/Control + H" to better visualize your brush strokes. Go over the areas multiple times, gradually building up the color and depth. This layering of strokes is key to achieving a convincing, non-flat appearance. Once you are satisfied with the initial coloring, you can deselect your drips by pressing "Command/Control + D."
Refining the Flow: Smudging and Transforming for Movement
To make your blood appear as if it's actively bleeding or dripping, the "Smudge Tool" (S) is indispensable. Select a brush with 0% Hardness. This creates a soft, fluid effect. Carefully "smudge" the edges and areas of your painted blood. The goal is to drag the color in a way that mimics the natural flow and spread of liquid. Think about where the blood would naturally trail and pool.
For more advanced manipulation, consider using Photoshop's transform tools. Select some of your blood drops and navigate to "Edit > Transform > Distort." This allows you to warp and manipulate the shape of the blood in more complex ways, adding to the sense of movement and realism. Options like "Skew" can also be useful for elongating or angling the drips.
PURE TERROR in After Effects!! Realistic Dripping Blood Effect
Adding Dimension: Blending Options and Layer Styles
To give your blood a more three-dimensional quality and enhance its believability, utilize "Blending Options" within the "Layer Styles" dialog window. Double-clicking on your "Blood" layer will open this panel.
- Bevel & Emboss: This can add a subtle raised effect, making the blood appear slightly dimensional. For the "Shadow Mode" color, a dark, deep red like #480101 can create realistic shadows within the embossed areas.
- Inner Shadow: This effect can simulate depth within the blood itself, making it look like it has volume. A blend mode color of #5a0000 can provide a subtle, dark red shadow that enhances the blood's richness.
- Outer Glow: While not always necessary, a subtle outer glow can sometimes help the blood stand out from the background, especially if it's meant to be wet and glistening.
Enhancing Realism: Advanced Techniques and Color Grading
Beyond the basic painting and smudging, several advanced techniques can elevate your blood effect.
Creating Custom Brushes for Highlights: For particularly realistic highlights, consider creating a custom brush. You can do this by selecting a small, sharp shape and saving it as a brush in the Brush Settings panel. When painting highlights, use white or a very light red and concentrate them on the thicker, darker areas of the blood where light would naturally reflect. Using a small brush size (3-6 px) for these highlights is often effective. The process of placing and undoing dots with "Control-Z" can help you find the perfect placement for these specular highlights.
Layer Masks for Gradient Effects: To create a gradient effect on individual blood blobs, apply a layer mask to them. Masking on three of the four sides of each blob can create a smooth transition, making it appear as if the blood is fading out or has a more natural edge.
Overlay for Subtle Color Variation: Creating a new layer set to "Overlay" and painting with varying shades of red around the eye area and thicker parts of the blood can add subtle color variations and depth, mimicking how light interacts with a viscous liquid.
Single Drops and Falling Blood: For individual drops, you can create a new layer set to "Multiply." Paint the base in a dark red. Then, use the eraser tool to define the shape of the drip, creating uneven ends that suggest it's in motion. Highlights on these single drops should focus on the top and bottom portions.
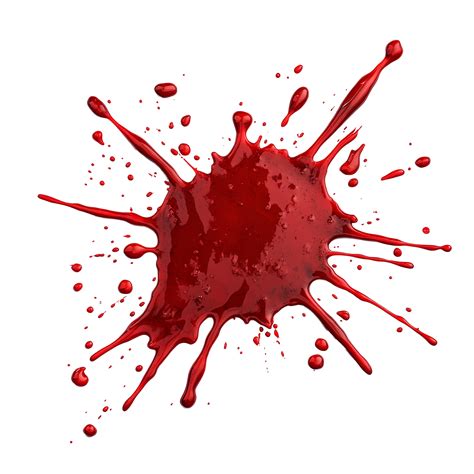
Realistic Blood Splatters: To create blood splatters, start by painting dots of medium red in the center of larger splatter areas. Use a soft round brush to darken these areas. For added realism, you can use Photoshop's built-in splatter brushes or create your own. After applying the splatter base, add a new layer clipped to it. Paint dots of medium or dark red within the splatter. Finally, on a layer above, paint bright white dots in the darker red areas to represent specular highlights.
Texture and Filters: Generating Blood from Scratch
Beyond painting directly onto an image, Photoshop's filters can be used to generate blood textures from scratch. This is particularly useful for creating seamless blood textures that can be applied to various surfaces.
- Initial Texture Generation: Start by creating a new PSD file and filling the first layer with white. Ensure your Foreground Color is white and Background Color is black. Apply "Filter > Render > Difference Clouds."
- Adding Non-Destructive Adjustments: To control the texture, add a non-destructive "Threshold" adjustment layer. Convert both the texture layer and the Threshold adjustment into a "Smart Object" so you can modify the results later.
- Blurring and Stylizing: Apply "Filter > Blur > Gaussian Blur" with a small radius (e.g., 1.8 px) for a smoother appearance. Then, use "Filter > Artistic > Plastic Wrap" to give the texture a more liquid-like quality. Another Gaussian Blur can further refine the smoothness.
- Color Mapping: Use a "Gradient Map" adjustment. Choose a gradient that transitions from a lighter red to a darker red to map the grayscale values of your texture to blood colors.
- Curves and Brightness/Contrast: A "Curves" adjustment allows for precise control over tonal range and contrast. You can adjust the curve to enhance the blood's vibrancy and depth. Finally, a "Brightness/Contrast" adjustment can further refine the overall look, making the colors more vibrant and the contrast more pronounced.
This method allows you to create a highly customizable and realistic blood liquid stain texture that can be easily adjusted by modifying the smart filters.
Integrating and Finalizing Your Effect
Once you have created your blood elements, whether by painting, smudging, or generating textures, the final step is to integrate them seamlessly into your image. Pay close attention to how light would realistically interact with a wet, viscous substance like blood. Consider highlights, shadows, and subtle color shifts.
If you've used a "Color Lookup" layer for your initial color grading, you might need to adjust its blending mode. Changing it to "Linear Light" and lowering its "Fill" to 70% can help blend the blood effect more naturally with the overall image tone.
Remember that depending on your chosen image and the specific effects you've applied, you may need to revisit and tweak the "Blending Options" and brush settings. Experimentation is key. The "History" panel is your best friend for undoing steps and trying different approaches.
Beyond the Basics: Actions and Special Effects
For those who want to achieve blood effects quickly or explore different styles, Photoshop Actions can be a valuable resource. Pre-made actions can automate complex sequences of steps, allowing you to create instant blood dripping effects or realistic blood splatters with a single click. Many actions offer a variety of glossy, realistic blood splatters, providing ample variety for different projects.
Furthermore, specialized brushes designed for blood splatters can significantly speed up the creation process. While some brushes might be advertised for ink or general splatter effects, a simple application of red color can transform them into effective blood splatter tools.
Understanding the Visuals: Why Fake Blood Works
The creation of fake blood in Photoshop relies on understanding the visual properties of real blood under different lighting conditions. Blood is not entirely opaque; it's partially transparent, allowing light to pass through. The perceived darkness of blood is often due to a high concentration of the substance or the absence of direct light. As blood flows, it leaves a trail, with the thickest concentration at the origin and becoming thinner as it disperses. Understanding these principles â that darker areas indicate thicker or less illuminated blood, and lighter areas suggest thinner or more reflective surfaces â is crucial for creating convincing results.
By combining careful observation, the right tools, and an understanding of Photoshop's capabilities, you can master the art of creating realistic and impactful blood effects for any of your creative projects.