Your logo is more than just a graphic; it's the visual cornerstone of your brand, often serving as the very first interaction a potential customer has with your business. A well-designed logo communicates your brand's essence, values, and professionalism at a glance. Whether you're launching a new venture or enhancing an existing one, mastering the art of logo creation in Adobe Photoshop is an invaluable skill. This comprehensive guide will walk you through the entire logo design process, from initial concept to a polished PNG file ready for any application.
Understanding the Fundamentals of Effective Logo Design
Before diving into the technicalities of Photoshop, it's crucial to grasp what constitutes a great logo. A truly effective logo is a delicate balance of art and science, requiring creativity, strategic thinking, and technical proficiency.
Key Attributes of a Strong Logo:
- Simplicity: The most memorable logos are uncomplicated. They are easy to recognize and recall. If you can't sketch it quickly, it might be too intricate.
- Memorability: A unique shape, element, or color combination helps a logo stick in the viewer's mind. Think of the Nike swoosh or the Apple logo; they are instantly identifiable.
- Appropriateness: The logo should align with the brand's tone, industry, and target audience. A playful logo might not suit a law firm, just as a stark, minimalist design might not fit a children's toy company.
- Timelessness: Great logos endure the test of time, remaining relevant across evolving design trends. Avoid overly trendy elements that will quickly become dated.
- Scalability: Your logo must look sharp and clear whether it's displayed on a business card, a billboard, a website favicon, or a social media profile picture.
The Design Process: From Idea to Digital
Creating a compelling logo is a journey that begins long before you open Photoshop.
- Brand Immersion: Deeply understand your brand's mission, core values, target audience, and competitive landscape. What message do you want your logo to convey?
- Conceptualization and Sketching: Jot down keywords, brainstorm symbols, and sketch rough ideas on paper. This initial phase is about exploration and can be done with a simple pen and paper. Don't be afraid to experiment with different shapes, styles, and layouts.
- Digital Translation: Once you have a rough logo concept on paper, it's time to bring it into Photoshop. Here, you'll refine your sketches, experiment with different styles, layouts, and color palettes.
- Feedback and Refinement: Share your digital designs with peers, potential clients, or a test audience to gather constructive feedback. This iterative process is crucial for identifying areas for improvement.
- Optimization and Finalization: Ensure your logo is optimized for clarity, scalability, and the appropriate file formats for its intended use.
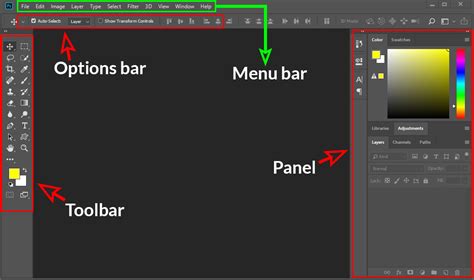
Navigating the Photoshop Workspace for Logo Design
Adobe Photoshop, while primarily a raster-based image editor, offers powerful tools that can be leveraged for creating scalable and versatile logos, especially when utilizing its vector shape capabilities. Understanding the interface is the first step.
Essential Photoshop Tools and Panels:
- Menu Bar: Located at the top, it contains commands for file management, editing, image adjustments, layers, and more.
- Options Bar: Situated below the menu bar, this dynamic bar displays settings relevant to the currently selected tool.
- Tools Panel: Typically on the left side of the workspace, this houses all the editing and drawing tools. Key tools for logo design include:
- Move Tool (V): For repositioning elements.
- Pen Tool (P): Essential for creating precise custom paths and shapes.
- Shape Tools (U): Includes Rectangle, Ellipse, Polygon, and Custom Shape tools for building basic geometric forms.
- Type Tool (T): For adding and formatting text.
- Eraser Tool (E): For removing parts of a layer.
- Gradient Tool: For creating smooth color transitions.
- Layers Panel: Crucial for organizing your design elements. Each shape, text, or image should ideally reside on its own layer for easy editing and manipulation.
- Color Selection: The foreground and background color swatches allow you to pick and switch between colors.
Step-by-Step: Creating Your Logo in Photoshop
Let's get started with the practical steps of designing your logo.
Step 1: Setting Up Your Canvas
A well-prepared canvas is the foundation for a successful design.
- Create a New Document: Go to
File > New. - Dimensions: For versatility, start with a square canvas. A size of
1000 x 1000 pixelsor larger is recommended for ample working space and detail. - Resolution: For print-quality logos, set the resolution to at least
300 pixels/inch. For web or digital use,72 pixels/inchis generally sufficient. - Color Mode: Choose
RGBfor digital designs orCMYKfor projects intended for print. - Background Contents: Set this to
Whiteinitially, orTransparentif you plan to work directly with transparency. - Workspace Setup: To ensure consistency, reset your workspace by going to
Window > Workspace > Essentialsand thenReset Essentials. - Enable Guides: For precise alignment and measurement, enable
GridandSmart Guidesunder theViewmenu. Then, ensureView > Snap To > Gridis selected.
Step 2: Drawing Your Logo Shapes
Photoshop's shape tools and pen tool allow for both geometric precision and custom artistry.
Using Shape Tools:
- Select a shape tool from the Tools Panel (e.g., Rectangle Tool, Ellipse Tool).
- In the Options Bar at the top, choose
Shapefrom the dropdown menu (notPathorPixels). This ensures you're creating a vector shape layer. - Select your desired
Fillcolor andStrokecolor and thickness. - Click and drag on the canvas to draw your shape. Use the grid and Smart Guides to help with proportion and alignment.
- To access a wider variety of pre-set shapes, select the
Custom Shape Tool, then click theShapedropdown in the Options Bar and choose from the available libraries or load new ones.
Mastering the Pen Tool:The Pen Tool is arguably the most powerful tool for creating custom, precise paths that can be converted into shapes.
- Select the Pen Tool (P).
- In the Options Bar, ensure
Pathis selected. - Click on the canvas to create anchor points. Click and drag to create curved segments.
- To refine existing points, hover over an anchor point with the Pen Tool selected. A plus (+) icon will appear to add a point, and a minus (-) icon to delete one.
- Once your path is complete, you can convert it into a shape layer by going to
Window > Propertiesand clicking theFillandStrokeoptions, or by right-clicking the path in thePathspanel and selectingMake Shape.
Step 3: Adding and Formatting Text
Typography plays a vital role in logo design, conveying brand personality and information.
- Select the Type Tool: Choose the Type Tool (T) from the Tools Panel.
- Create a Text Box: Click and drag on the canvas to define the area where your text will appear, or simply click once to create point text.
- Enter Your Text: Type your business name, initials, or slogan.
- Formatting Options: The Options Bar provides extensive control over:
- Font Family and Style: Select a font that aligns with your brand identity. Consider readability and personality.
- Font Size: Adjust the size to ensure it's proportionate to the logo's graphical elements.
- Text Color: Choose a color that complements your design.
- Alignment: Use the alignment options to position your text.
- Confirm Changes: Click the checkmark icon in the Options Bar or press
Enteron the numeric keypad. - Positioning and Resizing: Use the Move Tool (V) to reposition your text. To resize, go to
Edit > Free Transform(Ctrl+T on Windows, Command+T on Mac). HoldShiftwhile dragging a corner to maintain proportions.
How To Choose The Right FONT For Your Logo -Brand❓
Step 4: Color and Gradients
Color is a powerful psychological tool that significantly impacts brand perception.
- Solid Colors:
- Select the layer containing the shape or text you wish to color.
- In the Options Bar or the
Propertiespanel, click on theFillcolor swatch for shapes or the color swatch next to the font name for text. - The Color Picker will appear, allowing you to choose a color. You can use the sliders, input hex codes for precise brand color matching, or select from recently used swatches.
- Gradients:Gradients can add depth and visual interest.
- Select the layer.
- For shapes, choose
Gradientfrom the Fill options. For text, you can use theGradient Overlaylayer style (Layer > Layer Style > Gradient Overlay). - The Gradient Editor allows you to customize the colors, their distribution (stops), opacity, and angle of the gradient.
Step 5: Organizing and Refining Your Design
A well-organized design process leads to a cleaner, more manageable final product.
Layer Management:
- Rename Layers: Double-click a layer's name in the Layers Panel to give it a descriptive title (e.g., "Logo Circle," "Brand Name Text").
- Group Layers: Select multiple related layers (Ctrl+click or Command+click) and press
Ctrl+G(Windows) orCommand+G(Mac) to group them into a folder. This keeps your Layers Panel tidy and allows you to move or transform entire sections of your logo simultaneously. - Align and Distribute: Use the alignment and distribution options in the Options Bar (when multiple layers are selected) to ensure elements are perfectly spaced and aligned. Zoom in for pixel-perfect precision.
Transformations:
- Free Transform (Ctrl+T / Command+T): Allows for scaling, rotating, skewing, and distorting. Remember to hold
Shiftfor proportional scaling. - Editing Paths: If you used the Pen Tool or Shape Tools, you can select the individual anchor points of your vector shapes with the Direct Selection Tool (A) to further refine curves and angles.
- Free Transform (Ctrl+T / Command+T): Allows for scaling, rotating, skewing, and distorting. Remember to hold
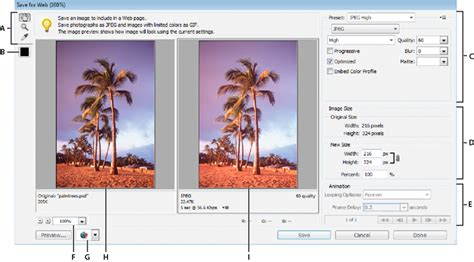
Step 6: Exporting Your Logo as a PNG
The PNG format is ideal for logos due to its support for transparency.
- Ensure Transparency: If you want a transparent background, make sure the background layer is deleted and no solid background color is present. The checkerboard pattern in Photoshop indicates transparency.
- Save for Web (Legacy) or Export As:
- Go to
File > Export > Save for Web (Legacy). This offers more control over optimization. - Alternatively, use
File > Export > Export As.
- Go to
- Choose PNG Format: In the export dialog box, select
PNGfrom the format dropdown. - Transparency Option: Ensure the
Transparencycheckbox is ticked. - Optimization: Adjust quality settings as needed, though for PNG, quality is generally preserved well.
- Save: Click
Saveand choose a location for your file.
Additional Tips for a Polished Logo
Elevate your logo design with these expert insights.
Vectorizing for Ultimate Scalability
While Photoshop excels at pixel-based editing, its vector shape tools allow for scalable elements. However, for true vector graphics that can be infinitely scaled without loss of quality, Adobe Illustrator is the preferred tool. If your Photoshop logo is primarily composed of vector shapes and text, you can often import it into Illustrator to convert it into a fully scalable vector file. Photoshop also offers a Export Paths to Illustrator feature, which can be a bridge for this process.
Color Palette Considerations
- Brand Consistency: Use hex codes to ensure your brand colors are consistently applied across all platforms and materials.
- Psychology of Color: Research the psychological impact of different colors to choose hues that align with your brand's message and evoke the desired emotions in your audience.
- Monochrome and Black & White Versions: Always create versions of your logo in black and white and monochrome for situations where color printing isn't possible or appropriate.
Testing and Feedback
Before finalizing, test your logo in various contexts:
- Small Sizes: Does it remain legible when shrunk down for favicons or social media avatars?
- Large Sizes: Does it hold up when scaled up for signage or merchandise?
- Different Backgrounds: How does it look on light, dark, and photographic backgrounds?
Beyond Photoshop: Bringing Your Logo to Life
Once your logo is perfectly crafted in Photoshop and exported as a high-quality PNG, the journey doesn't end. Your logo is the foundation for your brand's visual identity across various applications.
Merchandise and Branding
Platforms like Printify integrate seamlessly with e-commerce stores (Shopify, Etsy, etc.) and allow you to upload your logo to a vast array of products. From t-shirts and mugs to tote bags and stickers, you can easily create branded merchandise.
- Upload Your Logo: Use the Printify Product Creator to upload your PNG logo file.
- Customize and Preview: Adjust placement, resize elements, and preview your design on various products and backgrounds.
- Connect Your Store: Link your e-commerce platform.
- Sell: Printify handles printing, packing, and shipping directly to your customers, managing inventory and logistics.
How To Choose The Right FONT For Your Logo -Brand❓
Frequently Asked Questions
Can I create a logo in Photoshop?Yes, Adobe Photoshop is a powerful tool for logo design, offering extensive control over layers, editing, and styling. While Illustrator is ideal for vector-based work, Photoshop provides flexibility for detailed raster effects and is excellent for beginners learning the process.
Is Photoshop good for logo design for beginners?Absolutely. Photoshop is user-friendly and provides a visual, layer-based approach that is intuitive for newcomers. Its tools, like the Shape and Type tools, are straightforward to learn.
How do I make a logo transparent in Photoshop?To create a transparent logo, start with a new document or open your logo file. Ensure you are working on a layer that is not locked. Add a new transparent layer beneath your logo layer if needed. Use selection tools like the Magic Wand or Quick Selection tool to select the background you want to remove, then press Delete. When saving, choose the PNG format and ensure the transparency option is enabled.
What are the essential steps to design a logo in Photoshop?The core steps involve setting up a new canvas with appropriate dimensions, using shape tools or the pen tool to create graphical elements, adding and formatting text with the type tool, applying colors or gradients, organizing layers, and finally exporting the logo as a PNG file with a transparent background.
Should I use vector shapes or raster effects in Photoshop for logos?For maximum scalability and crispness, prioritize using Photoshop's vector shape tools and text layers whenever possible. Avoid applying raster-based effects like pixelated brushes or filters directly to your main logo elements if scalability is a primary concern. If you need to use raster effects, do so on separate layers that can be managed or potentially re-created in a vector program.
Can Photoshop create animated logos?Yes, Photoshop's Timeline features can be used to create basic animations for logos, suitable for short video intros or animated social media posts.
When saving a logo from Photoshop, what formats should I use?Always save your working file as a PSD (Photoshop Document) to retain layers for future edits. For final use, export as PNG (for web, especially with transparency), JPG (for general use where transparency isn't needed), and consider SVG if you plan to convert it to a vector format for ultimate scalability.
By following this comprehensive guide, you can confidently create professional, impactful PNG logos in Adobe Photoshop, ready to define and elevate your brand across all platforms.