Creating realistic blood effects in digital art can significantly enhance the impact of an image, particularly in genres like horror, fantasy, or even medical illustration. While the sight of real blood can be unsettling, digital tools like Adobe Photoshop offer a safe and versatile way to simulate its appearance. This guide delves into various techniques and approaches for generating convincing blood elements, from simple splatters to intricate dripping text, utilizing both pre-made brushes and custom creations. Whether you're a seasoned Photoshop user or a beginner looking to add a dramatic flair to your work, these methods will equip you with the knowledge to achieve a wide spectrum of bloody visuals.
Foundations of Digital Blood: Understanding the Basics
Before diving into specific techniques, it's crucial to grasp the fundamental principles that govern the visual representation of blood. Simon Rudd, a freelance writer and artist specializing in Photoshop tutorials, highlights that "blood brushes have their own set of rules." These rules often revolve around mimicking the fluid dynamics and optical properties of real blood.
The appearance of blood is heavily influenced by lighting conditions. In dimly lit scenes, blood strokes might need to be darkened to appear more realistic, while in well-lit environments, they should be brighter and more transparent. "Blood only looks realistic when the shadows and reflections are in cohesion with the rest of the image," emphasizes the importance of integrating the blood effect seamlessly with the existing scene's lighting and contrast. Understanding how light interacts with a viscous fluid like blood is key; it's not entirely opaque and can allow light to shine through, especially in thinner areas.
Leveraging Pre-made Brushes for Immediate Impact
One of the most accessible ways to incorporate blood into your Photoshop projects is by using pre-made blood brushes. These digital tools are designed to mimic various blood patterns, such as realistic blood splashes and splatters. "In Photoshop, there are numerous brush presets that are already available to use and mimic different patterns such as footprints, trails of leaves, snowflakes, and even shadows," noting that while these are general examples, specific blood brushes function similarly.
Finding suitable blood brushes is often a matter of searching online. Many websites offer free and premium brush packs for download. However, it's important to be discerning. When selecting brushes, look out for "glitching" effects, where the brush stroke cuts off unexpectedly, or pixelated and discolored edges. "To spot bad brushes, you need to look out for ‘Glitching‘ effects, such as the brush cutting off during strokes. There should also be no pixelated or discolored edges."
Using these brushes is typically straightforward:
- Launch Photoshop and navigate to the Brushes panel.
- If you haven't found a satisfactory set, you can access more options via the Brushes panel > Hamburger menu > ‘Get More ‘Brushes’. This method is particularly useful if the specific brush set you're looking for hasn't been created yet.
- Apply the brush by selecting it and painting on a new layer.
- Adjust the hue, saturation, and transparency of the brush strokes to make them appear more natural within the context of your image.
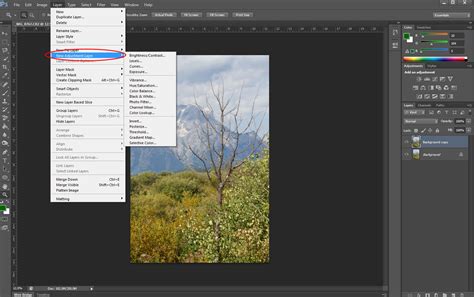
For instance, one tutorial outlines a basic approach: "First make a new Layer under the finger layer, name this Layer Blood. […] Next we shall darken the blood up using a Hue / Saturation Adjustment Layer, Add a new Hue / Saturation adjustment Layer above the blood layer by going to Layer>New Adjustment Layer>Hue / Saturation. Tick Colourize and set Hue to 0, Saturation to -61 and Lightness to -34." This demonstrates how post-application adjustments are crucial for realism.
Creating Custom Brushes for Unique Blood Effects
While pre-made brushes offer convenience, creating your own custom brushes provides unparalleled control and allows for truly unique results. This is especially valuable when depicting specific elements, such as individual red blood cells (RBCs) for medical illustrations. Annie, a medical illustrator, explains, "Drawing individual red blood cells (RBCs) in an illustration-especially when they are not the main focus of the piece-can become quite tedious and time-consuming. This is where I find using a pre-made RBC bush really speeds up my production process."
The process of creating a custom brush in Photoshop relies on the principle that black and white values dictate opacity. "When creating brushes in Photoshop, it’s useful to remember that the black values will = 100% brush opacity and the white values = 0% brush opacity-in other words the white areas will become transparent. Everything in between, i.e. all of the grey values, will range from 1-99% opacity."
Here’s a general workflow for creating a custom blood-related brush:
- Prepare your source image: This could be a photograph of paint splatters, a drawing, or even digitally created shapes. For a brush, you primarily need black and white pixels. If you have a colored image, convert it to black and white using a Black & White adjustment layer.
- Define the brush shape: Create a new document and draw or place your desired shape. For instance, to create an RBC brush, start with a grey-colored ellipse using the Custom Shapes tool. Avoid pure white highlights if you want to maintain opacity in those areas.
- Define the brush preset: Once your shape is ready, select the layer containing it and go to Edit > Define Brush Preset. Give your brush a descriptive name.
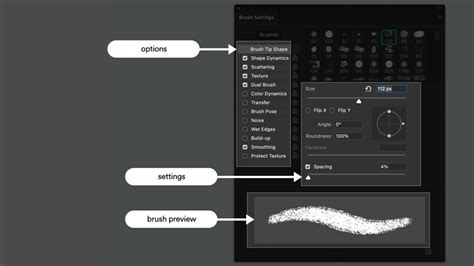
- Adjust brush settings: Open the Brush Settings panel (Window > Brush Settings). Here, you can fine-tune various parameters:
- Spacing: Controls the distance between brush dabs. Increasing spacing can create more distinct splatters, while decreasing it leads to a more continuous stroke.
- Shape Dynamics: Adjust Angle Jitter, Roundness Jitter, and Minimum Roundness for a more organic and varied look.
- Scattering: Control the spread of the brush dabs along the stroke.
- Color Dynamics: Use Foreground/Background Jitter to introduce variations in hue, making elements like RBCs appear more natural and differentiated.
Simulating Dripping Blood and Splatters
Creating the illusion of dripping blood and splatters often involves a combination of brushwork, layer styles, and blending modes. One effective method involves building up the blood effect in layers:
- Establish the base shape: On a new layer, use a hard round brush with a dark red color to paint the general shape of the blood pool or drip.
- Add mid-tones: Using a softer brush and a medium red color, fill in parts of the base, leaving the edges and areas where blood would be thickest darker.
- Introduce highlights and depth: With a bright red color and a low flow rate on a soft brush, paint strokes to suggest the flow and movement of the blood. Thicker areas of blood will appear darker, while thinner areas might catch more light. The transparency of blood means it's not entirely opaque.
- Refine with shadows and highlights: Use darker shades of red to build up shadows beneath drips and in thicker areas. For highlights, use a smaller brush with white or a very light red, concentrating on the darker, thicker parts of the blood to simulate shine.
- Employ layer masks: Layer masks are invaluable for creating gradient effects, allowing certain parts of the blood to fade out naturally.
For splatters, the process is similar, often involving dabbing with a brush to create clusters of dots that form the splatter shape. "Using the splatter brushes I painted dripping blood behind the text. To do this, you need to create a new layer and drag it under the text layer using Move Tool (V)." Varying brush opacity and size is key to achieving a dynamic and realistic look.
How to Paint TRULY Realistic BLOOD in Photoshop!
Crafting Dripping Blood Text Effects
Adding a bloody, dripping text effect is a popular technique for horror and Halloween-themed projects. This often involves a multi-step process using layer styles and manual painting.
- Set up your document: Create a new document and set your background and foreground colors. For example, a fade green background with a specific foreground color can be a good starting point.
- Type your text: Choose a font that complements the horror theme (e.g., "Gypsy Curse"). Enlarge the text and align it centrally.
- Apply Blending Options: This is where the magic happens. Right-click on the text layer and select 'Blending Options'. Experiment with settings such as:
- Bevel & Emboss: To give the text depth and a raised appearance.
- Contour: To refine the shape and highlight.
- Stroke: To add an outline, which can be a dark color with a shiny red middle.
- Inner Shadows: To brighten the text.
- Satin: To add brighter color variations.
- Color Overlay: To apply a darker red with a Color Burn blend mode.
- Gradient Overlay: To add darkness to the upper and lower parts of the text and brightness to the middle.
- Add blood cell effects: Load bubble patterns into Photoshop and apply them using the Pattern Overlay option with a red bubble pattern to create the appearance of blood cells within the text.
- Incorporate shadows: Add Drop Shadows to give the text depth and realism.
- Paint dripping blood: Create a new layer below the text layer. Use splatter brushes with a dark red color to paint dripping blood behind the text. You can also paint directly over the text on a new layer above it. Using a layer mask with the same brush in black can help achieve a nice dripping effect by selectively hiding parts of the splatter. Vary brush opacity and size for a more natural look.
- Add final drips: Use a hard round brush with a red color (e.g., #d80c22) and a slightly lower opacity and flow (60-70%) to paint individual drips vertically from the text. Add smaller drips at the end of these strokes.
This comprehensive approach allows for a highly customizable and convincing dripping blood text effect.
Generating Blood Textures from Scratch
Beyond direct application, Photoshop's filters can be used to generate realistic blood textures from scratch. This is particularly useful for creating seamless textures that can be applied as backgrounds or patterns.
- Start with a new PSD file: Choose any desired size.
- Fill the first layer with white.
- Apply Difference Clouds: Go to Filter > Render > Difference Clouds. This creates a noisy, cloud-like base.
- Introduce Threshold: Add a non-destructive Threshold adjustment layer (from the Layers tab's "Create new fill or adjustment" button). This will help to define shapes and contrast within the clouds.
- Convert to Smart Object: Select both the cloud layer and the Threshold layer and convert them into a smart object. This allows for non-destructive editing of subsequent filters.
- Apply Blurring and Artistic Filters:
- Gaussian Blur: Apply a gentle blur to smooth out the texture.
- Plastic Wrap: This filter can give the texture a more organic, liquid-like appearance.
- (Optional) Another Gaussian Blur with a small radius can further smooth the result.
- Colorize the texture:
- Gradient Map: Use a gradient map with lighter and darker tones of red to colorize the grayscale texture. This is crucial for achieving a blood-like hue.
- Curves: Adjust the curves to fine-tune the tonal range and contrast, making the blood appear more vibrant or muted as needed.
- Brightness/Contrast: Apply a Brightness/Contrast adjustment for further refinement of color vibrancy and overall contrast.
By adjusting the filters and adjustment layers, you can customize the generated blood liquid stains to achieve various looks, from thin and watery to thick and viscous.
Advanced Techniques and Considerations
The creation of realistic blood effects is an ongoing process of refinement and experimentation. As Simon Rudd notes, "This isn’t the only way you can make blood and I’m sure other people have other ideas."
- Light Source Consistency: Always assess the light sources in your image and ensure your blood effects are consistent with them. Shadows and reflections are critical for integration.
- Transparency and Opacity: Remember that blood is not entirely opaque. Adjusting opacity and using blend modes like Color Burn can help simulate how light passes through or reflects off the fluid.
- Smudge Tool: For a more organic, bleeding effect, the Smudge tool can be used to "smudge" the shape of the blood, giving the impression of it spreading or dripping naturally.
- Reference Images: Don't hesitate to use real-world references of blood splatters, drips, and textures to inform your digital creations.
- Experimentation: The best way to master these techniques is through practice. Try different brush settings, layer styles, and adjustment combinations to discover what works best for your specific project.
By combining these methods, artists can create a wide range of convincing and impactful blood effects in Photoshop, adding a new dimension of realism and drama to their visual creations.