Photoshop's ability to isolate elements from an image using selection tools and layer masks, and then seamlessly integrate them into new compositions, is a cornerstone of digital artistry. Once these elements are combined, the critical step of smoothing their often-jagged edges is essential for achieving a natural and believable result. This process, known as blurring or feathering edges, preserves the image's clarity and detail by gently softening the transition between edge pixels and their new surroundings. Whether you're adding something new to an existing image, creating a transparent background, or aiming for a specific artistic effect, understanding how to blur edges in Photoshop is a fundamental skill.
The Fundamentals of Edge Softening: Feathering and Anti-aliasing
At its core, blurring edges in Photoshop involves two primary techniques: anti-aliasing and feathering. Anti-aliasing gently softens the opacity and color transition between edge pixels and background pixels, ensuring that the image's clarity and detail are maintained. It's a subtle but crucial process that prevents stair-step artifacts on diagonal lines and curves.
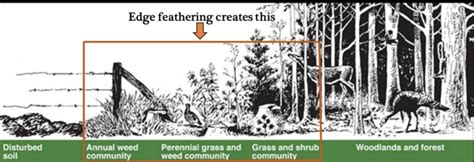
Feathering, on the other hand, goes a step further by softening the edges of a selection by creating a gradual fade between the pixels on the border and those in the surrounding area. This creates a more pronounced, yet still natural, transition. When you choose to feather an edge, you'll encounter the "Feather Radius" field. The number you input here determines how many pixels away from the edge of your selection Photoshop will begin the smoothing and blending process. A smaller radius results in a sharper, more defined edge, while a larger radius creates a broader, softer transition.
Step-by-Step: Blurring Edges for a Solid Background
For those looking to blur the edges of a photo to blend it into a solid or transparent background, or even into another photograph, Photoshop offers a straightforward workflow. This process is particularly useful for isolating a subject and placing it against a new backdrop, creating a dreamy effect, fixing harsh edges, or drawing attention to a specific focal point.
Importing Your Image
The first step in any Photoshop editing process is to import your image. This can be achieved by simply dragging and dropping the image file directly onto the Photoshop application icon. Alternatively, you can open Photoshop first, navigate to the "File" menu, click "Open," and then select your desired image file. For those who wish to follow along with a tutorial, it is advisable to download the latest version of Photoshop to ensure access to all features and tools.
Making Your Initial Selection
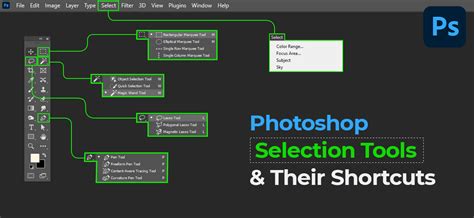
Once your image is loaded into the Photoshop workspace, you'll need to make an initial selection of the area you wish to preserve. The choice of selection tool depends heavily on the image itself. For this tutorial, we'll demonstrate using the Elliptical Marquee Tool, which is ideal for selecting circular or oval areas. If you're working with a portrait, you might select the model's face and head to ensure this area remains sharp and unblurred. However, you can use whichever selection tool best suits your image and desired outcome. Tools like the Quick Selection Tool or the Pen Tool can offer more precise selections for complex shapes. When you are satisfied with your selection, you can proceed to the next step.
Applying the Feathering Effect
With your initial selection in place, it's time to apply the feathering effect. Navigate to the menu bar at the top of the screen and click on "Select." From the drop-down menu, choose "Modify," and then select "Feather." This action will open the "Feather Selection" dialog box.
Within this dialog box, you'll find the "Feather Radius" field. Here, you will input the numerical value that dictates the extent of the feathering. The value you choose is subjective and depends on your personal taste and the desired final appearance of your image. For instance, a feather radius of 5 pixels will create a much sharper feather than a radius of 30 pixels. Experimentation is key; try altering the value to achieve different results. For this particular edit, a feather radius of 20 pixels has been chosen as an example. Once you've set your desired feather radius, click "OK."
Visualizing the Feathered Area with Quick Mask Mode
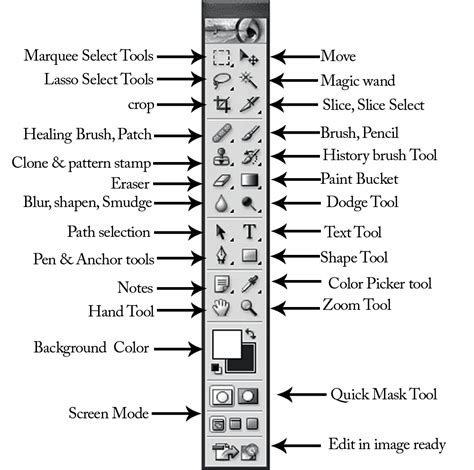
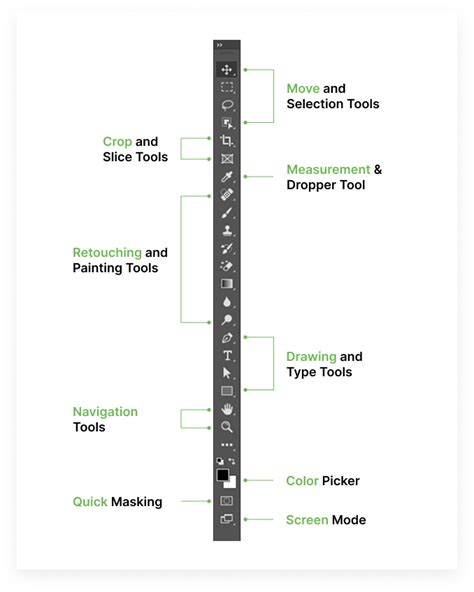
To better understand and visualize the area where you've applied the feather effect, you can activate "Quick Mask Mode." This mode overlays your photograph with a translucent red color, highlighting the unselected portions of your image. To enter Quick Mask Mode, locate and click the Quick Mask Mode icon on the left-hand toolbar. This icon typically appears as a circle within a rectangle. Upon clicking it, the red overlay will appear, clearly delineating the feathered region.
Inverting the Selection
The next crucial step is to invert your selection. This means that the area you initially selected will now be deselected, and the surrounding area will become the active selection. To invert your selection, return to the "Select" menu in the top bar, and choose "Inverse." After this action, you will observe that the outside of your image is now bordered by "marching ants" - the animated dashed lines that indicate an active selection. This signifies that the selection has been successfully inverted, and you have now deselected the part that was previously selected, effectively focusing on the area outside your original subject.
Creating a New Background
Now that the edges are softened and the selection is inverted, it's time to create a new background to make the feathered edge effect apparent. This is where you can blend your subject into a solid color, a transparent background, or even another image.
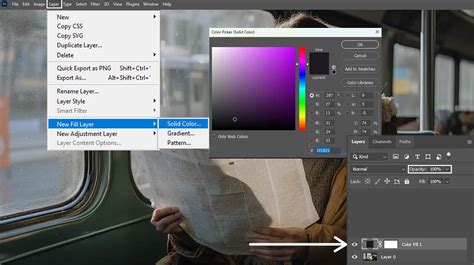
To fill your background with a solid color, go to the bottom of the "Layers" panel. Click on the "Adjustments" menu (represented by a half-filled circle icon) and select "Solid Color" from the drop-down menu. This will open the "Color Picker" window, allowing you to choose any color you desire. Experiment with different hues and shades until you achieve your preferred look. Once you've settled on a color, click "OK." For example, filling the background with white can create a clean and professional look, making the subject stand out.
Advanced Techniques and Considerations
Beyond the basic feathering method, Photoshop offers other powerful tools and techniques for manipulating edges and achieving specific artistic outcomes.
Gaussian Blur for Subtle Blurring
For a more subtle blurring effect, the Gaussian Blur filter can be employed. This filter is particularly useful for creating soft, atmospheric backgrounds or for gently softening the overall image without a distinct edge selection.
To use Gaussian Blur:
- Open your image in Photoshop. For non-destructive editing, it's recommended to convert your image layer into a Smart Object. You can do this by right-clicking on the layer in the Layers Panel and selecting "Convert to Smart Object."
- Navigate to the menu bar and click on "Filter."
- From the "Blur" submenu, select "Gaussian Blur."
- A dialog box will appear with a "Radius" slider. Adjust this slider to control the intensity of the blur. A higher radius will result in a more pronounced blur. For instance, in an example, the Gaussian Blur Radius was increased to 30.3.
- Click "OK" to apply the effect.
Gradient Fill for Feathered Edges
A Gradient Fill Adjustment Layer offers a sophisticated way to create beautiful, feathered edges. This method provides excellent control and is non-destructive.
To implement this technique:
- Open your image and convert it to a Smart Object if you haven't already.
- Click the "Create a New Adjustment Layer" icon at the bottom of the Layers Panel.
- Select "Gradient Fill" from the drop-down menu.
- The "Gradient Fill" dialog box will appear. Click on the gradient preview bar to open the "Gradient Editor."
- Within the "Gradient Editor," you can select from various presets or create your own custom gradient. To achieve a feathered edge, you might use a gradient that transitions from your subject's color to transparency or a solid background color.
- Ensure the "Style" is set to "Linear" or "Radial" as per your desired effect, and adjust the "Angle" and "Scale" to fine-tune the gradient's appearance.
- You can also click the "Reverse" option if needed.
- Check the image in the "Preview" window to see how the gradient affects your image.
- Click "OK" when you are satisfied with the results.
Utilizing Selection Tool Options
When you initially make a selection using any of Photoshop's selection tools, the Options Bar at the top of the screen provides direct access to modify its properties. Among these options is a "Feather" value box. You can enter a numerical value here before creating your selection to pre-feather the edges. For a slight feathering effect, a value around 30 pixels might be appropriate. Experimenting with different Feather values here allows for quick adjustments to the softness of your selection's edges.
Why Blur Edges? Artistic and Practical Applications
The reasons for blurring edges in Photoshop are diverse, ranging from purely aesthetic choices to practical necessities in image manipulation.
- Artistic Effects: Creating a dreamy, ethereal, or soft-focus effect is easily achievable with blurred edges. This can enhance the mood of a photograph, especially in portraiture or landscape photography.
- Focus and Attention: By blurring the edges of an image or the background, editors can effectively direct the viewer's eye towards the main subject, ensuring it remains the focal point.
- Subject Isolation: When cutting out subjects from their original backgrounds to place them into new scenes, blurred edges help to integrate them more naturally, preventing harsh, artificial outlines.
- Blending and Transitions: Blurring is essential for smooth transitions when combining elements from different images or when fading an image into a solid or transparent background.
- Atmospheric Backgrounds: Blurred backgrounds can create a sense of depth and atmosphere, making the subject pop and adding a professional polish to the image.
- Correcting Jagged Edges: Sometimes, the process of cutting out a subject can result in rough or "jagged" edges. Blurring techniques are the primary method for smoothing these imperfections.
A Note on Strength and Intensity
When working with some blurring tools, you may encounter a "Strength" or "Intensity" setting. This option allows you to control how pronounced the blurring effect is. Minimal smoothing has little effect on overall image quality, while higher intensities can lead to a more dramatic transformation of the edges.
Conclusion: Practice Makes Perfect
Mastering the art of blurring edges in Photoshop is a skill that develops with practice. By understanding the fundamental concepts of feathering and anti-aliasing, and by exploring the various tools and techniques available, you can significantly enhance your image-editing capabilities. Experiment with different selection tools, feather radii, and blurring filters on a variety of images to discover what works best for your specific creative vision. The ability to seamlessly blend elements and create compelling visual narratives is a testament to the power and versatility of Photoshop.