Shadows, when strategically employed, are potent tools for artistic expression, capable of imbuing images with depth and drama. However, intrusive or harsh shadows can detract from an image's overall appeal, creating distracting elements that disrupt the visual harmony. The key to achieving a polished and realistic aesthetic lies in understanding when and how to effectively remove or reduce these shadows within Adobe Photoshop. This comprehensive guide will walk you through various techniques, offering a step-by-step approach to mastering shadow manipulation in your photographs. Photoshop provides a versatile suite of tools, each suited to different scenarios and desired outcomes, allowing you to refine your images with precision.
The Foundation: Duplicating Your Layer
Before embarking on any editing process, it is crucial to safeguard your original image. Creating a duplicate layer serves as a vital backup, allowing you to revert to the original or experiment freely without the risk of irreversible damage. To initiate this protective measure, navigate to the "File" menu and select "New" to open your desired image. Once the file appears in the document window, you will see the "Background" layer in the "Layers" palette, typically located on the right side of your screen. Right-click on this "Background Layer" and choose "Duplicate Layer" from the contextual menu. A "Duplicate Layer" dialog box will then appear, providing an opportunity to rename the layer for easy reference - we will refer to it as the "Duplicate Layer" throughout this tutorial. This simple step ensures that your original image remains untouched, providing a safety net for all subsequent editing endeavors.
Method 1: The Power of Content-Aware Patch Tool
One of the most effective and intuitive methods for removing unwanted shadows involves the Patch Tool, particularly when utilized with its "Content-Aware" mode. This intelligent feature allows Photoshop to analyze the surrounding pixels and generate new ones to seamlessly fill the selected area, making it ideal for blending away distractions.
Step-by-Step Guide:
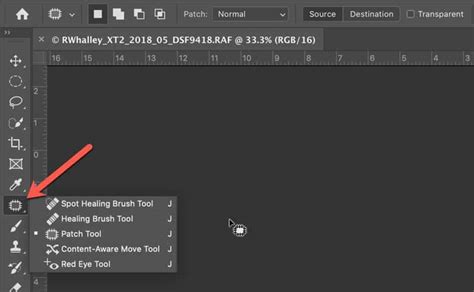
- Select the Patch Tool: Locate the Patch Tool in the toolbar on the left side of your screen. It often shares a spot with the Spot Healing Brush and Healing Brush tools; you may need to click and hold to reveal it.
- Set to Content-Aware: From the Patch Tool's drop-down menu, ensure that the mode is set to "Content-Aware." This is critical for enabling Photoshop's intelligent pixel generation.
- Isolate and Drag the Shadow: Begin by carefully selecting the area containing the unwanted shadow with the Patch Tool. Once the area is selected, click and drag this selection to a nearby portion of the image that exhibits a similar texture and tone, free from the distracting shadow. As you drag, observe how Photoshop dynamically updates the selected area, attempting to match the surrounding pixels.
- Release and Refine: Once you have dragged the selection to a suitable source area and are satisfied with the preview, release the mouse button. Photoshop will then process the information, smoothing out the transition and effectively removing the shadow. You may need to repeat this process on different parts of the shadow for optimal results, ensuring that you drag to areas that closely match the lighting and color of the area you are trying to fill.
The Content-Aware Patch Tool is remarkably effective for removing shadows that fall on relatively uniform surfaces, such as walls, skies, or smooth skin. Its ability to intelligently sample and blend pixels makes it a go-to tool for achieving natural-looking results with minimal effort.
Method 2: Precision with the Clone Stamp Tool
The Clone Stamp Tool offers a more hands-on approach to shadow removal, granting you precise control over which pixels are used to replace the shadowed areas. This method is particularly useful when dealing with complex textures or areas where Content-Aware Fill might struggle to produce a perfect match.
Step-by-Step Guide:
- Duplicate Layer (Again): As with all significant edits, begin by creating a duplicate of your image layer. A quick shortcut for this is to press
CTRL + J(orCmd + Jon a Mac). - Select the Clone Stamp Tool: Access the Clone Stamp Tool from the toolbar. It is represented by a rubber stamp icon.
- Configure Brush Settings: Before you start cloning, adjust your brush settings. The "Diameter" slider allows you to control the size of your brush tip; drag it left or right as needed. For smoother edges and better blending, select a soft, medium-sized brush. To completely eliminate a shadow, set the brush's "Opacity" to 100%. If you aim for a more subtle reduction, you might opt for a lower opacity.
- Define the Clone Source: This is a critical step. To sample pixels that will be used to cover the shadow, position your cursor over a non-shaded area of the image that has the desired texture and color. Then, press and hold the
Altkey (orOptionkey on a Mac). Your cursor will transform into a crosshair, indicating that you have set your clone source. - Paint Over the Shadow: Now, zoom in on the shadow area you wish to remove. With your defined clone source, begin painting over the shadow. As you paint, Photoshop will replace the shadowed pixels with the sampled pixels from your chosen source. For the most natural-looking results, you may need to re-sample pixels from different areas of the image periodically by repeating step 4 and then continuing to paint. This ensures that the cloned areas don't appear repetitive or unnatural.
The Clone Stamp Tool requires a bit more practice to master, but it offers unparalleled control. It's an excellent choice for intricate areas where precise pixel-by-pixel replacement is necessary to maintain image integrity.

Method 3: Reducing Shadows with the Dodge Tool
Sometimes, the goal isn't to completely remove a shadow but rather to reduce its intensity and lighten the darkened areas, making them less obtrusive. The Dodge Tool is specifically designed for this purpose, allowing you to selectively brighten parts of your image.
Step-by-Step Guide:
- Duplicate Layer: As always, start by duplicating your image layer (
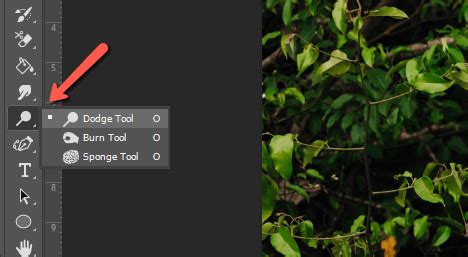
CTRL + JorCmd + J). - Select the Dodge Tool: Find the Dodge Tool in the toolbar. It is often represented by a magnifying glass icon.
- Set the Range to "Shadows": In the Dodge Tool's options bar, locate the "Range" setting. From the drop-down menu, select "Shadows." This ensures that the tool primarily affects the darkest areas of your image, preventing you from over-exposing brighter regions.
- Paint Over the Shadowed Area: Zoom in on the shadow you wish to lighten. Begin painting over this area with the Dodge Tool. You will observe that the selected shadow areas gradually become brighter, reducing their harshness and making them blend more harmoniously with the rest of the image. You can adjust the "Exposure" setting in the options bar to control the strength of the brightening effect.
While the Dodge Tool can be effective for subtle lightening, it's important to use it judiciously. Overuse can lead to an unnatural, "painted-on" appearance. For more precise and non-destructive shadow reduction, consider the following layer-based methods.
Method 4: Non-Destructive Shadow Reduction with Layers
For situations where you want to soften harsh shadows without permanently altering the original pixels, working with layers and adjustment layers provides a sophisticated and flexible approach. This method allows for fine-tuning and easy modification even after the initial edits are complete.
Step-by-Step Guide:
- Select the Shadow Area: Begin by selecting the shadow you wish to reduce. You can use any of Photoshop's selection tools, such as the Magic Wand Tool (for areas with distinct color differences), the Quick Selection Tool (for more intuitive edge detection), or the Lasso Tool (for freehand selections).
- Copy to a New Layer: Once the shadow is selected, go to the "Edit" menu at the top of the screen and choose "Copy." Then, navigate to the "Layer" menu, select "New," and finally, choose "Layer via Copy." This action places the selected shadow area onto its own independent layer.
- Adjust Brightness and Contrast: With the new shadow layer selected, open the "Adjustments" panel. Click on the "Brightness/Contrast" icon (often depicted as a sun-like symbol). The "Brightness Properties" panel will appear, offering two sliders: "Brightness" and "Contrast." Carefully adjust the "Brightness" slider to the right to lighten the shadow. Use the "Contrast" slider to fine-tune the tonal range if needed, but be cautious not to reintroduce harshness.
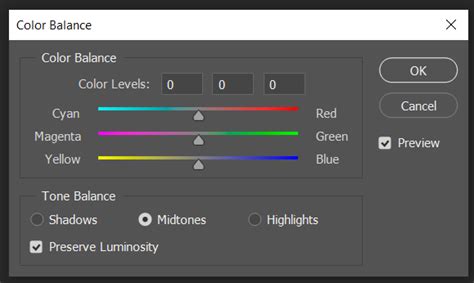
- Modify Color Temperature (Optional but Recommended): To ensure the reduced shadow looks natural, you can also adjust its color temperature. In the "Adjustments" panel, select the "Color Balance" icon (resembling a balance scales symbol). Under the "Tone" setting, choose "Shadows." You can then use the "Cyan," "Magenta," and "Yellow" sliders to subtly shift the color of the shadow area, making it blend more seamlessly with the surrounding tones. For instance, if the shadow appears too blue, you might add a touch of yellow.
This layer-based approach offers excellent control and allows you to non-destructively reduce the impact of harsh shadows, creating a softer and more natural-looking effect.
Advanced Techniques: Adjustment Layers for Comprehensive Control
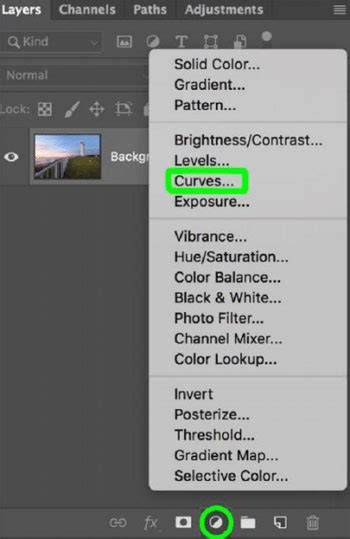
Adjustment layers are the cornerstone of non-destructive editing in Photoshop, and they are exceptionally powerful for managing shadows. The "Levels" and "Curves" adjustments offer the most sophisticated control over tonal range.
Using Levels:
- Create a Levels Adjustment Layer: Go to the "Layer" menu, select "New Adjustment Layer," and choose "Levels."
- Manipulate the Histogram: In the "Properties" panel for Levels, you'll see a histogram representing the tonal distribution of your image. There are three primary sliders: a black slider (representing shadows), a gray slider (mid-tones), and a white slider (highlights).
- Lighten Shadows: To lighten the shadows, drag the black slider slightly to the right. This effectively lifts the darkest tones in your image. You can also try moving the gray slider slightly to the left; this will lift the mid-tones, which can also help to brighten shadowed areas.
Using Curves:
- Create a Curves Adjustment Layer: Similar to Levels, go to "Layer" > "New Adjustment Layer" > "Curves."
- Adjust the Curve: The "Curves" adjustment offers a more powerful and granular control over tonal ranges. You'll see a diagonal line on a graph, representing the image's current tonal values. To lighten shadows, click on the bottom-left portion of this line (representing the darkest areas) and drag it upwards. This selectively brightens the shadows.
- Maintain Contrast: To prevent the image from becoming flat, you can create an "S" curve by adding another point to the middle of the line and slightly pulling it down. This helps to preserve contrast while still lifting the shadows.
Both Levels and Curves adjustment layers allow you to precisely target and lighten shadows without permanently altering your original image data, making them indispensable tools for professional retouching.
Understanding Photoshop's Shadow Tools
Photoshop does not feature a singular "Shadow Removal" button. Instead, it provides a robust collection of tools that, when used in combination, enable comprehensive shadow manipulation. The Patch Tool, Clone Stamp Tool, and Content-Aware Fill are frequently employed for direct shadow removal. For more subtle lightening and tonal adjustments, Adjustment Layers like Curves and Levels are invaluable, offering precise, non-destructive control. Mastering a blend of these techniques is key to achieving professional-quality results.
Automated Shadow Removal Features
Photoshop incorporates features that automate aspects of shadow removal, with Content-Aware Fill being a prime example. This tool intelligently analyzes surrounding pixels to fill selected areas, proving highly effective for removing shadows with minimal manual intervention. While not a one-click solution, it represents a powerful and largely automated process. For more complex shadow issues, third-party plugins can offer additional capabilities. Furthermore, emerging AI-driven features like Generative Fill are pushing the boundaries of automated, professional-level results in image editing.
The Dodge Tool: A Historical Perspective and Modern Application
The Dodge Tool, named after a traditional darkroom technique where a photographer would block light to selectively lighten areas of a print, serves to selectively brighten parts of an image. While it can be used to lighten shadowed areas, it's often not the most precise or effective method for complete shadow removal. The primary drawback is that it directly modifies pixels on the image layer, resulting in a destructive edit. This can sometimes lead to an unnatural, "painted-on" look and makes reversing changes more challenging. For these reasons, non-destructive tools such as Adjustment Layers (Levels or Curves) or content-aware tools like the Patch Tool and Content-Aware Fill are frequently preferred for more professional and seamless shadow adjustments.
Photoshop Basics: How to use the Dodge + Burn Tool
Removing Drop Shadows
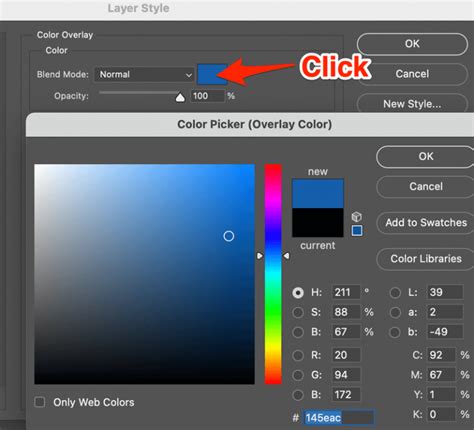
In instances where you need to remove a drop shadow effect applied to a layer, Photoshop offers straightforward methods. The most direct approach is to access the "Layer Style" settings for the layer containing the shadow and simply uncheck the "Drop Shadow" option. For more granular control, you can separate the drop shadow into its own layer. Right-click the "Effects (fx)" icon on the layer in the "Layers" panel and select "Create Layer." This isolates the drop shadow, allowing you to edit it with tools like the Eraser tool or apply a Layer Mask for finer control over its removal.
The Art of Balance: When to Remove, When to Reduce
The interplay of light and shadow is fundamental to compelling photography. Shadows can define form, create mood, and guide the viewer's eye. Therefore, the decision to remove or reduce shadows should be made with artistic intent. Severe shadows can sometimes distract from the intended subject or make an image appear unnaturally intense. Removing or lightening shadows is one way to refine your photograph, ensuring that the viewer's attention is drawn to the intended focal point. However, it is crucial to maintain a sense of realism. As you lighten or remove shadows, strive for edits that enhance, rather than detract from, the natural appearance of the scene. Experimentation with these tools will help you develop an intuitive understanding of how best to balance light and shadow for maximum visual impact.
The practical application of these techniques can be observed in real-world scenarios, such as addressing harsh shadows on subjects like the baby elephants in the example provided by Richard Pilcher. In such cases, the goal is to mitigate the impact of the shadows to reveal the details of the subject without making the edit appear artificial. By applying methods like adjusting exposure or utilizing the Clone Stamp tool strategically, one can achieve a significantly improved result, as demonstrated by the fixed image. This highlights the versatility of Photoshop in resolving common photographic challenges. The tutorial, while demonstrated in Photoshop CC, is also applicable to Photoshop CS6, ensuring its relevance for a broad user base. The process often involves steps like painting over the shadow area after resetting brush settings, and carefully matching the exposure of the selected area to its surroundings.
Ultimately, the ability to effectively remove and reduce shadows in Photoshop is a skill that enhances your photographic workflow. By understanding the capabilities of tools like the Patch Tool, Clone Stamp Tool, Dodge Tool, and the power of Adjustment Layers, you can transform distracting shadows into elements that contribute positively to the overall aesthetic of your images. Continuous practice and exploration of these techniques will empower you to achieve professional-grade results, allowing your creative vision to shine through.