The act of creation, particularly within the realm of art, often stems from a desire to capture, transform, and express. For many, this journey begins with a spark of inspiration, a yearning for a more tactile and less pressured form of making. This sentiment was the driving force behind a recent artistic endeavor: the creation of a book entirely composed of collages. This process, reminiscent of cherished school art lessons, offered a welcome departure from the precise demands of drawing, instead embracing the joy of collecting disparate elements and weaving them into something new. The allure of "feeding the magpie," as it were, and the freedom to experiment with materials, became the central theme.
Embracing the "Magpie" Instinct: Gathering Your Materials
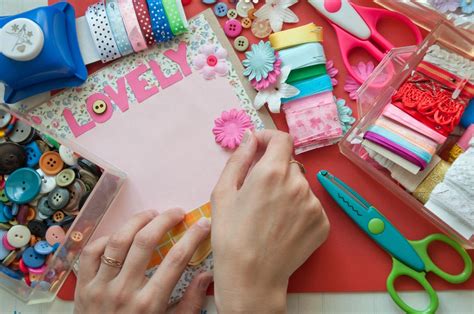
The foundation of any compelling collage lies in its constituent parts. The beauty of this art form is its inherent inclusivity; virtually anything flat enough to adhere can become a building block. The journey often begins with the readily available: stacks of old magazines and newspapers, their pages brimming with visual fodder. However, the creative spirit need not be confined to these traditional sources. Packaging materials, discarded fabric scraps, even natural elements like pressed leaves, can lend unique textures and narratives. Postcards and personal photographs offer a more intimate dimension, allowing for the infusion of personal history and memory. The key is to approach this stage with an open mind and an eager eye, much like a collector of curiosities.
The Art of Selection: Cutting and Curating Your Treasures
Once a diverse array of potential components has been amassed, the next crucial step is the act of selection. This is where the "magpie" instinct truly takes flight. Unlike the methodical approach of creating a mood board, where the aim is often literal representation, collage invites a more abstract and intuitive process. The user's experience highlights a valuable technique: holding an image upside down. This simple inversion can disrupt our preconceived notions of an object or scene, revealing new compositional possibilities and unexpected juxtapositions. The choice of cutting tool is largely a matter of personal preference. While a scalpel and cutting board offer precision, scissors provide a more immediate and accessible option, with ripped edges lending a softer, more organic texture to the final piece. The goal is to cultivate a collection of shapes and sizes, a visual vocabulary ready to be assembled.
The Alchemy of Arrangement: Piecing Together Your Vision
With a curated selection of cut-out elements at hand, the true alchemy of collage begins: the act of arrangement. This stage is best approached with a sense of playfulness and exploration. Spreading all the gathered pieces across a surface allows for a comprehensive overview, a visual feast from which to draw inspiration. The process then becomes one of trial and error, of picking up an element and testing its compatibility with others. It’s about discovering those combinations that "spark some joy," that resonate with an emerging aesthetic or narrative. This iterative process of moving, combining, and re-evaluating is where the magic of transformation truly happens, as disparate fragments begin to coalesce into a harmonious whole.
Final Touches and Flourishes: Bringing Your Collage to Life
Once a satisfactory composition has been achieved through the playful exploration of arrangement, the next step is to permanently fix the elements in place. The application of an appropriate adhesive, such as a reliable Pritt stick for most paper-based materials, secures the artwork. This is also the opportune moment to introduce any hand-drawn flourishes that might enhance the piece. These additions can range from subtle outlines and decorative patterns to more elaborate illustrative elements, offering a personal signature and a layer of depth to the collage. This integration of drawn elements with found imagery blurs the lines between different artistic disciplines, creating a richer and more complex final artwork.
Comics as a Canvas: Leveraging Collage for Storytelling
The principles of collage extend powerfully into the realm of sequential art, particularly in the creation of comics. Comics, as one of the oldest and most versatile mediums for storytelling, encompass a vast spectrum of genres and narrative styles. The misconception that creating comics requires specialized tools or expensive software is readily dispelled by the accessibility of modern digital platforms. Tools like BeFunky's Collage Maker offer a streamlined approach, providing pre-made layout templates and the flexibility to design custom arrangements. This democratizes the comic-creation process, allowing individuals to focus on the narrative and visual elements without being hindered by technical barriers.
The Anatomy of a Comic Page: Layouts, Panels, and Flow
Understanding the fundamental components of a comic page is crucial for effective visual storytelling. The format of a comic is intrinsically linked to the story it aims to tell. Some narratives are dialogue-heavy, while others rely on minimal text, allowing the imagery to carry the weight of the story. Similarly, panel count and size can vary dramatically. Some pages feature numerous small panels, creating a sense of rapid progression, while others utilize larger, more impactful illustrations. The standard American comic book size, approximately 6.625 by 10.25 inches, is a common benchmark, but ultimately, the page dimensions are a creative choice.
Several types of comic book pages exist, with the most familiar featuring multiple panels separated by white margins and gutters. Gutters, the spaces between panels, play a significant role in dictating the reading pace and flow. "Splashes" and "spreads" are often employed for moments of heightened drama or action, utilizing larger areas of the page to create a powerful visual impact. These can sometimes eliminate gutters entirely or feature panels nested within existing ones, further manipulating the visual rhythm.
Designing for the Reader: Understanding Visual Flow and Gutters
For those new to comic creation or seeking to refine their existing skills, understanding visual flow is paramount. In English-speaking cultures, the typical reading order is from left to right and top to bottom, often described as a "Z" pattern. This inherent flow can be influenced by various layout choices, such as the strategic placement of smaller panels adjacent to larger ones, creating "blockages" that guide the reader's eye. Furthermore, considering individual pages not in isolation but as "spreads" - two consecutive pages viewed together - can enhance the overall cohesiveness and narrative clarity of the comic. Uneven gutters, particularly around the outer edges of a page, can be visually distracting and disrupt the reading experience. Digital tools, however, simplify this aspect, allowing for precise alignment and consistent spacing.
A general guideline suggests limiting the number of panels on a comic page to no more than five, unless the panels are exceptionally small or minimal. This helps to maintain visual clarity and prevent the page from becoming overcrowded.
The Technicalities of Printing: Bleed and Margins
When preparing comics for printing, a crucial technical consideration is the concept of "bleed." To account for potential variations in the trimming process, margins are typically extended by an additional 0.125 inches beyond the intended final dimensions. This "bleed" area ensures that the artwork extends to the very edge of the page, preventing any unprinted white borders from appearing in the final product. When setting up a document for printing, it is advisable to create a new canvas with an increased height and width, typically adding between 75 to 200 pixels to accommodate this bleed, with 75 pixels being the minimum recommended.
Digital Tools for Comic Creation: A Step-by-Step Approach
Digital platforms, such as BeFunky's Collage Maker, offer a user-friendly environment for formatting comic pages. The process typically begins by selecting a suitable layout template that aligns with the comic's narrative structure. Pages can then be resized and rotated as needed. For adding comic panels, images are uploaded via an "Image Manager." Borders can be created by utilizing graphic shapes, such as rectangles, and adjusting their fill and stroke properties. Speech bubbles can be constructed using a combination of ellipse and line graphics, and text can be added and customized using the integrated text tool, allowing for adjustments in size and typeface. Once the comic page is complete, it can be saved to various cloud storage services or directly to the user's computer.
Mastering Panel Composition
Beyond Comics: The Versatility of Photo Book Creation
The principles of collage and digital design extend beyond comic creation to the creation of personalized photo books. While sophisticated software might seem like the ideal tool, the most accessible and powerful instrument often lies in the palm of one's hand - a smartphone. Applications like Journi simplify the process of transforming a collection of digital photographs into a beautifully curated keepsake.
Crafting a Narrative for Your Photo Book
The secret to an exceptional photo book lies in its underlying narrative. Before diving into the selection and arrangement of images, it's beneficial to consider the story you wish to tell. This could be a chronicle of an epic travel adventure, a compilation of a family's yearly milestones, a romantic retrospective of a relationship, or a tender documentation of a baby's first year. Having a clear narrative in mind provides a framework for selecting the most impactful photographs and ensures a cohesive and engaging final product.
Finding Your Aesthetic: Photo Book Themes and Styles
Once the narrative is established, choosing a visual theme can rapidly imbue the photo book with a professional and cohesive look. Various styles cater to different moods and purposes. A "clean & minimalist" theme, such as "Editorial," is ideal for wedding albums or professional portfolios, allowing the photographs to speak for themselves. For a more vibrant and engaging feel, themes like "Coral Garden" or "Bees & Flowers" are perfect for capturing the energy of a child's birthday party or a lively family vacation. These often feature bright colors and playful fonts. A "warm & rustic" aesthetic, exemplified by themes like "Lazy Sunday" or "Beach," lends a nostalgic and heartfelt quality, suitable for heritage projects or tributes. Finally, a "bold & adventurous" style, utilizing high-contrast colors and dynamic layouts, is well-suited for travel albums and city trip recaps.
Pre-Production: The "Favorites" Album Shortcut
A simple yet effective preparation tip for a stress-free photo book creation process is to pre-select your desired images. Before even opening the photo book application, scrolling through your phone's camera roll and marking your absolute favorite photos with a heart icon can create a dedicated "Favorites" album. This streamlines the subsequent selection process and provides the application's AI with the best possible ingredients for generating an initial draft.
The Power of AI in Photo Book Design
Modern photo book applications leverage artificial intelligence to automate many of the more time-consuming aspects of design. Upon selecting your photos, the AI can instantly organize them chronologically, optimize their quality, and generate varied page layouts. Features like automatic date and travel map integration further enhance the narrative and detail of the book. This AI-driven process results in a complete first draft in a matter of seconds, significantly reducing the manual effort required.
Personalizing Your Story: The Human Touch
While AI provides a robust foundation, the true personalization of a photo book comes from the human touch. This involves selecting a striking cover image that encapsulates the book's theme, or a series of images that hint at the unfolding narrative. Writing meaningful captions - whether witty anecdotes, significant dates, or heartfelt reflections - transforms the collection of images into a true storybook. Refining the AI-generated layouts, perhaps by dedicating a full page to a particularly impactful photograph or arranging a sequence of images to depict a specific event, further customizes the book. The choice of design theme and color palette also plays a crucial role in setting the overall mood and aesthetic.

Photo Books as the Perfect Gift
Custom photo books have emerged as an ideal gift for individuals who seem to have everything. Their personalized nature, combined with the ease of creation offered by AI-powered apps, makes them a thoughtful and impressive present, especially when time is limited. For birthdays, a collaborative effort where friends contribute their favorite photos can result in a "collaborative masterpiece." Anniversaries can be celebrated with a "Year of Us" book, compiled from couple's photos and enhanced with heartfelt captions. Similarly, Mother's Day or Father's Day gifts featuring family photos can be created with remarkable speed and ease.
Pro Tips for a Polished Photo Book
Achieving a professional quality in a photo book often comes down to attention to detail. Here are some expert tips:
- Design a Stunning Cover: The cover is the book's first impression. Choose a single, powerful image or a curated selection that tells a story.
- Think Like a Storyteller: Structure your book with a narrative arc. Begin with an "establishing shot" and conclude with a powerful final image.
- Vary Your Photo Styles: Incorporate a mix of wide shots, close-ups, posed portraits, and candid moments to create visual dynamism.
- Use Maps as Chapter Breaks: If your book involves travel, Journi's automatic map feature can serve as elegant visual dividers between different locations or segments of your journey.
- Let Your Photos Breathe: Don't shy away from white space. A single, impactful image can often be more powerful than a cluttered page.
- Consider Premium Binding: Opting for a "layflat" binding ensures that images are displayed without interruption across the spine, creating a truly premium feel.
The Beginner's Friend: Why Journi Excels
For individuals new to photo book creation, applications like Journi are designed to overcome common hurdles. The AI can efficiently sort through large numbers of photos, and the automated design process means a book can be created in seconds, with customization options available for those who wish to delve deeper. The app's intuitive interface and professionally designed themes empower users to feel like design pros, even with minimal experience.
Customization and Control: Your Book, Your Way
While AI streamlines the initial creation, the user retains complete creative control. Options for cover types (hardcover or softcover), paper finishes (semi-gloss or matt), and layout adjustments allow for fine-tuning. The automatic generation of travel maps and the ability to customize text, fonts, and colors ensure that the final product is a unique reflection of personal memories.
Frequently Asked Questions about Photo Books
- Best way to make a Photo Book online? AI-powered apps like Journi offer the quickest and most efficient method, automating sorting and layout.
- Best app for Photo Books? Journi is highly recommended for its speed, convenience, and quality, trusted by millions.
- Photo Album vs. Photo Book? Traditional albums involve inserting prints, while Photo Books print digital photos directly onto pages with professional layouts.
- How long does it take? While the AI draft is near-instantaneous, users can spend a few minutes to over half an hour personalizing their book.
- Will phone photos look good? Yes, modern smartphone photos are high-resolution, and apps like Journi enhance image quality for print. A quality warning system is in place for low-resolution images.
- Cost of Photo Books? Creating and designing is free; payment is only required for printing, with costs varying by size, cover, and page count.
- Mistakes? Projects are automatically saved, allowing for review and editing before ordering. A final check for typos is recommended.
Designing Eye-Catching Book Covers
Creating a compelling book cover is essential for attracting readers. Platforms like Canva offer user-friendly tools for designing professional book covers, even for those with no prior design experience. Access to extensive libraries of stock images, graphics, and illustrations, many of which are free or competitively priced, allows for the creation of high-quality visuals. The readability of the title is paramount, and many designs effectively use clear fonts over images. The ability to promote the book by directly sharing the cover design on social media further enhances its visibility. For print books, a well-designed spine is also crucial.
Repurposing Children's Board Books for Collage
An innovative approach to collage involves repurposing children's board books, those sturdy books with thick pages designed for young children. These can often be found affordably at thrift shops. The process involves gathering thinner collage papers that won't add excessive bulk to the finished piece. The papers are then trimmed and laid out directly onto the board book pages, with glue applied carefully to prevent seepage. This method offers a unique and engaging canvas for collage work, providing a tactile experience that is both nostalgic and creatively stimulating. Online classes are often available that offer in-depth guidance on working with board books for collage projects.
The Enduring Appeal of Photo Books
The act of revisiting cherished memories through a photo book remains a deeply satisfying experience. While previously a service requiring professional studios, the creation of personalized photo books is now easily achievable at home. Software like Photo Collage Maker provides a user-friendly interface with a vast array of templates catering to diverse themes such as weddings, children's milestones, vacations, and family history. These templates offer a range of styles, from classic and vintage to bright and modern. The process involves simply placing photos into pre-designed frames, with options to customize layouts, add frames, and include captions, making the creation of a printed book a surprisingly accessible endeavor.