In the realm of digital design, patterns are indispensable tools for injecting texture, depth, and visual interest into a wide array of projects. Among the vast selection of patterns available, the brick pattern stands out due to its enduring appeal and remarkable versatility. This comprehensive tutorial will guide you through the meticulous step-by-step process of generating a convincing brick pattern within Adobe Photoshop. Whether you are an established designer or embarking on your creative odyssey, this guide will furnish you with the requisite knowledge to construct an engaging brick pattern capable of elevating your design endeavors.
Laying the Foundation: Setting Up Your Photoshop Canvas
To commence the creation of your brick pattern, the initial step involves establishing a suitable canvas within Adobe Photoshop. This foundational setup ensures that your pattern will be seamless and of a high resolution, making it suitable for various applications.
- Initiate a New Document: Navigate to the top menu bar, click on "File," and then select "New." This action will open the "New Document" dialog box.
- Define Canvas Dimensions: For optimal results, particularly when aiming for a seamless texture, set the dimensions of your canvas to 3600 pixels by 3600 pixels. This substantial size provides ample space for intricate details and ensures that the pattern can be repeated without visible seams.
- Set Resolution: To guarantee high-quality output, configure the resolution to 300 pixels per inch (PPI). This resolution is standard for print and professional digital use, ensuring sharpness and clarity.
- Color Mode Selection: Choose the RGB color mode. RGB is ideal for digital displays and will ensure that your colors appear vibrant and accurate on screen.
- Background Content: For a flexible starting point, select "Transparent" for the background content. This allows you to easily apply different backgrounds or colors later without interference from a pre-filled layer.
- Create Canvas: Click "Create" to generate your blank, transparent canvas, ready for the next stages of pattern creation.
Constructing the Brick Units: The Base Rectangle
The fundamental element of any brick pattern is the individual brick, typically represented by a rectangle. This section details how to create and prepare this base unit for replication.
- Activate the Marquee Tool: Select the "Marquee Tool" from the Photoshop toolbar, which has a keyboard shortcut of "M." This tool is essential for creating selections and shapes.
- Draw the Base Rectangle: Utilizing the guides on your canvas (which we will set up shortly), carefully draw a rectangle. This rectangle will serve as the template for your individual bricks. Aim for proportions that are typical of standard bricks.
- Fill the Rectangle: Once the rectangle is drawn, fill it with your chosen foreground color. For a classic brick appearance, a shade of brown or brick-red is appropriate. Press "Alt + Delete" (on Mac) or "Alt + Backspace" (on PC) to fill the selected area with your foreground color. If black is your foreground color, this step will fill the rectangle with black.
- Deselect: To remove the active selection marching ants, press "Command + D" (on Mac) or "Control + D" (on PC).
- Convert to Smart Object: Right-click on the layer containing your filled rectangle. From the contextual menu, choose "Convert to Smart Object." This crucial step ensures that any transformations or edits applied to this layer can be non-destructively modified later, preserving the original data.
Establishing the Brickwork Grid: Guides and Duplication
The characteristic staggered arrangement of bricks is achieved through a precise grid layout. This section explains how to implement this structure using Photoshop's guide features.
- New Guide Layout: To create the foundational grid for your brick pattern, navigate to "View" > "Guides" > "New Guide Layout."
- Configure Grid Settings: In the "New Guide Layout" dialog box, set the grid to four columns and eight rows. This configuration provides a good starting point for a standard brick bond pattern. Adjust these numbers if you desire a different brick arrangement or proportion.
- Duplicate the Base Rectangle: Select your "Base Rectangle" Smart Object layer in the Layers panel. Duplicate this layer by pressing "Command + J" (on Mac) or "Control + J" (on PC).
- Align Duplicates: Carefully drag the duplicated rectangle layers and align them with the guides you've established. This process begins to form the basic grid structure of your brick wall. Repeat the duplication and alignment process as needed to fill the grid according to your desired brick pattern.
Detailing the Mortar and Refining the Grid
With the basic brick layout in place, the next phase involves refining the grid and adding the essential details that define a brick wall, most notably the mortar lines.
- Position and Rotation Adjustments: Depending on the specific brick pattern you aim to replicate (e.g., running bond, stack bond, herringbone), you may need to adjust the position and rotation of the duplicated rectangles to achieve the desired staggered effect. This step is critical for creating a realistic brick appearance.
- Enter Smart Object: To add the mortar lines, you need to edit the original "Base Rectangle" Smart Object. Double-click on the Smart Object's thumbnail in the Layers panel. This will open the Smart Object in a new Photoshop window.
- Simulate Mortar Lines: Inside the Smart Object, use the "Line Tool" (keyboard shortcut: U). Draw thin lines along the edges of the rectangles where the mortar would naturally appear. These lines represent the gaps between the bricks.
- Customize Stroke: Configure the "Stroke" settings for these lines. You can adjust the stroke width to control the thickness of the mortar and its color to match the desired grout color. A light gray or off-white is common for mortar. Experiment with these values to achieve the look you want.
- Save and Exit Smart Object: Once you have drawn the mortar lines within the Smart Object, save the changes by going to "File" > "Save" and then close the Smart Object tab. This will update the main canvas with the incorporated mortar lines.
Creating and Applying the Seamless Pattern
Now that the individual brick elements and their arrangement are defined, the next logical step is to transform this design into a repeatable pattern that can be applied to any shape or layer.
- Define the Pattern: With your completed brick design visible on the canvas, navigate to "Edit" > "Define Pattern." A dialog box will appear prompting you to name your pattern. Enter a descriptive name, such as "Brick Pattern," and click "OK." Your custom brick pattern is now saved within Photoshop's pattern library.
- Close Smart Object: You can now close the Smart Object tab if it's still open, returning to your main canvas.
- Create a Pattern Fill Layer: To apply your newly defined pattern, go to the Layers panel and click on the "Create new fill or adjustment layer" icon (a half-black, half-white circle) at the bottom. Select "Pattern…" from the dropdown menu.
- Select Your Pattern: In the "Pattern Fill" dialog box, locate and select the "Brick Pattern" you just created. Click "OK."
- Unclip Pattern Fill Layer: By default, the pattern fill layer will cover the entire canvas. To make it more versatile, you can unclip it. Hover your mouse cursor between the Pattern Fill layer and the layer below it in the Layers panel. When the cursor changes to a small arrow pointing downwards, click "Option" (on Mac) or "Alt" (on PC). This creates a clipping mask, meaning the pattern will only appear where the layer below it has content.
- Customize Pattern Color: To alter the color of your brick pattern, add a "Solid Color" adjustment layer (via the same icon used for the Pattern Fill layer). Then, create a clipping mask for this Solid Color layer by holding "Option" (Mac) or "Alt" (PC) and clicking between the Solid Color layer and the Pattern Fill layer. Now, whatever color you choose in the Solid Color adjustment layer will tint your entire brick pattern. This offers immense flexibility in creating bricks of various hues.
Fine-Tuning and Exporting Your Brick Texture
The final stages involve making any necessary adjustments to perfect your brick pattern and preparing it for export and use in other projects.
- Re-enter Smart Object for Adjustments: If you find that the mortar lines are too thick or thin, or if you wish to make other subtle changes to the brick appearance, you can re-enter the Smart Object. Double-click on the Smart Object's thumbnail in the Layers panel, make your modifications (e.g., adjust the stroke width of the mortar lines), and then save and close the Smart Object again.
- Update Pattern Definition: After making changes within the Smart Object, it's crucial to update the pattern definition. Go back to "Edit" > "Define Pattern" and name your pattern again (e.g., "Brick Pattern"). This ensures that any instances of the pattern fill layer you've already created will update to reflect your changes.
- Export the Pattern: To save your brick pattern for use in other documents or software, export it as an image file. Navigate to "File" > "Export" > "Export As." Choose a file format like JPEG or PNG, and select your desired export settings. This will save your seamless brick texture as a usable image.
Advanced Techniques and Applications
Beyond the basic creation of a brick pattern, Photoshop offers numerous ways to enhance its realism and apply it creatively.
Transforming Photos into Seamless Textures
One highly effective method for generating realistic textures, including brick walls, is by leveraging existing photographs. This approach requires careful consideration during the photography stage and precise editing within Photoshop.
The Art of Texture Photography: Symmetry and Light
Creating a photograph that will serve as a seamless texture is not a trivial task. Two paramount elements must be meticulously considered: symmetry and lighting.
- Symmetry: For a texture to be tileable, it needs to exhibit a high degree of symmetry. When photographing a brick wall intended for use as a texture, it is imperative to position your camera parallel to the wall. This ensures that the perspective distortion is minimized, leading to a flat, uniform appearance that is conducive to seamless tiling. Avoid shooting from an angle, as this will introduce perspective lines that are difficult to eliminate and will break the seamless repetition of the pattern.
- Lighting: The lighting in your scene plays a critical role in the texture's usability. Homogenous lighting is highly recommended. This means avoiding harsh shadows and bright highlights that can create undesirable contrast and break the illusion of uniformity. For this reason, it is generally advised not to use a flash when taking your shot. Natural, overcast lighting is often ideal as it provides soft, even illumination across the entire surface.
Editing the Photograph in Photoshop
Once you have captured a suitable photograph, the process of editing it in Photoshop can commence. The primary goals during this editing phase are to adjust the color and enhance the texture's visual fidelity.
- Color Correction: You will essentially be fixing the color of the photo. This involves adjusting parameters such as color saturation, contrast, color temperature, and sharpness. The specific values for these adjustments are highly dependent on the original photograph. There are no universally applicable settings. The general advice is to avoid over-editing. Strive to keep the values close to the default settings offered by Photoshop. Exaggerated adjustments can lead to an unnatural or artificial-looking texture.
- Imperfection Management: An expert tip for capturing brick wall photos for texturing is to pay close attention to imperfections. While some minor variations in color or texture can add realism, excessive damage, large cracks, or unusually discolored bricks can pose significant challenges when you later attempt to "unwrap" the texture for 3D models or create seamless tiling. Choosing a wall with relatively uniform bricks and minimal damage will greatly simplify the subsequent editing process.
Creating a Tileable Texture from a Photo
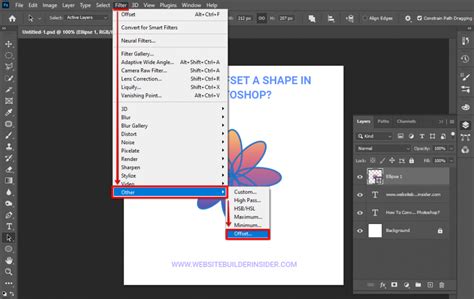
To make a photographic texture tileable, you can employ a few techniques within Photoshop. One common method involves using the "Offset Filter."
- Open Your Photo: Open the brick wall photograph in Photoshop.
- Use the Offset Filter: Go to "Filter" > "Other" > "Offset." This filter allows you to shift the image horizontally and vertically by a specified number of pixels.
- Identify Seam Issues: Enter values that shift the image by half of its width and half of its height. Photoshop will wrap the image around, revealing any seams where the edges meet.
- Clone and Heal: Use Photoshop's "Clone Stamp Tool" and "Healing Brush Tool" to meticulously blend these seams. The goal is to make the transition between the shifted edges completely invisible.
- Repeat if Necessary: You may need to repeat the offset filter and cloning process a few times to ensure the texture is perfectly tileable in all directions.
- Define as Pattern: Once the texture is seamless, you can define it as a pattern using "Edit" > "Define Pattern," just as described earlier for the vector-based brick pattern.
Applying Brick Textures to Text and Shapes
The brick pattern, once created, can be applied in numerous creative ways, including as a fill for text or custom shapes.
Embossing and Layer Styles
A popular effect is to create embossed or extruded text that appears to be made of brick. This involves careful use of Photoshop's Layer Styles.
- Type Your Text: Select the "Type Tool" (T) and input your desired text. Choose a bold font that will hold up well to texture application, such as "Myriad Pro Bold."
- Convert to Shape: Fill the text with a solid color, for example, a medium yellow (#f9de4a). Then, right-click on the text layer's thumbnail and select "Convert to Shape." This converts the editable text into vector paths, allowing for more detailed manipulation and smoother application of styles.
- Adjust Shape Points: Use the "Direct Selection Tool" (A) to modify the anchor points of the converted shape. For instance, you can select the end points on one side of a letter and drag them to the edge of the document, then adjust the curvature handles to create a more dynamic or distorted effect if desired.
- Layered Effects: To achieve a realistic embossed effect, you'll typically use multiple layers of the same shape, each with different Layer Styles applied.
- Base Layer: Duplicate your original shape layer. Lower its "Fill" opacity to 0%. This layer will serve as the foundation for all the layer styles.
- First Duplicate: Duplicate the 0% fill layer. This will be your primary brick layer. Apply Layer Styles:
- Bevel & Emboss: Adjust settings for depth, size, and softness to create a raised effect.
- Contour: Use a contour to shape the highlights and shadows, further defining the embossed look.
- Texture: This is where you apply your brick pattern. Select the brick pattern you created earlier. You can adjust the scale and blend mode of the pattern.
- Pattern Overlay: Similar to texture, this can be used to apply a different pattern or the same one with different settings, perhaps for a subtle variation in the brick surface.
- Second Duplicate: Duplicate the previous layer again. Apply Layer Styles:
- Bevel & Emboss: You might use slightly different settings here, perhaps focusing more on the inner bevel to create a sense of depth.
- Texture: Apply your brick pattern again.
- Subsequent Duplicates: You can create further duplicates, each with slightly varied Layer Styles (e.g., different "Inner Shadow" or "Drop Shadow" settings) to build up complex depth and lighting effects, mimicking the way light plays across a real brick surface.
Integrating Textures with Backgrounds
Combining your brick text with a background can create a cohesive scene. This might involve using a brick wall photograph as the background and then placing your brick text on top, or vice versa.
- Background Preparation: If using a photo as a background, ensure it is also seamless or that the edges are managed appropriately. You might use a brick wall photo and then apply the "Offset Filter" to it to make it tileable.
- Masking and Erasure: To blend the text or shapes with the background, you can use layer masks and custom brushes.
- Brush Tool: Select the "Brush Tool" (B). You can load custom brushes, such as a "Grass" brush (often a default Photoshop brush), to add organic elements. Adjust brush settings like "Shape Dynamics," "Scattering," and "Transfer" to achieve naturalistic effects.
- Saving Custom Brushes: After configuring a brush to your liking, you can save it by clicking the "Create New Brush" button at the bottom of the Brush Panel.
- Load Selection: With a text or shape layer selected, you can load its transparency as a selection by going to the "Properties Panel" and clicking "Load Selection from Mask" (if a mask exists) or by Ctrl/Cmd-clicking the layer thumbnail.
- Modify Selection: Once you have a selection, you can modify it. For example, using "Select > Modify > Contract" with a value of about 25 pixels will shrink the selection inwards.
- Work Paths: Convert your selection into a "Work Path" by going to the "Paths Panel" and clicking "Make work path from Selection."
- Stroking with Eraser: You can then use this work path with the "Eraser Tool" (E) and your custom brush to "stroke" the path, effectively erasing parts of the layer in a controlled and artistic manner.
How to Make a Letterpress Effect in Photoshop
Seamless Texture Creation for 3D Art
The principles of creating seamless brick patterns are directly applicable to generating textures for 3D models. Whether you're designing for architectural visualization, game development, or animation, a high-quality, tileable texture is essential.
- Sketching vs. Photography: While it's possible to sketch a texture entirely from scratch, this method is more commonly used for stylized or cartoonish aesthetics. For realistic applications, starting with a photograph and refining it in Photoshop is generally more efficient and yields better results.
- Applying to 3D Models: Once you have a seamless brick texture, it can be imported into 3D modeling software (like Blender, Maya, 3ds Max, or Cinema 4D). The texture is then applied to the surface of a 3D model, such as a building facade or a character's clothing, using UV mapping techniques. The seamless nature of the texture ensures that when it's repeated across the model's surface, there are no visible lines or breaks.
Conclusion: The Enduring Appeal of Brick Patterns
In this exhaustive guide, we have delved into the intricate processes of creating realistic brick patterns within Adobe Photoshop. By skillfully employing guides, smart objects, precise detailing, and the powerful capabilities of layer styles, you are now equipped to craft captivating brick patterns. These patterns can significantly enhance the depth and visual interest of your design projects, whether they are intended for digital scrapbooking, graphic design, web design, or even as base elements for 3D texturing. The inherent versatility of the brick pattern ensures its relevance across a broad spectrum of creative applications. With your newly acquired skills, you are well-positioned to explore a boundless array of possibilities, experimenting with different colors, scales, and variations to imbue your designs with unique character and realism.