Welcome to my photography blog, your comprehensive guide to mastering the art and science of photography. I’m Paige, ready to guide you on a journey of discovery, from capturing the perfect composition to deciphering the complexities of file formats and storage. This is where we will cover will include in-depth discussions on cameras, exploration of editing techniques, and a deep dive into photography’s fascinating world. Whether you’re a new enthusiast or an experienced photographer seeking to sharpen your skills, I’m committed to helping you elevate your craft to the next level.
Whether you’re new to editing or already comfortable in Lightroom, it can be hard to know where to start after applying a preset. That’s something I hear all the time from people who want to speed up their workflow without losing creative control. I get it. In this post, I’ll walk you through exactly how I edit my photos using my preset workflow. These steps are the same ones I follow every time I edit, and I’ll explain why I make certain choices.
Understanding Lightroom Presets: More Than Just a Filter
Lightroom presets are pre-saved editing settings that you can apply to your photo with one click. They change things like exposure, contrast, color, and tone to give your images a specific look. They’re perfect for speeding up your workflow and creating consistency across your edits. Many photographers sell preset packs as a way to generate income for their business, and why shouldn't they? Most have worked hard over the years to refine their colors and style, and along the way, found fans of their work on social media or elsewhere. There’s certainly demand, as people want to emulate the colors and style of photographers they like. I hope to sell my own preset packs in the near future - after I’ve tested them extensively and given potential purchasers the tools, knowledge, and guidance on how to use them most effectively.
A preset is a saved group of settings in Lightroom that you can apply to any photo with a single click. Think of them as templates that apply a consistent aesthetic or style to your images with a single click. This allows photographers to achieve a desired look quickly and also allows them to maintain a consistency across a series of photos. Rather than manually adjusting each slider for every image, presets offer a standardized starting point, which can then be further customized to suit individual preferences.
In practical terms, they serve as a powerful tool for:
- Efficiency: Significantly reducing editing time, particularly when processing large volumes of images.
- Consistency: Ensuring a uniform visual style across a project, which can be crucial for branding or portfolio presentation.
- Creative Exploration: Providing a foundation for experimentation, allowing photographers to explore various aesthetic directions without extensive manual adjustments.
For years, presets have been the go-to solution for efficient and consistent editing. They’ve served us well. They offer a way for aspiring photographers to achieve polished, professional-looking results without years of dedicated practice in mastering complex editing software. Presets are a game-changer for content creators, bloggers, influencers, and photographers. They help save time by allowing you to apply a specific look or style with just one click, ensuring consistency across all your images. Presets can be especially helpful for beginners who may not yet be familiar with Lightroom. They allow you to experiment with different styles without needing to know every detail of Adobe's software or app.
Installing Your Lightroom Presets
Installing presets is simple whether you’re using Lightroom Classic on desktop or Lightroom Mobile. Just import the files into your preset library and they’ll be ready to use. My downloads include files for both platforms.
There are a few different methods for installing Lightroom presets, depending on which version of the software you’re using. There’s also a Read Me (.pdf) file with these instructions, including screenshots of steps, in my free preset pack.
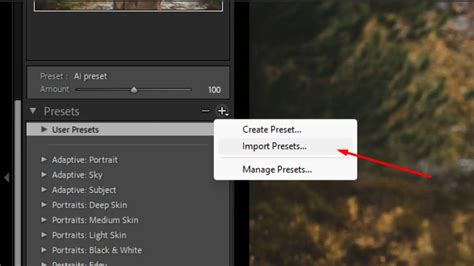
Lightroom Classic (LrC)Navigate to your Develop module and look for the Presets section on the sidebar. Click the plus sign, and then click Import Presets. Select the folder (unzipped) containing the presets (.xmp), and it will add them all to your presets list.
Lightroom (Lr): DesktopNavigate to the Edit module and look at the bottom of the sidebar for the Presets button. Click the three dots on the right, and then click Import Presets. Select the folder (unzipped) containing the presets (.xmp), and it will add them all to your presets list.
Lightroom (Lr): Mobile App with Adobe SyncFirst, complete the steps on the previous slide for the Lightroom (Lr) desktop version. Make sure your Adobe Cloud Sync is enabled and active. Once you re-sync after installing on desktop, these presets should appear.
Lightroom (Lr): Mobile App without Adobe Sync (Most Difficult/Tedious)Note that this is the most complicated installation method. Send the download preset folder “Mobile Only” version to your phone, and save it in the file organizer (e.g., Files on iOS). Select the folder (unzipped) containing the .dng files. Save these as photos to your phone. Open the Lr Mobile App and find the files, as they contain the metadata for the presets. To create each preset, press the three dot menu “…” then select “Create Preset”. Name each preset according to its file name (e.g. “Travel - T1 - B”). Make a new preset group and name it “Rohan Ugale Presets” or “Omotenashi Preset Pack” as you wish. Tap the following boxes: Profile: Color, Color, Effects, Detail. Tap the check mark to complete. Repeat preset creation steps for the remaining presets, until complete.
Before Applying Presets: Crucial Considerations
The biggest problem with presets (other than poorly made ones) is that many people, especially those just getting started with Lightroom & photo editing, don’t know how to get the most out of them. They either think or are sold on the idea that presets are a one-click solution to emulating their favorite creatives. While presets can speed up the editing workflow significantly, every photo needs certain tweaks to make the edit work. Likewise, not every preset is going to fit every photo, even when tweaked. It’s also important to understand that no edit or preset can save a bad composition - editing can enhance good photos, but it can’t fix bad ones.
Before starting to edit with presets, I want to raise awareness about a few potential issues you’ll run into when using them.
RAW vs. JPEG & Why It Matters
Before even applying a preset, the type of file you’re working with makes a huge difference. Presets will always work better on RAW files than JPEGs because RAW images contain more data. JPEGs are already processed in-camera, meaning they have baked-in contrast, sharpening, and color adjustments. When you apply a preset to a JPEG, the changes can be unpredictable since you’re layering edits on top of the camera’s own processing. This can lead to unnatural color shifts, extreme contrast, or loss of detail. On the other hand, RAW files give you way more flexibility. Since RAW images store unprocessed data, presets apply much more naturally, and you have more control to tweak exposure, white balance, and colors without degrading image quality. If you’re serious about editing and want the best results from presets, shooting in RAW is the way to go.
Skin Tones
Skin tones are one of the first things to check after applying a preset, especially if you photograph people often. Many presets apply strong color shifts that can make skin look unnatural. Some add a lot of warmth, which can make skin appear overly orange or red. Others might cool things down too much, leaving skin looking washed out or even slightly bluish. Another issue comes from heavy contrast or saturation boosts. If a preset increases saturation too much, it can make skin look harsh and unrealistic. Darker skin tones might lose their natural depth, while lighter skin tones can end up looking too bright and flat. To fix this, adjust white balance, tint, or the HSL sliders (especially in the orange and red channels). You can also use the masking tools in Lightroom to refine skin tones separately from the rest of the image. Masking tools are so powerful that they can automatically detect and mask certain people or even body parts on people, making it easier than ever to spot-correct skin tone issues.
Light & Contrast
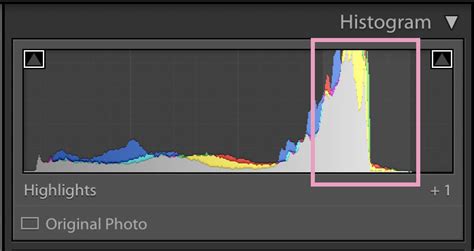
Presets can completely change how light and contrast behave in your photo. Some brighten everything, giving images a soft and airy feel. Others go for a dark, moody look by deepening the shadows and reducing highlights. These changes can be great, but they don’t always work with every image. For example, if you shot a high-exposure image with lots of bright tones, a dark and moody preset might crush the shadows too much, making the details disappear. On the other hand, if you took a low-light image, a bright and airy preset might push highlights too far, washing out important details. The best way to handle this is by fine-tuning the Saturation and Luminance levels in the Color Grading wheels, then adjusting the Exposure, Whites, Blacks, and Contrast sliders after applying a preset. Keep an eye on your histogram to make sure you’re not losing too much detail in the highlights or shadows. Importantly, presets can’t fix bad light. Finding good, interesting light should be the goal for every photographer, as it gives your photo a great starting point to edit from.
Pushing Color
Many presets are designed to create a specific color mood, which means they often push colors in a way that might not work for every photo. Teal and orange presets, for example, shift blues toward teal and warm up the oranges to create a cinematic look. This might look great in urban street photography but could make a nature shot look unnatural. Some presets go overboard with saturation and vibrance, making colors pop too much. Greens can turn neon, reds can look too intense, and blues might lose their natural depth. This is especially noticeable in landscape photography, where natural tones can be completely altered, highlighting the importance of purpose or genre based presets. To fix this, check the HSL panel. If a certain color looks off, try adjusting its hue, saturation, or luminance. You can also reduce overall vibrance if the preset has made the image feel too exaggerated. Additionally, on the color grading wheels, you can adjust the saturation or luminance specifically of the shadows, midtones, or highlights.
Artifacts & Noise
Some presets add grain, clarity, and texture to create a film-like aesthetic. While this can work well for certain styles, it can also introduce unwanted noise and artifacts, especially in images taken at higher ISOs or in low light. Artifacts are how we describe portions of the image that start to look unnatural, confusing, glitchy, or broken. For example, if a preset increases clarity too much, it can create harsh halos around edges, making the image look over-sharpened. Heavy sharpening settings can also amplify noise in darker areas, making them look rough and unnatural. To avoid this, check the Detail module or Presence panel in the Basic module. If there’s too much sharpening, clarity, or texture, dial it back. If the preset has added grain, decide whether it enhances the mood or just makes the image look noisy. If needed, adjust noise reduction settings to clean up any unwanted graininess. Lightroom Classic has fantastic AI-driven noise reduction tools, if desired.
My Preset Workflow: From Raw to Ready
If you want to follow along using the same presets, here’s the full breakdown of how I edit my images using presets. This is the exact workflow I use every time I take a photo from raw to ready.
How to Edit DARK MOODY Portraits with Lightroom - Step by step
1. Choose a Complementary Preset
Start by choosing a preset that complements your photo’s lighting and mood. My pack includes several variations for different lighting situations like golden hour, cloudy skies, and diffused backlight.
Pro Tip: Don’t worry about picking the “perfect” preset right away. Focus on finding one that feels close to your scene’s lighting.
2. Adjust Exposure
Exposure is always the first thing I adjust. I leave it untouched in my presets so you can make it your own. Some images need more light, others look better when pulled back a bit. Get this right before tweaking anything else.
How to do it: In the Basic panel (or Light section on mobile), drag the Exposure slider left or right. Aim for a balanced overall brightness before moving on.
Pro Tip: Once your exposure feels right, the preset will look much closer to its intended effect.
3. Utilize Radial and Graduated Filters (Masking)
Each of my presets includes radial and graduated filters to enhance lighting and add mood. Radial filters exaggerate light sources, and graduated filters help shape shadows and balance bright skies. You can move or customize them depending on your scene, but I highly recommend using them as part of your edit.
How to do it (Lightroom Classic/Desktop): Click the Masking icon. Choose Radial Gradient to add or boost natural light. Use Linear Gradient to darken skies or foregrounds.
How to do it (Lightroom Mobile): Tap the Masking tool. Add a Radial or Linear Gradient. Drag and resize the area, then adjust exposure or highlights.
Pro Tip: Think about where your light is coming from.
4. Fine-Tune Colors with Temperature and Hue
Once the lighting feels right, check the colors. I like to use the temperature slider to warm things up or cool them down depending on the look I want. Sometimes I also shift the hue to tone down greens or bring out golden tones. Color temperature and hue adjustments can completely transform the feel of a photo. A little goes a long way.
How to do it: In the Basic panel, use the Temperature slider to warm (yellow) or cool (blue) the image. Use the Tint slider to fix green or magenta tones. In the HSL/Color panel, adjust individual hues or saturation.
Pro Tip: If the greens look too harsh or neon, shift the green hue toward yellow and reduce green saturation. This step is optional but makes a big difference.
5. Dodge and Burn with the Brush Tool
I use the brush tool to lighten areas where the light hits and darken areas that need more depth. It’s a great way to guide the viewer’s eye and add dimension to the image. I usually spend a few extra minutes here. It’s worth it.
How to do it: Open Masking, then choose Brush. For dodging: increase Exposure and lightly paint areas that are already naturally lit. For burning: lower Exposure and brush into shadow areas to deepen contrast.
Pro Tip: Use a Feather of 75 to 100 for soft blending and keep Flow between 10 to 30 for subtle buildup.
6. Final Review and Export
Once everything looks good, take one last look at your image. Does the lighting feel natural? Are the colors balanced? Make small final adjustments if needed, then export your photo in the format you need whether that’s for web, print, or social media.
How to do it (Lightroom Classic): Click File > Export. Choose file type (JPEG, TIFF, etc.), resolution, and output location. Click Export.
On Lightroom Desktop or Mobile: Tap the Share or Export icon. Choose your file format and quality. Save to your device or cloud folder.
Pro Tip: Save a high-resolution version for printing and a resized copy (2048px wide) for web or social media.
The Evolution of Editing: Beyond Static Presets
Presets are there to speed up your workflow and help you find your style. But they’re not meant to be one-click and done. Play around with the sliders. Adjust the filters. Try the brush tools. The more you experiment, the more confident you’ll feel. I hope this walkthrough gave you a clearer picture of how to actually use Lightroom presets, especially if you’ve ever felt stuck after applying one and not knowing what to do next. Presets should make your editing easier, not harder. With a few simple adjustments like exposure, filters, color, and some brushwork, you can take a base preset and turn it into something that feels truly yours.
The fundamental limitation of a traditional preset is that it’s static. It applies the exact same settings to a bright, sunny outdoor photo as it does to a dark, moody indoor shot. This is where artificial intelligence is beginning to revolutionize the editing process. AI-powered tools can analyze each photo individually and make intelligent adjustments based on the image’s specific content and your learned editing style.

For example, Imagen uses AI to learn your unique editing style by analyzing thousands of your previously edited photos. It learns how you handle exposure in tricky lighting, how you adjust skin tones, how you grade your colors in shadows and highlights, and more. The AI then edits new photos in the cloud at incredible speed, with the adjustments applied directly back into your Lightroom catalog. This technology offers a level of adaptability and personalization that static presets cannot match. It's not about replacing the artist, but about delegating the tedious, mechanical parts of the editing process to an intelligent assistant. This frees up mental energy to focus on what really matters: capturing beautiful images, telling compelling stories, and building strong relationships with clients.
Developing Your Own Signature Style
If you want to start practicing this workflow on your own images, you can grab my Lightroom preset pack. I created them to work beautifully with landscapes, but they’re flexible enough to use in all kinds of scenarios. And don’t forget, once you’re done editing, make sure your work is backed up properly.
The ultimate goal for many photographers is to develop a style that is truly their own. The best way to do that? By creating your own custom presets. When you create your own presets, you are distilling your unique creative vision into a reusable tool. You are no longer borrowing someone else’s style; you are defining your own. This is crucial for building a recognizable brand. Your custom presets are tailored to your camera, your lenses, and your shooting style.
To create your own presets, start with a well-exposed RAW image in the Develop module. Edit the photo to perfection, adjusting all the settings until you are completely happy with the look. Then, go to the Presets panel on the left and open the “Create Preset” dialog. It’s almost always a good idea to uncheck the boxes for White Balance, Exposure, Transform, and Lens Corrections, as these settings are specific to each individual photo and should be adjusted manually before applying the preset. Name your preset descriptively and click “Create.” By creating a library of your own presets for different scenarios, you take full control of your editing workflow.
If you want to start practicing this workflow on your own images, you can grab my Lightroom preset pack. I created them to work beautifully with landscapes, but they’re flexible enough to use in all kinds of scenarios. If you want to follow along with the free preset pack, be sure to download it here. Let’s get started.
Welcome to my photography blog, your comprehensive guide to mastering the art and science of photography. I’m Paige, ready to guide you on a journey of discovery, from capturing the perfect composition to deciphering the complexities of file formats and storage. This is where we will cover will include in-depth discussions on cameras, exploration of editing techniques, and a deep dive into photography’s fascinating world. Whether you’re a budding enthusiast or an experienced photographer seeking to sharpen your skills, I’m committed to helping you elevate your craft to the next level. Get ready to transform your passion into prowess, one click at a time.