Dodging and burning is a fundamental photographic technique that has transcended the limitations of the traditional darkroom to become an indispensable tool in the digital age. This powerful method allows photographers to selectively lighten (dodge) and darken (burn) specific areas of an image, thereby enhancing detail, sculpting form, and directing the viewer's attention. While the concept itself is straightforward, achieving professional results often involves navigating certain misconceptions and employing the right techniques, particularly concerning non-destructive editing in Adobe Photoshop.
Understanding the Core Principles of Dodge and Burn
At its heart, dodging and burning is about manipulating light and shadow to create depth and dimension. In the traditional darkroom, dodging involved reducing the exposure of a specific area of photographic paper, resulting in a lighter tone in the final print. Conversely, burning meant increasing the exposure of an area, leading to darker tones. This was typically achieved by physically blocking light with objects or by selectively allowing light to reach the paper for longer periods.
In essence, Burn darkens the pixels you paint, while Dodge lightens them. These techniques are particularly helpful for heightening the contrast in black and white photos but can also be used to great effect in color photos as well. Even when taken by a professional photographer with a high-end camera, photos can sometimes appear very flat. While you can always adjust your hue, saturation, and contrast levels to create a greater variance between your colors, what often happens is that you still end up with a somewhat flat photo because you are making universal changes to the entire image. By using Burn, you can create greater contrast by deepening the shadows in certain areas of a photo, which serves to create an almost 3-dimensional appearance. You can make some areas a deep, rich gray while making others a stark, pitch black.
Similarly, the Dodge tool can be used to do the same thing with whites, further extending the distance between the darkest blacks and the brightest whites. In color photos, Burn can be used to create deep shadows, while Dodge can be used to create patches of brilliant light. This adds richness, depth and texture. Ideally, every photo taken would be lit well, but this is not always the case. Burn and Dodge allow you to add shadows and create highlights to add rich color to even amateur photos. In addition, photos taken outdoors often end up having white patches from the sun or faces cast in deep shadow. Burn can darken the white patches, while Dodge can be used to lighten up shadowy faces.
When we view a photo, our brains work by subconsciously directing our gaze towards light areas and away from the dark. We also tend to notice differences in tone whilst passing over areas where the tones are quite similar. This is how we detect detail and depth. If the subjects in an image have a similar tone to their background, we tend to ignore them. If the entire image has very similar tones, our eyes wander across and out of the frame without anything to hold our attention.
The Pitfalls of Photoshop's Built-in Dodge and Burn Tools
A significant point of confusion for many Photoshop users lies in the existence of tools within the toolbar explicitly named "The Dodge Tool" and "The Burn Tool." It is crucial to understand that these particular tools are destructive. This means that once you apply them, the changes are permanently embedded into the pixels of your image. If you make a mistake or wish to adjust the effect later, you will find it impossible to revert or refine the changes without compromising image quality. Therefore, for any serious retouching, it is strongly advised to never use these destructive Dodge and Burn tools directly on your image layers.

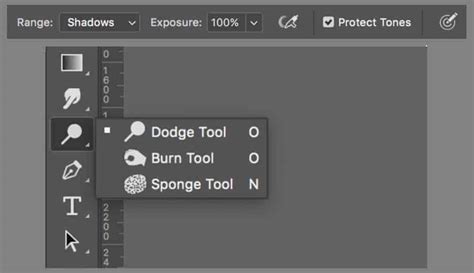
The Dodge and Burn Tools are part of a group of three tools in the Photoshop Tools palette, the third being the Sponge Tool. Whilst the Sponge Tool isn't the focus here, it's used to selectively increase or decrease the saturation of colors. For example, look back to the Before and After image at the start of this article. You can see the colours in the foreground leaves on the path are more saturated in the finished image. Depending on which tool you used last, you could see any of the three tools (Dodge, Burn and Sponge) in the Tools Palette.
It's important to remember the Photoshop Dodge and Burn Tools are both Brush Tools. The Burn Tool allows you to darken areas of your image. The Dodge Tool allows you to lighten an area. When you select either the Dodge or Burn Tool, you see the controls in the Context Sensitive toolbar along the top of the screen. It's possible to configure the Dodge and Burn tools and then save that configuration as a Tool Preset using this dropdown. This is where you can configure characteristics of the Brush like the Size and Hardness. There are also other much more advanced settings you can access here such as changing the shape and direction of the brush tip. The Range dropdown allows you to target the tonal range you want to affect with the brush. You can select from Highlights, Midtones and Shadow tones. Exposure controls how strong the effect is. Clicking this icon will toggle the airbrush effect on and off. When the airbrush effect is on, the adjustment builds up gradually on an area until it reaches the value set by the Exposure slider. This can help with blending the effect but personally, I tend not to use it. When you Protect Tones, you prevent the Dodge and Burn tools from affecting the saturation of the image where they paint. For example, if you use the Burn tool to darken an area you will also increase the saturation of that area.
The Art of Non-Destructive Dodging and Burning
The good news is that achieving professional dodging and burning results without harming your image quality is surprisingly straightforward. The key lies in working non-destructively, which allows for maximum flexibility and editability.
Method 1: The Gray Layer Technique
This is arguably the most popular and accessible method for non-destructive dodging and burning.
Open Your Image and Create a New Layer: Begin by opening your image in Photoshop. It’s always good practice to duplicate your background layer (Ctrl/Cmd + J) to have a backup, though this method itself is non-destructive. Then, create a new, empty layer above your image layer(s) by going to
Layer > New > Layer.Fill the New Layer with 50% Gray: With the new layer selected, go to
Edit > Fill. In the Fill dialog box, ensure that "Contents" is set to "50% Gray" and click "OK." This gray layer will serve as your canvas for dodging and burning.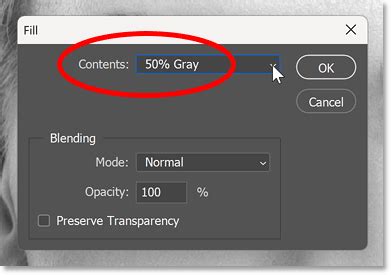
Set the Blend Mode: The crucial step is to change the blend mode of this gray layer. Locate the blend mode dropdown menu (usually set to "Normal" by default) at the top of the Layers panel and change it to either "Soft Light" or "Overlay."
- Soft Light: This blend mode generally produces a more subtle effect and tends to slightly desaturate the areas being adjusted. It's often considered a safer choice for beginners.
- Overlay: This mode is more intense and tends to saturate the colors in the areas being adjusted. It's useful when you want to add a bit more punch to your edits.
The choice between Soft Light and Overlay often depends on the specific image and the desired outcome. If an area is already somewhat dull, using Overlay can provide the added benefit of increased saturation.
Select Your Brush Tool: Now, select the Brush Tool (B). Ensure its blend mode is set to "Normal" and its Opacity is set very low. Often, an Opacity of 5% works well, but sometimes 2-3% is necessary for finer control. The Flow setting of your brush tool can also be adjusted if you are a habitual user of it; there is no need to change it.
Dodge and Burn:
- To dodge (lighten an area), paint with white on this gray layer.
- To burn (darken an area), paint with black on this gray layer.
Gently paint over the areas you wish to adjust. You can layer multiple strokes to gradually "massage" the light and shadow on your photo, building up the effect gradually.
Non-Destructive Dodge and Burn (#Photoshop CS6)
A strange myth persists in some tutorials about needing a 50% grey layer to perform dodging and burning. While this method is valid and widely used, it's important to note that the "gray layer" itself is not strictly necessary for the effect to work when using blend modes like Soft Light or Overlay with white and black paint. You can achieve a similar result by creating a new blank layer and setting its blend mode to Soft Light or Overlay, then painting with white or black. The gray layer simply provides a neutral base.
Method 2: Using the Dodge and Burn Tools on a Separate Layer (with a Caveat)
While the destructive nature of the built-in Dodge and Burn tools is a concern when used directly on image layers, they can be employed non-destructively if used on a separate, dedicated layer.
Create a Stamp Layer: The most efficient way to create a layer that captures all visible elements of your image is to use the keyboard shortcut
Shift + Ctrl + Alt + E(on Mac:Shift + Option + Command + E). This creates a "Stamp Layer" which is essentially a flattened duplicate of all visible layers.Select Dodge or Burn Tool: Now, you can select either the Dodge Tool or the Burn Tool from the Photoshop toolbar.
Adjust Tool Settings:
- Brush Size and Hardness: You can adjust the brush size using the square bracket keys (
[and]). The hardness determines the sharpness of the brush edge; a hardness of 0% creates a very soft, safe edge, while 100% creates a sharp edge. - Range: This setting allows you to target specific tonal ranges: Highlights, Midtones, or Shadows.
- Exposure: This controls the strength of the effect. The default strength of these tools is often too high, so it's recommended to keep the Exposure between 3% and 5% to avoid overdoing the effect. If you want a stronger effect, simply brush over the same area again.
- Protect Tones: Enabling this option preserves the hue and some of the tones, which is beneficial for photographs. Without it, darkening an area can also increase its saturation.
- Brush Size and Hardness: You can adjust the brush size using the square bracket keys (
Apply the Adjustments: Carefully paint over the areas you wish to lighten (Dodge) or darken (Burn).
Important Caveat: While this method is technically non-destructive because you are working on a separate layer and have your original image intact, it's not "fully" non-destructive in the purest sense. Repeatedly dodging and burning the same spot on this layer can still lead to a subtle degradation of image quality over time. The gray layer method is generally preferred for its cleaner, more robust non-destructive workflow.
It's worth noting that you can often achieve the "burn" effect by simply holding down the
Alt/Optionkey while using the Dodge tool (or vice versa), effectively inverting its function. This can save you from switching tools constantly.
Advanced Techniques and Considerations
Modifying Color with Dodge and Burn
Dodging and burning primarily affects luminosity (brightness and darkness). However, the blend modes used in the gray layer technique can also influence color. As mentioned, Soft Light tends to slightly desaturate, while Overlay tends to saturate. This can be a useful consideration when deciding which blend mode to use. If you need to specifically modify color, other adjustment layers like Hue/Saturation or Color Balance will be more direct tools.
The Role of Luminosity Masking
For even more precise control, dodging and burning can be combined with luminosity masking. Luminosity masking uses the brightness values of your image to create sophisticated layer masks. This means your dodge and burn adjustments will automatically be applied only to specific tonal ranges (e.g., only to the highlights, only to the midtones, or only to the shadows).
To implement this:
- Create a Dodge and Burn Layer: Set up a gray layer with the "Soft Light" or "Overlay" blend mode as described in Method 1.
- Add a Layer Mask: With this dodge and burn layer selected, click the "Add Layer Mask" button at the bottom of the Layers panel.
- Apply Image to Mask: Ensure the layer mask itself is selected (not the layer thumbnail). Go to
Image > Apply Image. Select your original image layer (e.g., "Background") in the "Layer" dropdown. Set the "Blending Mode" to "Multiply" or "Normal." - Invert and Adjust Mask: You can then invert the mask (Ctrl/Cmd + I) if needed. Using the Levels tool (Ctrl/Cmd + L) on the mask itself allows you to refine which areas are affected by your dodge and burn layer. By dragging the outer sliders of the Levels adjustment towards the center, you increase contrast within the mask, thereby controlling the areas where your dodge and burn effects will be visible.
This advanced technique ensures that your dodging and burning precisely targets specific tonal areas, leading to highly refined and professional results.
Avoiding Common Misconceptions
- The 50% Gray Layer Myth: As discussed, while the 50% gray layer method is effective, the "gray" itself isn't the magical component. It's the blend mode (Soft Light/Overlay) combined with painting in black or white that creates the effect. You can achieve similar results on a plain white or transparent layer.
- "Never Use the Destructive Tools": This is a strong guideline. While technically you can use the built-in Dodge and Burn tools on a duplicate layer or stamp layer, the gray layer method offers superior flexibility and quality preservation.
- Overdoing It: Dodging and burning is a subtle art. Over-application can lead to unnatural-looking images with blown-out highlights or crushed shadows. It's easy to overdo, especially when working quickly.
Checking for Detail Loss
A useful technique to check if you've pushed your dodging and burning too far, resulting in pure black or white areas and a loss of detail, is to use a Threshold adjustment layer.
- Add Threshold Layer: Go to
Layer > New adjustment layer > Threshold.... Place this layer at the very top of your layer stack. - Adjust Threshold Slider: In the Properties window for the Threshold layer, you can move the slider.
- Setting the slider to a low value (e.g., 8) and looking for large dark areas will reveal if you've made parts of your image too dark.
- Setting the slider to a high value (e.g., 249) and looking for large white areas will reveal if you've over-brightened certain parts.
- Refine Edits: If you see large uniform areas at these threshold values, it indicates a loss of detail. You'll need to go back to your dodge and burn layer and reduce the intensity of your brush strokes in those areas.
- Toggle Visibility: Remember to turn off the visibility of the Threshold layer (by clicking the eye icon next to it in the Layers panel) once you've finished checking.
By understanding the principles of light and shadow, avoiding destructive tools, and employing non-destructive techniques like the gray layer method, you can effectively master dodging and burning to add depth, dimension, and artistic flair to your photographs.