Camera flash and shutter effects, along with their associated transitions, are established techniques in cinematic storytelling. These visual cues evoke a sense of captured moments, whether it's a joyous snapshot of a couple celebrating a wedding or a holiday, or the clandestine surveillance of a subject through rapid-fire photography. Fortunately, creating these dynamic effects in DaVinci Resolve 17 is a straightforward process, primarily leveraging the software's built-in transition tools. The true impact, however, is amplified through judicious application of color grading and complementary sound design.
Crafting the Freeze-Frame Flash Effect
A fundamental element of a convincing camera flash effect is the momentary suspension of action, simulating the freeze that occurs when a photograph is taken. This is achieved by isolating a still frame from the video sequence. The process begins with duplicating your primary video clip. This can be accomplished by holding down the 'Alt' key (or 'Option' on a Mac) and dragging the clip upwards onto a track directly above the original.
Once the duplicate clip is in place, position the playhead precisely at the point where you wish the freeze-frame effect to initiate. Subsequently, invoke the speed change dialog by pressing 'Ctrl+R' (or 'Cmd+R' on a Mac). Within this dialog, select the 'Freeze-frame' option. This action will effectively introduce a discontinuity in the duplicated clip, transforming a segment of it into a static image. The software automatically generates a cut at the beginning of this freeze-frame. It is then necessary to delete any portion of the duplicate clip that precedes this freeze-frame and to judiciously trim the freeze-frame itself to a duration of a few seconds, aligning with the desired visual pacing.
Following this, manipulate the original, main clip. Make a cut at the exact point where the freeze-frame begins. Then, move this cut section to the end of the freeze-frame segment. The freeze-frame itself should then be repositioned back onto the primary video track, precisely filling the gap created by this manipulation. The result is a seamless playback that transitions from motion to a frozen moment, and then resumes its original motion.
To further enhance this effect, a 'Dip to Color Dissolve' transition can be applied to the edit point where the freeze-frame commences. With this transition selected, navigate to the Inspector panel. Here, adjust the 'Color' parameter to white and reduce the 'Duration' of the transition to its absolute minimum. This creates a sharp, white flash precisely as the freeze-frame begins, mimicking the instantaneous burst of light from a camera flash.
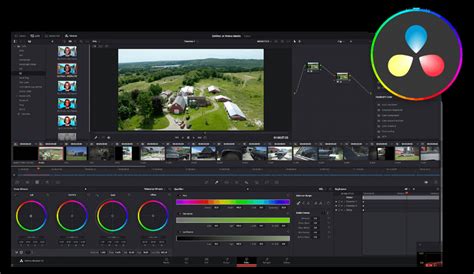
To imbue the freeze-frame with the aesthetic of a captured photograph, further refinement is possible. Select the still frame clip and navigate to the 'Color' page within DaVinci Resolve. To achieve a vintage, photographic look, consider increasing the 'Contrast', decreasing the 'Saturation', and then selectively increasing the 'Low' and 'High Soft' parameters. This subtle color grading can transform a simple freeze-frame into a more convincing still image.
Finally, to ensure a smooth transition as the video resumes its motion after the freeze-frame, apply a 'Smooth Cut' transition to the edit point where the clip continues. This provides a visually pleasing and natural flow between the frozen moment and the returning action.
Character introduction / Freeze frame effect // DaVinci Resolve 17 Tutorial
Implementing the Fast Shutter Effect
The camera shutter effect, characterized by rapid, successive flashes, is equally achievable within DaVinci Resolve and is particularly effective for sequences depicting rapid action or surveillance. This effect can be employed in scenarios such as showcasing models on a catwalk or recreating the classic cinematic trope of a private detective intensely photographing a subject from a distance, capturing a flurry of images in quick succession.
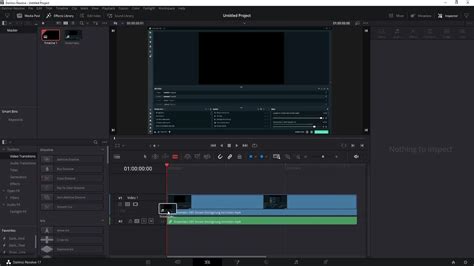
Begin by placing your primary video clip onto the first track of the timeline. Advance the playhead to the desired starting point for the shutter effect. From the 'Effects' panel, locate the 'Generators' section and add a 'Solid color' generator onto the second video track. Trim this solid color generator to approximately match the intended duration of your shutter effect.
Next, employ the 'Blade' tool (shortcut 'Ctrl+B' or 'Cmd+B') to meticulously cut the solid color generator frame by frame. It is crucial when using keyboard shortcuts to ensure that the auto track-selector for track one is deactivated to prevent unintended cuts to your main video track.
With the solid color generator now sectioned, select alternate frames using the 'Ctrl' (or 'Cmd') key. Once selected, use the 'Cut' command ('Ctrl+X' or 'Cmd+X') to remove these frames. This process leaves single frames of the solid color interspersed between the original video frames, creating the visual impression of rapid shutter flashes when played back.
To complement the visual effect, consider adding corresponding audio elements. A camera shutter sound effect, synchronized with these flashes, will significantly enhance the realism and impact of the effect. The solid color frames can be duplicated by holding 'Alt' (or 'Option') and dragging, allowing for the extension of the effect if needed.
To further intensify the shutter effect, a speed manipulation can be applied to the video clip. Position the playhead at the commencement of the effect and select the video clip. Open the 'Retime controls' by pressing 'Ctrl+R' (or 'Cmd+R') and add a 'Speed point'. Advance the playhead well beyond the conclusion of the effect and introduce another 'Speed point'. Subsequently, drag this second speed point to align with the end of the effect. This action introduces a sudden, dramatic speed change to the clip, which, when combined with the visual shutter flashes, imbues the sequence with a heightened sense of dynamism and urgency.
The effectiveness of this technique is particularly pronounced with moving subjects. The faster the speed changes are implemented, the more pronounced and impactful the shutter effect becomes. The duration of the speed point can be prolonged, and the speed increased further, to fine-tune the intensity of the effect.
Integrating Sound and Color for Enhanced Realism
Regardless of whether you are implementing a freeze-frame flash or a rapid shutter sequence, the judicious use of sound effects and color grading is paramount in elevating the illusion and making the effect feel authentic. For the freeze-frame flash, a distinct "click" or "whirr" sound of a camera shutter, synchronized precisely with the white flash transition, will anchor the visual to a sonic reality. This auditory cue is often more impactful than the visual alone in convincing the viewer of the camera's action.

Color grading the freeze-frame itself, as previously detailed, can transform a simple still into a photographic artifact. Applying subtle desaturation, increased contrast, and perhaps a slight vignette can mimic the characteristics of film photography or specific camera filters. This not only adds a stylistic flair but also reinforces the notion that the moment has been captured. For the shutter effect, while individual flashes might not require elaborate color grading, the overall sequence can benefit from subtle adjustments to enhance the mood. If the effect is intended to convey urgency or suspense, a slight increase in contrast and a cooler color temperature might be appropriate. Conversely, a more casual or celebratory montage could benefit from warmer tones.
Advanced Considerations and Applications
The fundamental techniques for creating camera flash and shutter effects in DaVinci Resolve can be adapted and expanded upon for more complex narrative purposes. For instance, the freeze-frame effect can be used to highlight a significant detail within a scene, drawing the audience's attention to a specific object or expression. The duration and intensity of the freeze can be manipulated to control the dramatic weight of this moment.
Similarly, the rapid shutter effect can be employed not just for surveillance but also to convey a character's heightened emotional state, such as panic, excitement, or intense focus. By adjusting the speed of the clip and the frequency of the shutter flashes, editors can manipulate the perceived tempo of the scene, influencing the audience's emotional response.
Consider the implication of using these effects in conjunction with other visual elements. A flash effect could be timed to coincide with a sudden realization or a moment of revelation. A series of shutter flashes might precede a jarring event or a rapid montage of related images. The interplay between visual, auditory, and temporal elements is key to creating a truly impactful cinematic experience.
The beauty of DaVinci Resolve's built-in tools is their accessibility. Even users without extensive experience can achieve professional-looking results. The key lies in understanding the underlying principles of photography and filmmaking â how light, motion, and sound combine to create a perceived reality. By mastering these effects, editors can add a significant layer of polish and storytelling capability to their projects.
The application of these effects extends beyond simple transitions. They can be integral to the narrative flow, reinforcing themes, characterizing individuals, and shaping the audience's perception of events. For example, a character who is a photographer might have their perspective consistently framed by flash and shutter effects, subtly reinforcing their role and worldview. A scene depicting a chaotic event could be amplified by a frenetic series of shutter flashes, mirroring the disarray.
Furthermore, experimenting with the parameters of the built-in transitions and the speed manipulation tools can lead to unique variations. A slow, lingering freeze-frame with a soft flash might evoke nostalgia, while a jarring, rapid succession of sharp flashes could create a sense of unease. The versatility of DaVinci Resolve allows for a wide spectrum of creative expression within these core effects.
It is also worth noting that these effects can be combined. A sequence might begin with a rapid shutter effect to establish a sense of urgency, followed by a freeze-frame to emphasize a critical moment within that sequence. The ability to layer and interweave these techniques offers a powerful toolkit for visual storytelling.
Character introduction / Freeze frame effect // DaVinci Resolve 17 Tutorial
The fundamental principle is to use these effects not merely as decorative elements, but as tools to enhance the narrative and emotional impact of the footage. By understanding how a camera captures light and motion, and how these processes are simulated digitally, editors can create a more compelling and immersive viewing experience. The ease with which these effects can be implemented in DaVinci Resolve democratizes their use, allowing filmmakers of all levels to incorporate these classic cinematic devices into their work.