The digital art landscape is constantly evolving, and within this dynamic space, the Procreate app has emerged as a powerhouse for artists seeking to imbue their creations with a tangible, almost physical, presence. It's no secret the Spoonflower community has caught the Procreate bug! This raster graphics editor app for digital painting allows you to create expressive sketches, rich paintings, gorgeous illustrations, and beautiful animations all from the comfort of your couch. For those still on the fence, understanding the profound impact of texture within Procreate can be the deciding factor. As Doodle-a-Day creator and Spoonflower designer Rhianna Wurman attests, Procreate is a must-have design tool for any designer, offering unparalleled freedom and expressive potential. This article, originally published on the Spoonflower Blog in 2020, delves into the multifaceted world of Procreate canvas textures, exploring how artists like Rhianna and Cory Romeiser leverage its features to achieve depth, character, and an authentic analog feel in their digital work.
The Genesis of Texture in Digital Art: Rhianna Wurman's Journey
Rhianna Wurman's exploration with Procreate began in 2016, coinciding with her ambitious 100-day project, "100 Unlikely Combinations." This endeavor was a deliberate foray into a new digital medium, aiming to master the app, acquire new techniques, experiment with texture, and expand her understanding of digital tablet art. Procreate, she found, was instrumental in streamlining her design process. It facilitated the creation and sharing of digital art from virtually anywhere, offering a level of freedom that mitigated the fear of irreversible mistakes. The app's intuitive selection tool allowed for swift manipulation of design elements, enabling her to focus on specific details with remarkable accuracy through zooming capabilities.
Procreate's influence on Rhianna's design aesthetic has been profound and organic. She learned to seamlessly integrate interesting textures, bestowing her work with enhanced character and depth. The robust layers feature allowed her to construct richer scenes around her illustrations, adding a new dimension to her visual storytelling. Furthermore, Procreate's compatibility with Adobe® Photoshop® proved to be a significant advantage. Possessing prior knowledge of Photoshop, Rhianna found the transition to Procreate smooth. The ability to quickly export layered images from Procreate directly into Photoshop for further refinement or reformatting was a game-changer. For designers, Procreate represents a dream tool due to its accessibility, portability, and the sheer joy of experimentation it fosters. The immediacy of creating digital art at one's fingertips, coupled with an expansive library of engaging brushes and tools, unlocks endless creative possibilities. Artists can achieve a polished, clean aesthetic or opt for an organic feel reminiscent of traditional mediums. The app also simplifies the process of importing and tracing existing sketchbook drawings or creating entirely new pieces directly on the iPad.
Rhianna highlights several brushes that are instrumental in her workflow:
- Dry Ink: This brush is her go-to for most line work and sketching, appreciated for its subtly gritty texture.
- Studio Pen: Another excellent choice for line work, the Studio Pen offers a clean and smooth finish, with the added benefit of achieving beautiful variations in line weight.
- Bonobo Chalk: This brush is a favorite for introducing grainy texture and adding shadows to illustrations.
- Tarraleah: Featured in the latest Procreate release, this brush excels at creating textured backgrounds and adding texture to shapes.
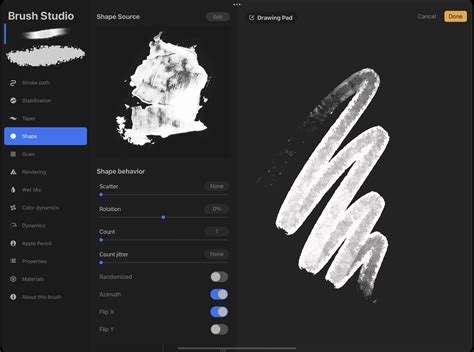
The use of an Apple Pencil further enhances flexibility, allowing for nuanced control over pressure sensitivity. Procreate's built-in features also aid in workflow optimization. Artists can review their creative process through a time-lapse video by navigating to Actions > Video > Time-lapse Replay. For managing multiple elements, selecting and grouping layers is straightforward: tap one layer and then slide any other desired layers to the right to temporarily group them for simultaneous movement or resizing. The eraser library mirrors the brush library, offering a consistent toolset. To achieve smoother, more stable curved lines, artists can access Brush Properties and increase the "Streamline" value under "Stroke Path." Adding texture to a shape is also simplified; by selecting the layer containing the shape and swiping right with two fingers, the layer enters "Alpha Lock," ensuring that any subsequent painting or texturing remains confined to the shape's existing pixels.
Rhianna Wurman's artistic endeavors extend to her role as the owner and illustrator for the paper goods company Ello Lovey and as the host of the popular Instagram challenge "Doodle-a-Day." Her vibrant greeting cards and art prints are celebrated for their whimsical charm and the elegant simplicity with which they capture everyday moments. When not immersed in design, Rhianna can be found exploring the scenic mountain trails of Asheville, NC, with her husband.
Crafting Worn and Weathered Designs: Cory Romeiser's Textured Approach
Cory Romeiser, art director at Golden Press Studio, shares the sentiment that digital art can sometimes feel like it's "missing something." His solution lies in the creation of custom textured brushes designed to impart a weathered, faded, and perfectly worn aesthetic to Procreate designs.
The process begins with the initial artwork. Cory typically opens a new canvas in Procreate and starts with a subject, such as a skull. Once the final design is inked, he often inverts it to achieve a desired look on a dark background. This involves creating a new layer beneath the inked layer. The inked layer is then placed above a blank layer, and the background color is set to a dark hue. On this new, blank layer, the brush color is set to white, and the skull is colored in using this white brush. This technique effectively transforms the inked lines into negative space. This method is then repeated for other elements, like a beanie, in their desired colors.

The crucial step of adding texture commences after the design is finalized. A key best practice before applying texture is to duplicate the colored layer of the design. This ensures that the original artwork remains intact. Cory then accesses the eraser/brush menu and selects a textured brush.
The foundation of an organically textured design is laid by creating a base layer of texture over the entire design. This initial application mimics the appearance of the design being printed on a canvas material that has weathered over time. The art of achieving convincing textures lies in layering them, building up complexity to create a natural look.
Once the base texture is established, Cory selects a different brush. He applies this new texture to the edges of the skull, recognizing that edges are typically the first areas to show wear and tear.
Pro Tip: There is no definitive formula for creating great texture; experimentation is key.
For the subsequent layer of texture, Cory opts for a denser brush, applying it to areas like the eye sockets. Because this brush is denser, it's applied with less intensity, resulting in a cracked appearance that enhances the skull's character.
The goal for the beanie is to make both the skull and the beanie appear authentic, as if they were applied to a substrate and have naturally worn away over time. To achieve this, texture is added not only within the design's boundaries but also extending slightly beyond them, creating the illusion of the design flaking away from the main form. For this effect, a finer, textured brush is selected from the brush library. The color of the element being textured is chosen, and then texture is applied in small increments outside the original lines. For larger "flakes," a chunkier brush can be employed.
Pro Tip: If a mistake is made, a simple two-finger tap will undo the action.
The same process is then repeated for the skull, using white as the color. It's important to ensure that texture is only added outside the original lines where the main design has already been textured. The application of texture is inherently subjective, and artists are encouraged to revisit and refine their work.
To further erode specific areas and create visual balance, Cory utilizes a dense brush on the left cheekbone of the skull, aiming to match the erosion on the right side.
Pro Tip: Texture can also be used to erase other textures. By selecting a texture brush, choosing the background color, and brushing over an area, you can selectively remove texture without completely obliterating it. This allows for subtle adjustments and a more nuanced finish.
The process of playing with textures and the design continues until the artist achieves a satisfactory outcome.
Beyond direct texture application, another technique can elevate digital art. By clicking on a lower layer and creating a new layer beneath the colored design layers, artists can introduce a subtle paper-like quality. Selecting a black shade and a brush with a "paper vibe" from the library, and then painting broad strokes across the entire canvas, creates a new backdrop. Subsequently, on the main design layer, the eraser tool is set to the "paper brush." Applying this eraser lightly over the design can create a subtle, textured effect. If the result is too dark, the opacity of the eraser brush can be reduced, or the action can be undone with a two-finger tap, and the process can be reattempted. Adding texture through these various methods is an efficient way to introduce depth and visual interest with minimal effort, resulting in compelling designs that appear weathered and distressed.
How to Create Realistic Oil Painting Textures in Procreate
Understanding Layers in Procreate: Beyond 2D
While the concept of layers is familiar in 2D digital painting, Procreate's implementation, particularly in its 3D painting capabilities, offers a distinct approach. In 3D painting, layers function differently. A 3D model comprises Texture Sets, Meshes, Base Layers, and Materials.
- Texture Sets: These encompass all the meshes and layers associated with a 3D model.
- Meshes: Within a texture set, a 3D model is divided into meshes, with each mesh defining a specific painting area on the model.
- Base Layers: These are masked by the currently selected mesh, causing the base layer to shift as if grouped with the selected mesh. Not all 3D models include base layers.
- Materials: A key distinction in 3D painting is that each layer contains three materials: Color, Roughness, and Metallics. These materials can be influenced by Procreate brushes that contain specific Roughness and Metallics information. Brushes without this information will only affect the Color material. Artists can select and paint directly onto individual materials, similar to working with layer masks.
Accessing and selecting individual materials is done by tapping the Materials Icon within the Layers panel. The "Create Layer" button, marked with a '+' symbol, is located in the top right corner of the Layers panel, allowing for the addition of new layers.
The materials themselves offer a subset of layer options: Select, Copy, Fill Layer, Clear, and Invert. By copying image data to the clipboard, it can be pasted into another material layer or a different Procreate canvas. Filling an entire material layer with the currently selected color is also possible. Procreate also imports Ambient Occlusion and Normal materials, though these are not directly editable through layers.
Recreating Analog Charm: Importing and Manipulating Paper Textures
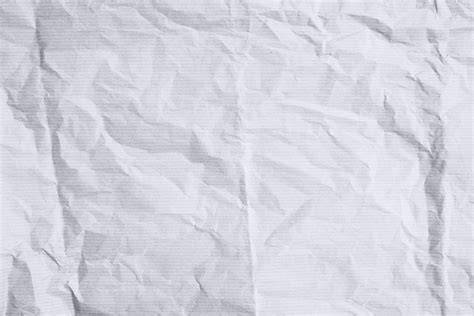
The aesthetic of ink on textured paper, particularly cardboard, holds a unique charm, often seen in vintage matchbooks with their subtle ink bleeds, print misregistrations, and the coarse texture of the paper. This effect can be replicated in digital art to add another layer of character.
The process begins by collecting and saving various rough paper and cardboard textures. The more random the texture, the better. Sources can include the backs of legal notepads or chipboard with visible fiber bits. Inspiration can also be found at flea markets and old paper shows.
When preparing to import a texture, ensuring the paper is evenly lit is crucial. Once imported into Procreate, the image is placed on a new layer, typically labeled "Inserted Image." This layer can then be positioned as desired.
Using the "Adjustments" (Gear icon) and then "Hue, Saturation, Brightness" tools, the texture's appearance can be refined. While artists can adjust to their taste, a common approach is to modify saturation and brightness levels to retain the texture's detail while reducing the dominant brown tone of the paper.
Layer effects are then employed to blend the textured background with the artwork. Setting the texture layer's blend mode to "Multiply" allows the texture to show through the artwork. If the artwork consists of multiple layers, experimenting with multiplying individual layers can offer finer control.
For more advanced manipulation, scanning and importing the texture image into Photoshop can be beneficial. Here, adjustments like "Black & White" and "Levels" can be used to increase contrast and fine-tune the texture's appearance. Each image will require unique adjustments, so the provided settings should be used as a guide.
Sometimes, an illustration might feel like it needs an additional element, a certain "something else." While some artists prefer to keep their work simple, adding texture can be a subtle yet impactful way to enhance a piece.
Phantom Paper Textures: A Seamless Path to Analog Feel
For artists seeking to infuse their Procreate work with the authentic feel of archival paper, the Phantom Paper texture packs offer a comprehensive solution. These textures are designed to capture the tooth, highlights, and shadows characteristic of real ink or paint on paper, providing a seamless, tileable experience for any canvas size.
Each texture in the pack is named to suggest its paper type, such as "TobaccoKraft," which is scanned from archival paper composed of cotton fibers and wood pulp, imparting a rich, aged aesthetic. Robin Banks, in a tutorial, demonstrates how to achieve an authentic analog feel using these textures.
Step-by-Step Guide to Adding Paper Textures in Procreate with Phantom Paper:
- Download the Textures: After purchasing Phantom Paper, access the download page and select the desired textures.
- Import Your Textures into Procreate: Download the textures, open Procreate, navigate to "Import," locate the downloaded textures, and import them.
- Set Up Your Canvas: Adjust your canvas size to suit your project. A 12x12 inch canvas, for instance, is ideal for both Instagram and printmaking. Phantom Paper textures are designed to be seamless across any size.
- Tile Texture on Canvas (if Needed): For a canvas like 12x12 inches, duplicate the texture layer three times and align each layer edge-to-edge for a seamless, continuous texture.
- Ink Your Artwork: Import your sketch into Procreate or begin inking on a layer positioned below the texture layer. Lowering the sketch's opacity can improve visibility while inking.
- Add Color and Effects: Create a new background color layer and set its blend mode to "Multiply." Set your line art layer to "Reference Mode" and create new layers for each color. Colors can then be dragged and dropped into enclosed areas.
- Fine-Tune Textures: Adjust the opacity of the texture layer to control the intensity of the paper effect.
- Add Finishing Effects: Incorporate elements like glue edges and discoloration for added authenticity. These effects are often included with Phantom Paper.
Seeing the Difference: Before and After
The impact of using Phantom Paper Textures is striking. In "before" images, artwork may appear clean and digital but can lack the depth and character of traditional media, presenting a somewhat sterile appearance with crisp lines and flat colors. In contrast, "after" images reveal a rich, tactile quality. The subtle grain, minor imperfections, and warm tones contribute to an authentic vintage look. This transformation not only enhances visual appeal but also imbues digital art with a nostalgic, analog feel, making it appear as if it were created on a physical medium, complete with the charm and texture of real paper.
User testimonials often highlight the unique quality of these textures, with many artists expressing how they fulfill a specific need for their projects.
Embarking on Your Textured Art Journey
To experience the tangible difference that paper textures can bring to your digital creations, consider trying Phantom Paper Textures for Procreate. Sharing your projects using these textures with the hashtag #RetroSupply offers a chance to be featured and connect with a community of artists. When sharing, be sure to mention the specific product used and include before-and-after images. Joining the community provides access to more tutorials, tips, and exclusive content. Signing up for newsletters keeps artists informed about the latest products and tutorials.
The exploration of texture in Procreate is an ongoing journey, offering artists powerful tools to move beyond flat digital representations and embrace a richer, more tactile visual language. From the subtle grit of a Dry Ink brush to the complex layering of scanned paper, Procreate provides a versatile canvas for achieving a wide spectrum of analog-inspired aesthetics.