In the intricate world of digital art and design using Adobe Photoshop, layers serve as the fundamental building blocks of any ambitious project. As your creative vision expands and evolves on the canvas, it's common to accumulate a multitude of layers. While this offers immense flexibility, an excessive number of layers can lead to a cluttered workspace, making it challenging to navigate and manage your project effectively. Furthermore, a proliferation of layers can significantly increase your file size, impacting performance and storage. Understanding how to efficiently combine these layers is therefore a crucial skill for any Photoshop user, from novice to professional.
The Essence of Layers and Merging
At its core, each layer in Photoshop functions like an independent, transparent sheet stacked upon others. This allows for precise editing of specific elements without affecting the rest of your composition. Once you have meticulously refined a particular section of your work, the ability to merge several layers into a single, cohesive unit becomes invaluable. This process streamlines your workflow, simplifies your layer management, and can contribute to optimizing file size.
It is paramount to understand that merging layers is an irreversible operation. When you merge layers, the content of the uppermost layer will overwrite any overlapping areas on the layer beneath it. Once you save your document after merging, you cannot easily revert to the original, separate layers. Therefore, it is always advisable to save a master version of your project before undertaking significant merging operations, or to utilize techniques that create merged copies without altering the originals.
Diverse Methods for Combining Layers
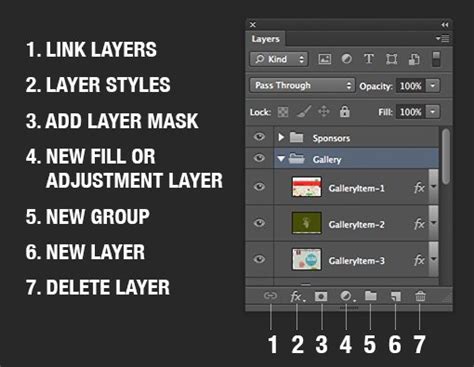
Photoshop provides a flexible array of options for combining layers, catering to different workflow preferences and project needs. Each method offers a distinct approach to consolidating your visual elements.
Merging Selected Layers with the Layer Below
One of the most straightforward methods allows you to merge a selected layer with the layer directly beneath it in the Layers panel. This is particularly useful for consolidating adjacent elements that have been edited independently.
To execute this:
- Begin by clicking on the top layer you wish to merge. This action highlights it in the Layers panel, indicating that it is selected.
- Subsequently, you can either navigate to the "Layer" menu and select "Merge Down," or right-click on the selected layer and choose "Merge Down" from the contextual menu.
- Alternatively, a common keyboard shortcut exists for this operation: press
Ctrl + E(orCmd + Eon macOS). This command will immediately merge the active layer with the one directly below it, provided both are pixel layers and visible.
Merging Consecutive Layers
When you have a series of layers that are positioned one after another in the Layers panel and you wish to combine them all into one, Photoshop offers a convenient way to select this contiguous block.
To select a group of consecutive layers:
- Click on the first layer in the sequence you intend to merge.
- Hold down the
Shiftkey on your keyboard. - While still holding
Shift, click on the last layer in the sequence. This action will select all layers between the first and the last, inclusive. - Once these layers are selected, you can then use the "Merge Down" command (Layer > Merge Down or
Ctrl + E/Cmd + E) which will apply to the entire selected range, effectively merging them into a single layer.
Merging Non-Consecutive Layers
For situations where the layers you wish to combine are not adjacent in the Layers panel, Photoshop allows for the selection of multiple, individual layers.
To select non-consecutive layers:
- Click on the first layer you want to merge.
- Hold down the
Ctrlkey (orCmdkey on macOS). - While holding
Ctrl/Cmd, click on each additional layer you wish to include in the merge. As you select them, these layers will be highlighted in the Layers panel, visually confirming your selection. - After selecting all desired non-consecutive layers, you can then proceed to merge them. The most common method is to use the "Merge Layers" command, accessible by selecting "Layer" > "Merge Layers" from the main menu. This will combine all selected layers into a single layer.
Flattening the Image: Merging All Visible Layers
The "Flatten Image" command is a more drastic merging operation that consolidates all visible layers in your document into a single background layer. This is a powerful tool for reducing file size significantly and preparing an image for final output, but it means that all individual layer edits are lost.
To flatten your image:
- Ensure that only the layers you intend to keep are visible by toggling the "eye" icon next to the layers you wish to hide.
- Navigate to the "Layer" menu.
- Select "Flatten Image."
When you flatten an image, any transparent areas that remain are typically filled with white. This process permanently discards all hidden layers. It's crucial to remember that flattening is a destructive process, and once saved, the original layers cannot be recovered.
Stamp Visible: Creating a Merged Copy Without Destroying Originals
One of the most versatile and safest ways to combine layers is through the "Stamp Visible" command. This unique method creates a brand new layer that contains a merged composite of all currently visible layers, leaving your original layers intact and editable. This is exceptionally useful when you want to apply global effects, filters, or adjustments to your entire composition without committing to a destructive merge.
To use Stamp Visible:
- First, ensure that all the layers you wish to include in the merged copy are visible by checking for the "eye" icon next to their names in the Layers panel. Hide any layers you do not want to be part of this merged layer.
- Then, press the keyboard shortcut:
Shift + Alt + Ctrl + E(on Windows) orShift + Option + Cmd + E(on macOS). - A new layer will appear at the top of your Layers panel, containing the combined visual information from all the visible layers. Your original layers remain untouched below this new merged layer.
There's also a variation of this command called "Stamp" (or "Merge Copy" in some contexts), which is triggered by Alt + Ctrl + E (or Option + Cmd + E on macOS). This command works similarly by creating a new layer with the merged visible content, but it's often associated with merging the active layer with all visible layers above it, or simply merging the selected layer with all visible layers if no specific layer is active. The key takeaway is that these "stamping" methods are non-destructive, creating a new layer for the merged result.
Advanced Layer Management and Considerations
Beyond the fundamental merging techniques, several other features and best practices can significantly enhance your layer workflow in Photoshop.
Organizing Your Layers with Groups and Naming
As projects grow in complexity, maintaining order in the Layers panel becomes paramount. Photoshop offers powerful tools for organization:
- Naming Layers: Assigning descriptive names to your layers and layer groups is a fundamental practice. Double-click on the layer or group name in the Layers panel to rename it. This makes it instantly clear what each element represents.
- Grouping Layers: To keep related elements together, you can create layer groups. Select the layers you want to group, then either right-click and choose "Group Layers," or use the folder icon at the bottom of the Layers panel. You can then merge entire groups by selecting the group and using the appropriate merge command.
- Color Coding: Photoshop allows you to assign a color to each layer or group by right-clicking on it and selecting a color from the "Color" option. This visual cue makes it easier to quickly identify and select related layers within a crowded panel.
Organize and Track Layers like a Pro in Photoshop
Understanding Rasterization and Vector Data
Photoshop handles different types of layer content, and understanding these distinctions is crucial for merging and editing.
- Vector Data: Layers containing vector data, such as Type layers, Shape layers, vector masks, and Smart Objects, are resolution-independent and can be scaled without loss of quality. However, you cannot directly use most painting tools or filters on these layers.
- Rasterized Data: Layers that contain pixel-based information (raster data) are what most painting and editing tools operate on. If you find that you cannot merge a certain layer, or if a tool isn't behaving as expected, it might be because the layer contains vector data.
- Rasterizing Layers: To overcome these limitations, you can rasterize a layer. Right-click on the layer in the Layers panel and select "Rasterize Layer" (or "Rasterize Type" for type layers). Once rasterized, the layer is converted into pixel data, making it compatible with a wider range of tools and filters. However, remember that rasterization is a destructive process, and you lose the scalability of vector data. It's often recommended to duplicate a layer before rasterizing it, so you retain the original vector data if needed.
Deleting Layers and Hidden Layers
When layers are no longer needed, they should be removed to keep your file clean and reduce its size.
- Deleting Individual Layers: Select the layer you wish to remove, then click the trash can icon at the bottom of the Layers panel, or press the
Deletekey. - Deleting Hidden Layers: To efficiently clean up multiple hidden layers at once, you can go to the "Layer" menu, then "Delete," and select "Hidden Layers." This will remove all layers that are currently not visible.
Exporting Layers
Photoshop also offers the capability to export layers individually, which can be useful for various workflows, such as creating sprite sheets or preparing assets for web development. You can export all layers or only the visible layers to separate files.
The Irreversibility of Merging: A Constant Reminder
It cannot be stressed enough: merging layers is a permanent action. Once you save your Photoshop document after merging, the original individual layers are gone. This is why non-destructive methods like Stamp Visible, using Smart Objects, or maintaining backup copies are so highly recommended.
Enhancing Efficiency with Shortcuts and Tools
Working efficiently in Photoshop often comes down to mastering keyboard shortcuts and utilizing specialized hardware.
- Keyboard Shortcuts: As demonstrated throughout this guide, numerous shortcuts exist for merging, selecting, and managing layers. Learning and implementing these can dramatically speed up your workflow. For example,
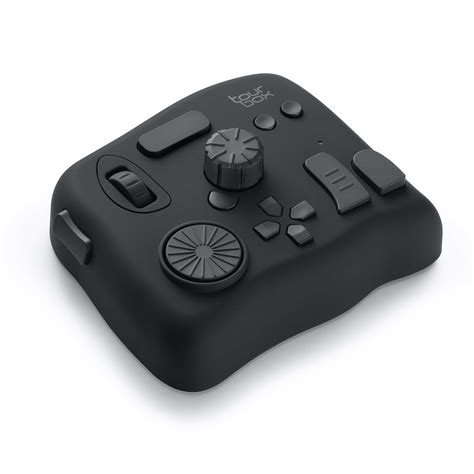
Ctrl + E(orCmd + E) for Merge Down, andShift + Ctrl + Alt + E(orShift + Cmd + Option + E) for Stamp Visible are incredibly time-saving. - External Controllers: For users who spend extensive time in Photoshop, dedicated creative consoles like the TourBox can further boost efficiency. These devices offer customizable buttons, dials, and wheels that can be programmed to execute complex shortcuts or commands with a single press or turn, streamlining the process of layer manipulation and other common tasks.
Merging Layers in Practice: A Simple Example
Let's illustrate with a basic scenario. Imagine you have three layers: a background image, a subject you've cut out, and a text overlay.
- Examine the Layers Panel: Look at the names and order of your layers. Let's say they are named "Background," "Subject," and "Title."
- Select for Merging: If you decide the "Subject" and "Title" layers no longer need independent editing and you want to combine them into one layer that sits on top of the background:
- Click on the "Title" layer.
- Hold down
Ctrl(orCmd). - Click on the "Subject" layer. Both layers are now selected.
- Merge: Press
Ctrl + E(orCmd + E). The "Subject" and "Title" layers will merge into a single new layer, which will likely be named after the bottom-most selected layer ("Subject" in this case). This new layer now contains both the subject and the title, and it sits above the "Background" layer. - Consider Flattening: If you are completely finished with all edits and want the smallest possible file size, you could then merge this new layer with the "Background" layer using
Ctrl + Eagain, or use "Flatten Image" to combine everything.
Conclusion: A Foundational Skill
Layer merging is a fundamental yet essential skill in Photoshop. While it might seem straightforward, its proper application is key to efficient project management, optimized file sizes, and a cleaner, more manageable workflow. Whether you are consolidating elements, preparing for export, or simply tidying up your workspace, understanding the various methods of combining layers empowers you to work more effectively and creatively within Photoshop. Mastering these techniques, alongside good organizational habits and efficient use of shortcuts, will undoubtedly elevate your digital design capabilities.