DaVinci Resolve, available for both Mac and Windows devices, is a powerful tool for video editors, offering extensive capabilities for creating dynamic text and essential subtitles. This guide delves into the intricacies of adding and customizing these elements, from manual subtitle creation to leveraging advanced features and third-party integrations. Whether you're a seasoned professional or a newcomer to video editing, understanding DaVinci Resolve's text and caption presets can significantly enhance your video's accessibility and impact.
The Crucial Role of Text and Subtitles in Video Content
Text serves as a versatile tool for conveying information to your audience. It can be strategically used in tutorials to emphasize key points, capture attention at the beginning of a video, or generally deliver more information on screen. The scope of text application ranges from straightforward title screens and credits to sophisticated motion graphics featuring intricate animations and vibrant fonts. The specific style and complexity of text employed will be dictated by the nature of the content you aim to produce.
Filmmakers, for instance, often utilize text judiciously within DaVinci Resolve. Typically, text might be reserved for opening titles and end credits, with few exceptions. However, there are creative avenues where filmmakers can integrate text effectively. For example, user interface (UI) elements in films like "Iron Man" employ text for informational displays, and, of course, for subtitles.
Creators of commercials and social media content are more inclined to use text to augment the visual appeal of their work. In these contexts, text styles tend to be more flamboyant and eye-catching. Text in advertisements can manifest as lower thirds, providing viewers with the name and occupation of individuals appearing on screen.
The importance of subtitles extends beyond mere dialogue transcription. They are fundamental for accessibility, ensuring that viewers who are deaf or hard of hearing can fully engage with the content. Furthermore, in noisy environments or when viewing videos without sound, subtitles allow audiences to follow along. Subtitles also play a critical role in international distribution, enabling content to reach a wider, global audience. For educational videos, adding text in the form of labels and captions to accompany audio narration is a necessity. People learn through various modalities; some are visual learners, while others prefer auditory input. Some individuals prefer to read, while others absorb information best through watching and listening. By presenting the same information through multiple sensory channels, you maximize the impact on a broad spectrum of viewers.
Manually Adding Subtitles in DaVinci Resolve
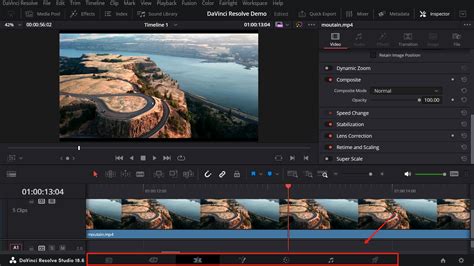
Adding subtitles within DaVinci Resolve is an accessible process, making it suitable for both professional video editors and those just beginning their journey into video editing. The initial step involves opening DaVinci Resolve and either importing an existing project or creating a new one. Navigate to the bar at the bottom of the DaVinci Resolve interface and click on the "Edit" tab.
Subsequently, direct your attention to the "Effects" tab, located on the left-hand side of DaVinci Resolve. Within this section, click on "Titles" and scroll down to the bottom. Here, you will discover an effect labeled "Subtitles." Drag this effect onto your timeline to incorporate it into your project.
Once the subtitles are placed on your timeline, you can modify them by clicking on the beige subtitle bar that appears. The "Inspector" tab, situated on the right-hand side of the screen, is divided into two sub-tabs: "Caption" and "Track."
The "Caption" tab provides options for timing your subtitles and adding new ones. You can also customize specific sets of subtitles within this tab. The "Track" tab, conversely, offers more extensive customization possibilities for your subtitles, including features such as drop shadow, transform, stroke, and character adjustments.
Timing your subtitles is straightforward; simply drag the beige subtitle bar to the left or right on the timeline, much like you would adjust your video footage. Alternatively, you can right-click on the beige subtitle bar to add subtitles.
Another method for adding subtitles involves right-clicking within the audio/video tracks located on the left side of the timeline. A pop-up menu will then appear, offering the option to "Add Subtitle Track." You will then need to right-click again within the newly created subtitle track and select "Add Subtitle."
Importing and Exporting SRT Files for Subtitles
For projects where subtitles have already been created and need to be integrated into DaVinci Resolve, workflows often involve SRT subtitle files. The most efficient method to import these into DaVinci Resolve is by navigating to "File" > "Import" > "Subtitle."
Once imported, you will find your subtitle file in the media pool. Drag this file onto your timeline. Subsequently, you can customize the subtitle settings as you would with manually added subtitles.
DaVinci Resolve also provides options for exporting subtitles. A simple way to achieve this is by right-clicking on the audio/video tracks and selecting "Export subtitle." The same functionality can be accessed via "File" > "Export" > "Subtitle."
Streamlining Subtitle Creation with Third-Party Extensions
While DaVinci Resolve offers robust built-in subtitle functionalities, certain aspects can present limitations. Fortunately, platforms like Simon Says provide powerful extensions that integrate seamlessly with DaVinci Resolve. These extensions offer automatic subtitle generation and a comprehensive suite of closed captioning features, supporting various file formats.
With the Simon Says extension, you can add captions and subtitles to your footage directly within DaVinci Resolve, supporting up to 100 languages with a single click. After activating a timeline in Resolve, navigate to "Workspace" > "Scripts" > "Simon Says" and select "2 Subtitle-Caption Timeline."
9 Editing Tips To Save HOURS in DaVinci Resolve!
Upon exporting, open the Simon Says application, where a new project will be created. Simon Says then uploads the exported timeline for transcription. After the transcription process is complete, click "Transcribe." Once the transcription is finalized, click "Export," choose SRT subtitles, and the file will download to your designated Downloads folder. Unzip the file, return to Resolve, locate the downloaded SRT file, and import it. This process significantly reduces the time required for subtitle creation. Simon Says also facilitates the translation of your transcriptions and subtitles into 100 supported languages.
Advanced Text Elements: Call Outs and Fusion Clips
Beyond standard subtitles, DaVinci Resolve's Fusion page offers advanced capabilities for creating dynamic text elements like "Call Outs," which are particularly useful for highlighting specific areas or providing contextual information.
To implement a Call Out, right-click on the timeline and create a new track, similar to adding a subtitle track, but this will be an empty track. Select "Call Out" from the effects library. Hover the playhead over the "Call Out" and transition to the Fusion tab. This is a crucial step for further customization.
Within the Fusion tab, you can adjust the position of the text in relation to its leader line. To incorporate multiple labels, duplicate the "Call Out" text node in the Fusion page.
Multiple Labels in Fusion
When working with multiple labels, there can be a loss of granular control over individual label attributes. To regain access to these attributes and manage multiple labels effectively, itâs often necessary to backtrack and integrate the "Call Out" node into the existing node network. This typically involves holding "Shift" and dragging the "Call Out" node onto the line connecting the "MediaIn" node to the "MediaOut" node, thereby inserting the "Call Out" with a "Merge" node. While manually adding a merge node first is an option, it might not always yield the desired result, as the order of merging nodes can be critical.
To add more labels to a shot, copy and paste the "Call Out" node; this will usually include a "Merge" node. Then, while holding "Shift," insert this new "Merge" node between the initial "Merge" node and the "MediaOut" node.
Creating a "Fusion Clip" allows for the combination of nodes from various sources, providing maximum editing control. Once you've initiated the Fusion Clip, its duration will be locked to that of the source footage. Therefore, it's advisable to set your in and out points for the clip beforehand. It is also highly recommended to rename the Fusion Clip to avoid confusion, especially when dealing with numerous pre-comps for each label.
In the upper left of your UI, you will find the Media Pool. The newly created Fusion Clip will appear in whichever bin was open at the time of its creation. On your timeline, position the playhead over the "Call Out" and navigate back to the Fusion page. You should see the nodes for your labels against a checkerboard background. Select both "Call Out" node groups and the "Merge" node, then copy them using "Ctrl+C" (or "Cmd+C" on Mac). Return to the Edit page, move the playhead over the Fusion Clip, and go back to the Fusion page. Paste the "Call Out" node groups using "Ctrl+V" (or "Cmd+V" on Mac). Connect the "Merge" node, with both "Call Outs" feeding into it, to the "Merge" node you previously placed between the "MediaIn" and "MediaOut" nodes. This action combines your footage and labels within the Fusion Clip.

Enhancing Labels with Drop Shadows and Backgrounds
Unlike standard subtitles, "Call Out" elements in Fusion do not have readily available "Drop Shadow" or "Background" options directly in the Inspector. Attempting to insert these effects via a "Merge" node might not produce immediate results. A key consideration is ensuring that the "MediaIn" node for your footage is the last node added to the network, following the labels. If the labels become invisible on top of the footage after this adjustment, you may need to reorder the nodes. To efficiently swap the layering order of nodes within a "Merge" node, select the "Merge" node and press "Ctrl+T" (on PC) to swap their order.
You might notice that the "Call Out" node itself appears as a collection of nodes, indicating it's a "node group." Access to the animated nodes within this group is readily available by opening the "Spline" viewer. In the upper right of the Fusion UI, locate and click on "Spline." Navigating to the "Text" node within the "Call Out" node group will reveal additional controls in the Inspector. A particularly useful attribute here is "Write On," which allows for animated text effects. By opening the node group for the "Call Out," you can access the "Text" node and find all its editable attributes in the Inspector.
To add a background to your label for better visibility, navigate to the "Shading" tab within the Inspector. Under "Shading Elements," select "Element" and set the number to '2'. Then, under "Properties" > "Appearance," click the square icon to add a background to the label.
Label Backgrounds in Fusion
For adding a background to your label to make it stand out against the footage, setting this up from scratch using basic nodes in Fusion can be a somewhat involved process. Open the "Call Out" node group and locate the "Text#_#.." node, which should be connected to the last "Merge" node in the group and also to an instance of itself. In the Inspector attributes, go to the "Shading" tab. At the very top, you'll find a dropdown menu for "Select Element." Currently, "Element 1" is active, representing your text. It's important not to add the background here, as it would essentially "take over" this element. Experiment with these settings and add more elements as needed.
Presets and Workflow Efficiency in DaVinci Resolve
DaVinci Resolve offers robust features for managing and applying text and subtitle styles, enhancing workflow efficiency.
Saving and Applying Track Styles as Presets
To maintain consistency across multiple projects or to establish a custom subtitle style as a standard, you can save the subtitle track as a preset. On the "Edit" page, for example, a pop-up dialog box allows you to configure settings such as "Language" (or "Auto" for automatic language detection), "Caption Preset," and "Maximum Characters per Line." After DaVinci Resolve completes its analysis, click on the respective subtitle in the subtitle track.
To apply a previously created preset, click on the ellipsis button (three dots) in the top right corner of the Inspector panel. After creating a subtitle track, click on the ellipsis button again. Select the name of your saved preset, and then load it.
Render Presets for Output
Beyond subtitle styles, DaVinci Resolve also allows for the creation of custom render presets. In the "Delivery" tab, click on the ellipsis button (three dots) in the top right corner of the "Render Settings" panel. In the subsequent "Render Preset" dialog box, enter a name for your preset. After clicking "OK," the newly created rendering output preset will appear at the top of the list in the "Render Settings" panel. This feature is invaluable for quickly applying consistent export settings for various project types.
Keyboard Shortcuts and Workflow Enhancements
Mastering key shortcuts can significantly accelerate your subtitling workflow. Consider learning shortcuts for adding new subtitle tracks (e.g., Shift+Cmd+L on Mac) or navigating between subtitles (e.g., Cmd+Arrow keys on Mac). Engaging "Cinema Mode" can help reduce interface clutter, allowing for a focused review of subtitle timing and accuracy. The Inspector panel is useful for applying simultaneous alterations to multiple subtitle clips. Efficient timeline navigation can be achieved using keys like 'G' to snap to the beginning of subtitle clips and 'H' to jump to the end.
Leveraging External Tools for Enhanced Subtitling
While DaVinci Resolve's native features are powerful, integrating with specialized software can further optimize the subtitling process. Tools like Simon Says offer advanced transcription services and seamless integration, automating much of the manual effort. For instance, DaVinci Resolve's audio-to-text feature converts audio directly into text. Post-transcription, this text is exportable, and the search function is particularly useful for locating specific phrases within lengthy videos. When this feature is activated, DaVinci Resolve analyzes the audio of your clip, and upon completion, displays the entire spoken content of your video in text format.
Conclusion
DaVinci Resolve offers a comprehensive and flexible environment for integrating text and subtitles into your video projects. From the straightforward manual addition of subtitles to the sophisticated customization available within the Fusion page, and the efficiency gains offered by third-party extensions and presets, the software caters to a wide range of user needs and skill levels. Whether you are aiming to improve accessibility, enhance viewer engagement, or streamline your post-production workflow, mastering DaVinci Resolve's text and caption functionalities is a valuable endeavor. By utilizing these tools effectively, your videos will not only be heard but also remembered.