The drop shadow is a fundamental tool in Adobe Photoshop, offering a versatile way to imbue two-dimensional images with a sense of three-dimensional depth. This seemingly simple effect can profoundly influence how viewers perceive an image, conveying crucial information about the light source's size and direction, as well as the object's proximity to the background. This tutorial will delve into the various methods and nuances of creating effective drop shadows in Photoshop, from basic applications to advanced, realistic simulations.
Understanding the Drop Shadow Dialog Box: A Beginner's Gateway
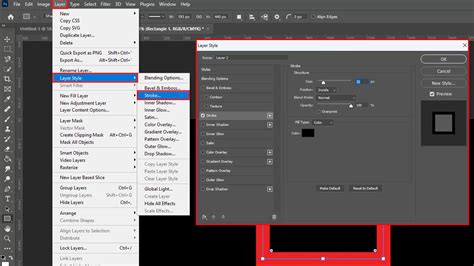
For those new to Photoshop's extensive effects, the Drop Shadow dialog box serves as an excellent starting point. Its straightforward settings provide a foundational understanding of how layer styles function, paving the way for more complex manipulations.
Navigating the Core Settings
Within the Drop Shadow dialog box, several key controls allow for precise customization:
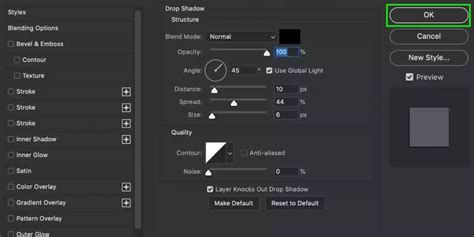
- Blend Mode: This setting dictates how your drop shadow interacts with the pixels beneath it. The default "Multiply" mode is often ideal for creating a standard, natural-looking shadow. However, exploring other options like "Linear Burn" can yield more dramatic darkening effects.
- Color: Clicking the color swatch next to the Blend Mode dropdown allows you to select the hue of your shadow. While black is a common choice, using a dark maroon or other colors that complement your image can add subtle sophistication. The provided examples demonstrate how a black shadow on the left contrasts with a dark maroon shadow on the right, showcasing the impact of color choice.
- Opacity: This slider controls the transparency of the drop shadow. Lowering the opacity creates a more subtle, faded effect, while a higher opacity results in a bolder, more defined shadow.
- Angle and Distance: The Angle spinner and its corresponding input box allow you to define the apparent direction of the light source. This directly influences the position of the drop shadow relative to the object. The "Use Global Light" checkbox is a powerful feature; when enabled, any adjustments to the angle of one layer's drop shadow will automatically update the angles of other effects using global light, such as Bevel and Emboss or Inner Shadow, ensuring consistency across your project. The Distance slider controls the perceived separation between the object and the background, effectively simulating how far the object is from the surface it's casting a shadow upon.
- Size: This slider determines the apparent size of the drop shadow. When set to 0, the shadow precisely mimics the shape of the object. Increasing the size not only controls the overall dimensions of the shadow but also its softness. A larger size generally leads to a softer, more diffused shadow.
- Spread: The Spread slider adjusts how much the shadow "expands" or "contracts" around the edges. A higher spread can make the shadow appear more solid, while a lower spread allows for a more diffused edge.
- Contour: The Contour options offer advanced control over the falloff of the shadow. These non-linear shapes allow for more sophisticated shadow shapes than a simple linear fade.
- Anti-aliased: Checking this box helps to smooth out the edges of the shadow falloff, improving the overall visual quality, albeit with a slight potential impact on performance.
- Noise: The Noise slider is a valuable tool for adding texture to your drop shadows. Introducing a small amount of noise can make shadows appear more gritty and realistic, particularly when emulating materials like dirt or concrete. A range of 0%-25% is generally recommended, as higher values can lead to an unnatural, speckled appearance.
Advanced Techniques for Realistic Shadows
While the Drop Shadow dialog box is excellent for quick effects, achieving truly natural-looking shadows often requires a more involved process that simulates real-world light behavior. This approach moves beyond the basic layer style to create shadows that are dynamic and responsive to their environment.
The "Layer Knocks Out Drop Shadow" Concept
A sometimes-confusing setting for beginners is "Layer Knocks Out Drop Shadow." This option, when checked, creates a transparency mask within the layer style itself. Essentially, if the layer's fill opacity is set to 0%, and "Layer Knocks Out Drop Shadow" is enabled, the drop shadow will not appear where the layer content would be. This is useful for creating more complex shadow interactions, but for a standard drop shadow, it's typically left unchecked.
Saving and Loading Presets
The Layer Styles dialog box allows you to save and load custom settings for your drop shadows and other effects. This is incredibly useful for maintaining consistency across multiple projects or for quickly applying a favorite shadow style. Clicking "Reset to Default" will revert the settings to the last saved defaults.
Leveraging Photoshop Actions for Efficiency
For repetitive tasks, Photoshop Actions can be a significant time-saver. Pre-recorded actions can automate the process of adding and customizing drop shadows, especially for specific types of objects or desired effects like "long drop shadows." These actions can add depth and magnificence to visual projects in mere seconds.
How to Create Long Shadow Effect in adobe Photoshop
Simulating Depth and Realism: A Step-by-Step Approach
Creating a truly realistic shadow in Photoshop involves more than just applying a layer style. It requires an understanding of how light interacts with objects in the real world. This advanced method breaks down the process into several key stages.
1. Isolate Your Object from the Background
The first crucial step is to separate your subject from its original background. This is typically done using Photoshop's selection tools (e.g., Object Selection Tool, Quick Selection Tool, Pen Tool) and then copying the selection to a new layer. This ensures you can manipulate the object and its shadow independently without affecting the original image. Naming this new layer something descriptive, like "Isolated Object," helps maintain clarity.
2. Create a New Background
With the object isolated, you'll need a surface for it to cast a shadow upon. A new "Solid Color" fill layer, often set to white or a neutral gray, is placed directly beneath the isolated object layer. This provides a clean canvas for observing and refining the shadow.
3. Determine Your Cast Shadow Color
Real-world shadows are rarely pure black. They pick up ambient light and the colors of their surroundings. To determine a natural shadow color, use the Eyedropper Tool to sample a darker, less saturated area of form shadow directly on your object. This sampled color then becomes your foreground color, ready to be applied to the shadow.
4. Create an Initial Drop Shadow
With the isolated object layer still selected, access the Layer Styles by clicking the "fx" icon at the bottom of the Layers panel and choosing "Drop Shadow." Set the shadow color to the sampled foreground color determined in the previous step. At this stage, you don't need to perfect all the settings; focus on getting a basic shadow in place. Values from provided examples can serve as a starting point for Opacity, Distance, Spread, and Size.
5. Separate the Drop Shadow into its Own Layer
To gain maximum control over the shadow's appearance, it needs to be rasterized or converted into its own layer. Go to Layer > Layer Style > Create Layer. This detaches the drop shadow effect from the object layer, allowing it to be transformed and manipulated independently. A warning dialog might appear, which can be safely dismissed by clicking "OK."
6. Distort the Drop Shadow for Realism
Now, the real artistry begins. With the newly created drop shadow layer selected, use Edit > Transform > Distort. This tool allows you to pull the edges of the shadow to simulate how it would fall on a surface. Consider the direction of the light source and the perspective of your image. If form shadows on your object indicate the light is coming from the top-left, the cast shadow should fall towards the bottom-right. Understanding the vanishing point of your image is crucial for accurate distortion.
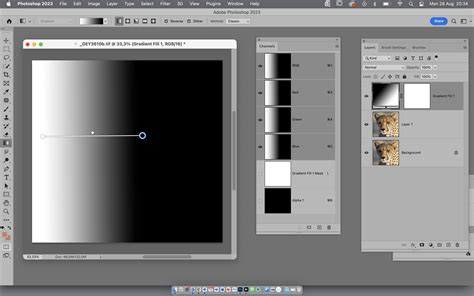
7. Create an Alpha Channel for Gradual Fading
Real-world shadows gradually fade and become softer as they move further away from the object. An alpha channel is an effective way to control this falloff.
- Open the Channels panel (
Window > Channels). - Click the panel menu and select "New Channel." Keep the default name "Alpha 1" and ensure "Selected Areas" is chosen under "Color Indicates."
- With the Alpha 1 channel selected (just like a layer), choose the Gradient Tool.
- Set your foreground color to black and your background to white.
- In the Options Bar, select a "Linear" gradient.
- Apply the gradient from the furthest point of your shadow towards the object. This creates a gradient within the alpha channel that will dictate where the shadow is opaque (black) and where it is transparent (white).
8. Apply a Lens Blur Based on the Alpha Channel
The alpha channel now serves as a depth map for blurring.
- Return to your Layers panel and ensure your drop shadow layer is selected.
- Go to
Filter > Blur > Lens Blur. - In the Lens Blur dialog box, check the "Preview" box.
- Under "Depth Map," select "Alpha 1" from the "Source" dropdown.
- Keep "Blur Focal Distance" at 0 and check "Invert."
- Set the "Radius" to a high value (e.g., 72) to create a strong blur. Adjust other values as needed. Click "OK."
9. Create a Layer Mask from the Selection
The blurred shadow needs to be applied selectively.
- Go to
Select > Load Selection. Choose "Alpha 1" from the Channel dropdown and ensure "New Selection" is checked. Click "OK." This loads the gradient you created as a selection. - Invert the selection:
Select > Select Inverse(orShift + Control + Ion Windows,Shift + Command + Ion Mac). - With the inverted selection active, click the "Add Layer Mask" icon at the bottom of the Layers panel. This will apply the mask, making the shadow fade out as it recedes from the object. The shadow should now appear to naturally recede into the background.
10. Consider Light Source and Clean Up
Finally, review your shadow. Ensure no part of it appears to be in front of the object, which would contradict the simulated light source. Use the Eraser Tool on the drop shadow layer to carefully remove any extraneous shadow elements. Adjusting the opacity of the drop shadow layer can also help achieve a more subtle effect.
How to Create Long Shadow Effect in adobe Photoshop
When to Use Natural Shadows in E-commerce and Design
The application of natural-looking shadows extends beyond mere aesthetics; it plays a significant role in professional product photography and graphic design.
Enhancing Product Photography
When showcasing products against a plain background, especially white, adding a natural drop shadow is essential. It elevates the product image from a flat representation to a more tangible, professional presentation, making it "pop" against the background and appear more realistic. This technique is particularly effective for items like furniture, where adding dimension and depth can significantly enhance their appeal without requiring complex studio lighting setups during the photoshoot.
Companies like The Mood Store and Famous Footwear utilize natural shadows to create a consistent, appealing product display, demonstrating their effectiveness in driving visual engagement and perceived value.
Adding Depth and Dimension in Design
In graphic design, drop shadows contribute to a layered look, giving elements a sense of elevation and separation from the background. This can improve visual hierarchy and guide the viewer's eye. Whether it's for website elements, marketing materials, or digital art, a well-executed drop shadow can make a design feel more polished and professional.
Frequently Asked Questions About Photoshop Drop Shadows
How do I add a shadow to an image in Photoshop?
The most common method is to isolate your object, create a new background, determine a shadow color, apply a basic Drop Shadow layer style, and then convert it to a separate layer for further manipulation (distorting, blurring, masking) to achieve realism.
What is the easiest way to add a shadow in Photoshop?
The quickest method is to use the built-in Drop Shadow layer style. Identify the layer you want to add a shadow to, right-click it in the Layers panel, select "Blending Options," and then enable and configure the "Drop Shadow" option.
How do you add a subtle shadow in Photoshop?
For a subtle effect, create a small, feathered ellipse of color beneath your object. Set the ellipse to be short and wide, feather the selection, fill it with 50% gray, and then reduce the layer's opacity.
What is a drop shadow in Photoshop?
A drop shadow is a layer effect that creates a shadow behind a layer's content, simulating a light source casting a shadow. It can be applied via Layer > Layer Style > Drop Shadow....
How do I make a drop shadow appear on its own layer?
To separate a drop shadow from its original layer, go to Layer > Layer Style > Create Layer. This converts the layer style into a rasterized layer that can be edited independently.
How do I reset drop shadow settings in Photoshop?
If your drop shadow settings are not behaving as expected, you can reset them. In the Drop Shadow dialog box, click the "fx" icon, then select "Layer Style Settings." Hold down the Shift key, and the "Save As Defaults" option will appear at the bottom of the dialog box. Click this to reset to default settings.
How do I add a drop shadow to all layers?
To apply a drop shadow consistently across multiple layers, you can apply the effect to one layer, adjust it to your liking, and then use Edit > Copy with Property Links (if available in your version) or copy the layer style and paste it onto other layers. Alternatively, if working with groups of layers, you can apply the layer style to the entire group.
How do I fix a drop shadow that isn't working?
If a drop shadow effect is not appearing or functioning correctly, ensure the layer is not hidden (check the eyeball icon in the Layers panel), verify that the layer's fill opacity is not set to 0% if you expect the shadow to show, and check if "Layer Knocks Out Drop Shadow" is inadvertently enabled. Resetting layer styles or Photoshop preferences might also resolve issues.
The ability to effectively add and manipulate drop shadows in Photoshop is a valuable skill for any digital artist or designer, offering a powerful way to enhance visual appeal and convey depth.