Creating a compelling CD cover is more than just a visual accessory; it's an integral component of an artist's brand and a vital marketing tool. A well-crafted cover can capture the attention of potential listeners, effectively convey the mood and theme of the album, and even evolve into a collectible piece of art in its own right. This article delves into the essential techniques for designing an eye-catching CD cover using Adobe Photoshop, offering a comprehensive guide from initial setup to final touches.
The Significance of CD Cover Design
In the competitive landscape of music distribution, the CD cover serves as the initial point of visual contact between an artist and their audience. It acts as a silent ambassador for the music contained within, sparking curiosity and offering a preview of the album's narrative or sonic identity. Beyond its immediate promotional function, a distinctive CD cover can foster a deeper connection with listeners, transforming a simple piece of packaging into a memorable artistic statement. For independent artists and labels, investing time and creativity into the cover art is a strategic decision that can significantly influence an album's reception and overall market presence.
Embarking on Your Design Journey with Photoshop
Adobe Photoshop stands as an exceptionally versatile and powerful platform for crafting professional-quality CD covers. Its extensive array of tools and features allows for intricate manipulation of images, typography, and graphic elements, empowering designers to bring their unique visions to life. Below is a step-by-step walkthrough to guide you through the process of designing a captivating CD cover using Photoshop.
Step 1: Establishing Your Document Canvas
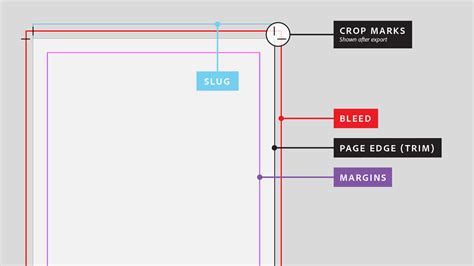
The foundational step in any Photoshop project is the precise setup of your document. Begin by opening Adobe Photoshop and initiating a new document. For a standard CD cover, the dimensions should be set to 4.75 x 4.75 inches (120 x 120 mm). This square format is designed to fit perfectly within a standard jewel case. Crucially, to ensure high-quality print output, set the resolution to at least 300 DPI (dots per inch). Furthermore, it is essential to incorporate a 0.125-inch bleed on all sides of your document. This bleed area accounts for any slight variations during the printing and trimming process, ensuring that your design extends to the very edge of the final product without any unwanted white borders.
Step 2: Mastering Layer Organization
Effective layer management is paramount for a streamlined and adaptable Photoshop workflow. The creation of distinct layers for different design elements-such as the background, text, and images-will not only keep your project organized but also facilitate easier adjustments and revisions as the design progresses. This systematic approach prevents elements from becoming jumbled and allows for selective editing without impacting other parts of the artwork.
Step 3: Curating Your Background Aesthetic
The background of your CD cover plays a pivotal role in setting the overall tone and mood of the artwork. Photoshop offers a rich palette of options, allowing you to opt for a solid color fill, a smooth gradient, or even a textured image to establish the visual foundation. Experimentation is key here; utilize Photoshop’s gradient tool, its extensive libraries of textures, and adjustment layers to explore a variety of looks until you discover the perfect backdrop that complements your album's theme. For instance, a deep, moody gradient might suit a melancholic album, while a vibrant, textured background could enhance an energetic track.
Step 4: Integrating Images and Graphics
Images and graphic elements often serve as the central focal points of a CD cover, drawing the viewer's eye and communicating key visual themes. It is imperative to select high-resolution images to prevent pixelation and maintain sharpness in the final print. You can source these images from reputable stock photo websites or create your own original artwork. Once you have your chosen image, use the Move Tool (V) to position it on your canvas. The Free Transform tool (Edit > Free Transform, or Ctrl+T/Cmd+T) is indispensable for resizing, rotating, and skewing the image to achieve the desired composition and fit within your design.
Step 5: The Art of Typography
Text is a critical element in CD cover design, typically encompassing the album title, the artist's name, and potentially a tagline or song list. The selection of fonts should be deliberate, chosen to resonate with the album’s overall tone and genre. A delicate script font might be appropriate for an acoustic folk album, while a bold, sans-serif typeface could better represent a punk or electronic release. It's essential to strike a balance between stylistic flair and legibility, ensuring that all text is easily readable even at a smaller size. Consider font hierarchy, using size and weight to guide the viewer’s eye to the most important information first.
Step 6: Applying Effects and Finalizing Touches
Photoshop provides a plethora of creative effects that can imbue your CD cover with depth, intrigue, and a professional polish. Tools such as drop shadows, bevels, and highlights can add a tangible sense of dimension to your design. However, it is crucial to apply these effects with restraint; subtlety often yields more sophisticated and enduring results than overt embellishments. Overuse of effects can lead to a cluttered or amateurish appearance. Always save your work in a layered format (such as .PSD) to retain editability. Additionally, create a print-ready version, typically a high-resolution .JPEG or .TIFF file, ensuring all your design elements are flattened and ready for the printing process.
PHOTOSHOP TUTORIAL | How to Create an Album Cover in Photoshop
Creating CD Case Templates and Inserts
Beyond the main cover art, the accompanying CD case inserts and the disc label itself offer further opportunities for creative expression and brand consistency. Many professional printing services, such as Disc Makers and Unified Manufacturing, provide downloadable templates for various CD packaging formats, including jewel cases, digipaks, and booklets. These templates are often available for industry-standard software like Adobe Photoshop, Illustrator, and InDesign, ensuring compatibility and adherence to print specifications.
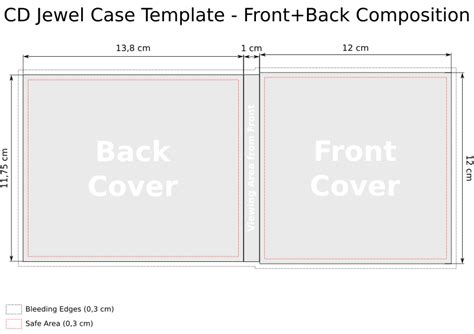
Designing for Jewel Cases and Inserts
When designing for a standard CD jewel case, you will typically need artwork for the front cover, the back cover (often featuring the tracklist and credits), and potentially a booklet. The standard format for the front and back cover panels is a square design. For printing on a regular printer or for professional services, using standard paper sizes like A4 can be a practical starting point.
Front and Back Cover Template Construction:
- Open Adobe Photoshop and create a new document. For ease of printing on standard paper, consider selecting the A4 format.
- Utilize the Rectangle Tool (U) to draw a square. In the Properties panel (Window > Properties), you can adjust its dimensions. For a CD cover, this would typically be 4.75 x 4.75 inches.
- To create the back cover, duplicate this square layer by holding the Option (Alt) key and Shift key, then dragging the copy below the first square. This ensures precise alignment.
- For the spine of the jewel case, use the Rectangle Tool (U) again to draw a narrow vertical shape. In the Properties panel, set its dimensions (e.g., 10mm x 125mm). Assign a gray stroke color and no fill.
- To represent the circular area where the CD disc sits, use the Ellipse Tool (U). Set its dimensions (e.g., 16mm x 16mm) with a gray stroke and no fill. Position this circle centrally within the top square of your template.
- Group all these shape layers (Command-G or Ctrl+G) to form your complete CD case template. Your design artwork can then be placed beneath this group.
CD Disc Label Template:
- To create a design for the CD itself, start with a new document.
- Employ the Ellipse Tool (U) to create a circular shape. Adjust its size in the Properties panel to match the printable area of a CD, which is typically around 4.6 inches in diameter.
- Add two more concentric circles with the same fill and stroke properties. Set their sizes to 46mm x 46mm and 24mm x 24mm respectively. These can help define the central hub and the main printable area.
- Group these circle layers together. Your artwork can then be placed beneath this group for printing and application onto the CD.
Leveraging Online Design Tools
For artists who may not have extensive experience with Photoshop or prefer a more streamlined approach, numerous online design tools offer user-friendly interfaces and pre-designed templates. Platforms like Adobe Express, Placeit, and various specialized music promotion sites provide intuitive interfaces where you can easily:
- Select from a Wide Array of Templates: Choose from professionally designed templates categorized by musical genre, mood, or style.
- Customize with Your Assets: Upload your own images, logos, and branding elements.
- Modify Text and Fonts: Easily change album titles, artist names, and other text, selecting from a vast library of fonts.
- Adjust Layout and Colors: Experiment with different arrangements of elements and color palettes to achieve your desired aesthetic.
Adobe Express, for instance, offers a free plan that includes core features, photo editing tools, and thousands of templates, making it an accessible option for independent artists. You can customize templates by adding images, filters, text, backgrounds, and borders. Branding elements like logos and custom fonts can be easily integrated to ensure your CD cover design aligns with your established artistic identity.
Print-Ready Artwork and Distribution
Once your CD cover design is finalized, it's crucial to export it in a format suitable for professional printing. High-resolution PDFs are generally the preferred format, as they preserve vector data and ensure the sharpest possible print quality. Most printing services will provide specific guidelines for file preparation, including color mode (typically CMYK for print) and resolution requirements.
Beyond physical distribution, your CD cover artwork will also be used across digital platforms. Exporting your design as a high-quality JPG or PNG file will allow you to share it effectively on social media, streaming service profiles, and your artist website.
Free Music Distribution for Labels and Artists
Complementing the visual aspect of album promotion is the strategic distribution of music. While many digital distribution services charge fees, there are options for cost-effective or even free music distribution. Services like SoundOn allow artists to register and distribute their music across major streaming platforms with lower associated costs compared to physical media, often providing real-time analytics to monitor performance. This combination of striking visual art and accessible distribution channels empowers artists to build a strong presence in the dynamic music market.
The process of creating a CD cover is an iterative one, often involving experimentation and refinement. As you work through the design, don't hesitate to adjust elements, play with the layout, and fine-tune the finishing touches. This dynamic approach is how truly impactful and professional designs are brought to fruition. By mastering the tools within Photoshop or utilizing the convenience of online design platforms, artists can create unique and impressive artwork that visually represents their music and resonates deeply with their audience.