The ability to effectively smooth the edges of a photo is a cornerstone of professional image manipulation in Adobe Photoshop. This crucial skill is vital for seamlessly integrating subjects into new backgrounds, crafting convincing composite images, and perfecting portraits and product shots. Smooth edges in Photoshop are not merely an aesthetic choice; they play a significant role in professional image editing services, ensuring that a manipulated image appears natural and polished. The transformation achieved through proper edge smoothing can be dramatic, elevating an ordinary photograph into a compelling visual. This guide provides a comprehensive approach to achieving sharp and smooth edges, even when dealing with complex backgrounds.
The Importance of Smooth Edges in Digital Imagery
In today's visually driven world, the demand for high-quality imagery is paramount across various sectors. E-commerce businesses, digital photography studios, advertising agencies, and magazine publishers all rely heavily on pristine product photos and portrait images. Jagged or rough edges in an image can be a significant distraction, detracting from the overall appeal and professionalism of the final product. When a subject is cut out from a distracting background to enhance the edited image, the process can sometimes result in harsh or unnatural edges. Therefore, refining these imperfect edges is essential to create a smooth and captivating final output. Photoshop, as the leading photo editing software, offers a powerful suite of tools and techniques to address and rectify these rough edges, making digital photographs more attractive and professional.

Advanced Techniques for Edge Refinement: The Channel Pull Method
One of the most effective methods for achieving a precise and smooth cutout, particularly for subjects with intricate details, is the channel pull technique, often combined with dodging and burning. This process allows for meticulous control over the mask that defines the subject.
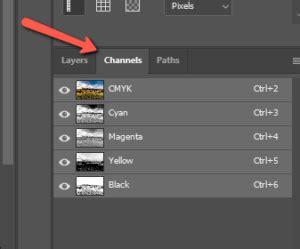
The initial step involves selecting the subject from the image. Once the selection is active, navigate to the Channels panel, typically located in the bottom right section of the Photoshop interface. Within this panel, identify the channel that exhibits the highest contrast between the subject and the background. Often, the Blue channel offers the best contrast.
With the chosen channel selected, drag it to the "New Channel" icon at the bottom of the Channels panel, which usually displays a "+" symbol. This action duplicates the selected channel, creating a working copy. Next, it's crucial to establish a clear distinction between the subject and the background. Fill the selection with black, which will represent the areas to be masked out. You can select black as your Foreground color from the Toolbar or quickly press the 'D' key to reset foreground and background colors to default (black and white) and then use Alt/Option + Delete to fill with the foreground color.
Following this, the selection needs to be inverted. This is a simple task that effectively reverses the active selection. After inverting, change the fill color to white. White will now represent the subject that will be retained. Pressing Ctrl/Cmd + Delete will fill the inverted selection with white. Deselect the inverse selection by pressing Ctrl/Cmd + D.
At this stage, the initial cutout is complete. However, it is imperative to zoom in closely on the image and critically examine the edges. This is where the true refinement begins.
Refining Edges with Edge Detection and the Refined Edge Brush Tool
After the initial channel-based selection, the next phase involves using Photoshop's built-in edge detection tools and specialized brushes to smooth out any remaining ruggedness.
Within Photoshop's selection refinement options, you will find the "Select and Mask" workspace (formerly known as Refine Edge). This workspace offers several powerful tools for smoothing. Key controls include the Radius slider and the Smart Radius checkbox. To begin, set the Radius to a low value. The Smart Radius option intelligently adjusts the radius along the edge, which is particularly useful for varying edge complexities. Gradually increase the Radius slider until the tool detects most of the critical edges.
If the initial detection is unsatisfactory, increasing the Radius in pixels can help. It's essential to continuously check whether the edge detection is accurately capturing all the desired edges of the subject.
For particularly challenging areas, such as hair, fur, or other fine, wispy details, the Refined Edge Brush tool is invaluable. This brush allows for precise manual refinement of intricate edges. You can adjust the brush size using the open or closed bracket keys. Carefully paint with the Refined Edge Brush over the hair or fur areas. As you paint, the tool intelligently blends the edges, transforming craggy, sloppy, or rough lines into new, smooth, clear, and sharp edges. This technique yields exceptional results for complex edge scenarios, and its effectiveness can be verified even at a 400% zoom level.

Leveraging Dodge and Burn Tools for Subtle Edge Adjustments
The Dodge and Burn tools, traditionally used for lightening and darkening areas in photography, can also be remarkably effective in subtly refining edges. By carefully applying these tools, you can further enhance the blend between the subject and its new background.
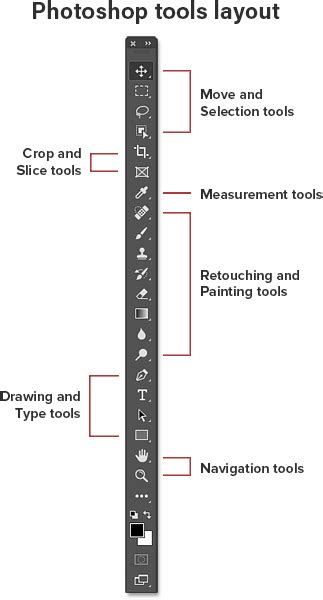
To use the Dodge and Burn tools for edge refinement, select the Burn Tool from the left toolbar. In the Options bar at the top, ensure the Range is set to "Highlights" or "Midtones" and the Exposure is set to a low value (e.g., 5-10%). Zoom in on the photo to get a clear view of the edges. Gently paint with the Burn Tool over any slightly lighter or brighter jagged edges. Observe how this process subtly darkens and smooths these areas, making them less conspicuous.
Conversely, if you encounter dark or shadowed edges that appear too harsh, you can use the Dodge Tool. Select the Dodge Tool, set the Range to "Shadows" or "Midtones," and again use a low Exposure setting. Drag the Dodge Tool over these dark edges to gently lighten them, creating a smoother transition.
The key to using Dodge and Burn effectively for edge refinement is subtlety and precision. Overuse can lead to unnatural-looking results, so gradual application and constant observation are crucial.
Photoshop Magic Minute: Using the Refine Edge Brush | Adobe Photoshop
Additional Smoothing Techniques: Gaussian Blur and Levels Adjustments
When further smoothing is required, or if the previous methods haven't achieved the desired result, two other powerful techniques can be employed: Gaussian Blur and Levels adjustments.
Gaussian Blur: Applying a Gaussian blur to the edges of a selection can instantly smooth out jaggedness. This is particularly useful for less intricate edges where a subtle softening is all that's needed. After making your selection, you can apply a Gaussian blur filter (Filter > Blur > Gaussian Blur). Adjust the Radius slider to control the amount of blur. A small radius will provide gentle smoothing, while a larger radius will create a more pronounced softening effect. It's often beneficial to apply this blur to a duplicated layer or a mask to maintain non-destructive editing.
Levels Adjustments: Levels adjustments can be used to refine the tonal range of the edges, effectively smoothing transitions. This method is often used in conjunction with masks. By opening the Levels adjustment window, you'll see three sliding arrows representing black, white, and gray points. Carefully manipulating these sliders, particularly the black and white sliders, can help to further define and smooth the edges of your subject, converting rough edges into smoother ones. Observing the visual display of the levels can assist in making precise adjustments.
Smoothing Text Edges in Photoshop
While the primary focus is on image edges, smoothing the edges of text is also a common requirement, especially when dealing with low-resolution images where text can appear fuzzy.
To smooth text edges:
- Select your Text layer and press Ctrl+T (or Cmd+T on Mac) to activate the Free Transform tool. This will often bring up a Character display pop-up or allow you to access character settings.
- Within the Character window, locate the "Anti-aliasing" options.
- From the drop-down menu, select the "Smooth" option. This will apply anti-aliasing to the text, softening its edges and making it appear less pixelated.
Fading Edges for Creative Effects
Beyond precise smoothing, Photoshop also offers methods to gently fade the edges of an image, creating softer transitions or artistic effects.
To fade edges:
- Use any preferable selection method to create a selection around your desired area, closely following the edge of your subject.
- Navigate to Select > Modify > Feather from the top options bar.
- In the new Feather Radius window, enter a value (e.g., 25 pixels). This value determines how many pixels away from the edge the feathering will extend. Click OK.
- To further enhance the fading, go to Image > Adjustments > Curves.
- In the Curves window, select the center point of the curve and drag it downwards. This will gradually fade the selected edges, creating a softer, more blended appearance.
The Versatility of Photoshop's Smoothing Tools
Photoshop is undeniably the industry-leading software for image editing, and its array of tools for smoothing edges is extensive and flexible. Users can employ a combination of tools to achieve the best possible results. The Smooth Brush tool, Burn tool, Dodge tool, and Gaussian Blur tool are all readily available and effective. Often, the most professional and seamless results are achieved by combining 2-3 of these tools in a strategic manner.
Who Benefits from Smooth Edges?
The need for smooth edges extends across a wide spectrum of professionals and businesses. Online marketers, in particular, require polished visuals to enhance their campaigns and attract customers. Photographers, e-commerce store owners, advertisers, magazine publishers, and even celebrities rely on smooth edges to create visually appealing content that captivates their target audience. Eye-grabbing images with soft, well-defined edges can significantly contribute to increased website traffic and engagement, ultimately supporting business growth.
Feathering for Soft Transitions
Feathering is a fundamental technique in Photoshop for smoothing rough edges by creating a gradual transition between the selected area and the surrounding image. The process begins with creating a selection around the object using tools like the Magic Wand Tool or the Object Selection Tool. Once the selection is made, access the "Select and Mask" workspace. Within this workspace, the "Feather" slider can be adjusted to soften the edges of the selection. Feathering effectively blurs the boundary between the selection and the rest of the photo, resulting in less harsh borders and a more blended appearance with the background.
The Role of the Blur Tool
The Blur Tool offers a direct method for softening edges directly on the image layer. After selecting the Blur Tool from the tools palette, you can gently brush over the edges that require smoothing. The key to its effective use lies in applying the tool evenly around the edges to achieve a natural blend into the background.
Refining Selections with the "Select and Mask" Workspace
The "Select and Mask" workspace provides dedicated features for refining selections, including a "Smooth" slider under the "Edge Detection" section. After making an initial selection, opening this workspace allows you to adjust the "Smooth" slider. This action helps to smooth out jagged edges, essentially feathering the border to eliminate roughness. For even more refined results, the "Feather" and "Shift Edge" options within the same workspace can be used in conjunction with the "Smooth" slider.
The Magic Wand Tool's Contribution
While not a direct smoothing tool, the Magic Wand Tool can indirectly facilitate edge smoothing in Photoshop. It enables quick selections based on similar color ranges. These initial selections can then be further refined using the techniques described above to achieve smooth edges. The Magic Wand Tool is particularly useful for selecting areas with solid color backgrounds, providing a starting point for more complex edge refinement.
Conclusion: Precision and Patience in Edge Work
Mastering the art of smoothing edges in Photoshop is a skill that requires attention to detail, patience, and an understanding of the various tools available. Whether employing the intricate channel pull method, the precise Refined Edge Brush, the subtle application of Dodge and Burn, or the straightforwardness of Gaussian blur and feathering, the goal remains the same: to achieve clean, seamless edges that enhance the overall quality and professionalism of an image. Inaccurate or rugged edges can leave a poor impression on viewers and clients, underscoring the importance of dedicating time and effort to this critical aspect of image editing. The ability to seamlessly cut out subjects and refine their edges is a fundamental component of effective photo manipulation, essential for creating impactful and believable visual content.