Embarking on a digital art journey can be an exciting adventure, and for aspiring artists of all ages, Procreate on the iPad offers a powerful yet intuitive platform. This guide delves into the world of Procreate, drawing inspiration from resources designed to make digital art accessible and enjoyable, particularly for children and those rediscovering their creative spark. From understanding the basics of brush creation to exploring advanced techniques for pattern design and animation, this tutorial aims to equip you with the knowledge to bring your imagination to life.
Getting Started with Procreate: Your First Digital Canvas
Procreate is a sophisticated drawing and painting application exclusively for the iPad, renowned for its user-friendly interface and robust feature set. Whether you're a seasoned professional or a budding artist, Procreate provides the tools to explore your creativity. For those new to the app, understanding the fundamental steps is crucial.
Creating Your Digital Space: The Canvas
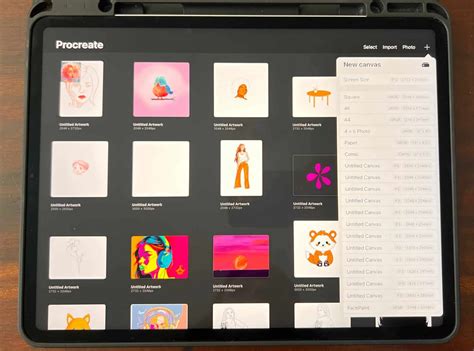
The first step in any digital art project is setting up your canvas. Procreate allows you to create a new canvas with specific dimensions, resolution, and color profiles. For beginners, understanding how to set up a canvas that suits your project is key. The app offers various templates, and with Procreate 5, the canvas template generator was revised, allowing you to set your canvas to a CMYK color profile. This feature is particularly beneficial for artists who intend to print their work accurately.
Navigating the Tools: Brushes, Erasers, and More
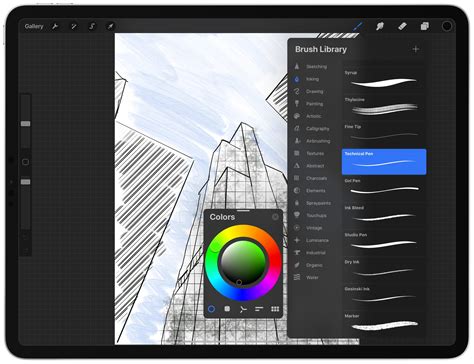
Procreate offers a vast array of brushes, each with unique characteristics. To get started, it's beneficial to explore the default brushes and understand how they mimic traditional art supplies. For younger artists, Bardot Brush has created a set of six high-quality Procreate brushes designed to feel like familiar art supplies such as crayons, markers, paint, and colored pencils. This "Kids Make Art!" brush set is perfect for little artists learning Procreate or for anyone wanting to recapture the joy of simple art creation.
The eraser tool functions similarly to its traditional counterpart, allowing you to remove or modify parts of your artwork. Understanding how to select, adjust, and utilize these basic tools is fundamental to the Procreate workflow.
The Magic of Color: Choosing and Applying Hues
Color is at the heart of visual art, and Procreate offers a dynamic color system. The Color Picker has undergone significant enhancements, notably in Procreate 5. It now floats, allowing you to position it anywhere on the screen for continuous accessibility. A key feature is the ability to select primary and secondary colors, enabling quicker access to a wider palette. Furthermore, Procreate 5 introduced the "Harmony" panel, designed to assist artists in creating balanced and aesthetically pleasing color palettes by utilizing various color theory models. This is invaluable for ensuring your digital creations have a cohesive and impactful color scheme.
How To Make Color Palette In Procreate - Tutorial For Beginners
Bringing Your Ideas to Life: Drawing and Illustrating
With the foundational tools understood, you can begin to translate your creative ideas onto the digital canvas. Procreate provides features that simplify complex drawing tasks and introduce exciting possibilities for artistic expression.
Step-by-Step Creation: Drawing a Hot Air Balloon
For beginners, following guided tutorials can be an excellent way to learn Procreate's capabilities. A popular example is a tutorial on how to draw a hot air balloon with an animal passenger. This type of beginner-friendly lesson introduces fundamental digital art techniques. You'll learn about choosing colors effectively, utilizing layers to build your illustration, employing the Alpha Lock feature to restrict coloring to specific areas, adding texture to your artwork, and much more. These techniques are not only applicable to drawing a hot air balloon but are transferable skills for a wide range of illustration projects.
The Power of Layers: Building Depth and Complexity
Layers are a cornerstone of digital art, and Procreate's implementation is both powerful and intuitive. Layers allow you to separate different elements of your artwork, making it easier to edit, rearrange, and experiment without affecting other parts of your design. For instance, you can place line art on one layer, coloring on another, and shading on a third. This non-destructive workflow is crucial for efficient and sophisticated art creation. Understanding how to create, group, and manipulate layers is essential for creating detailed and polished illustrations.
Transforming Your Art: Moving, Scaling, and Shaping
Procreate offers versatile tools for manipulating your artwork. The Transform tool allows you to move, scale, rotate, and distort your layers or selections. This is invaluable for refining compositions, resizing elements, or creating dynamic perspectives. Additionally, Procreate enables the creation of various shapes, which can be used as building blocks for more complex illustrations or as design elements in their own right.
Unleashing Creativity: Drawing Prompts and Coloring Pages
To spark imagination and encourage consistent artistic practice, drawing prompts and coloring pages offer accessible entry points into digital art.
Inspiring Your Imagination: Weekly Drawing Prompts
Bardot Brush provides curated drawing prompts divided into weekly themes, encouraging artists to explore different subjects and styles. These prompts range from "Animals & Creatures," where you can let your imagination run wild with unusual colors or hybrid animals, to "Adventures & Imagination," pushing you to create fantastical scenes with elements like rocket-powered swings or toilet cars. "Coloring Book" week inspires the creation or coloring of dedicated pages, and "Kid's Choice" allows the community to dictate the creative direction. These prompts serve as excellent starting points for daily drawing exercises, helping to overcome creative blocks and build confidence.

The Joy of Coloring: Free Procreate Coloring Pages
For a more relaxed creative experience, Procreate coloring pages are a fantastic option. Bardot Brush offers free downloadable coloring pages in Procreate format, allowing you to color directly on your iPad. These pages can be used with the "Kids Make Art!" brushes or any other Procreate brush. For those who prefer traditional methods, printable PDF versions are also available.
How to Use Coloring Pages in Procreate:
- Download: Obtain the Procreate (.Procreate) files.
- Import: The files will save to your iPad's Files app (Downloads folder). Tap a file to import it into Procreate.
- Color: Open the imported file. In the Layers panel, you'll find a "Color Here" layer beneath the line art. You can use the Color Drop tool for quick fills or color by hand.
These coloring pages also serve as excellent practice for Procreate's features. Live tutorials often demonstrate how to leverage layers and Alpha Lock to enhance the coloring process and achieve unique digital effects not possible with traditional media.
Advanced Techniques: Pattern Design and Sticker Making
As your Procreate skills grow, you can explore more specialized areas like pattern design and creating your own merchandise.
Crafting Repeating Patterns: A Deep Dive
Creating seamless, repeating patterns is a valuable skill for surface design, fabric printing, and digital assets. A repeating pattern is a tile that can be duplicated infinitely without visible seams.
Understanding Pattern Design Vocabulary:
- Block: The fundamental design or illustration that repeats.
- Tile (verb): The action of repeating the block.
- Repeat (noun): The point at which elements visibly repeat.
- Scale: The size of the repeat; smaller scale means more tiles in an area.
- Colorway: A variation of a pattern's color scheme.
- Surface Design: Artwork intended for printing on surfaces like fabric, apparel, and home goods.
Methods for Creating Repeating Patterns:
A common method involves placing motifs in the center of a canvas, avoiding the edges. The canvas is then divided into quarters, and these sections are swapped (left with right, top with bottom) to create the repeating tile. Adding more elements to the center ensures the pattern tiles seamlessly. Procreate 5's Brush Studio offers a built-in seamless texture generator, simplifying the creation of textured brushes that tile flawlessly.
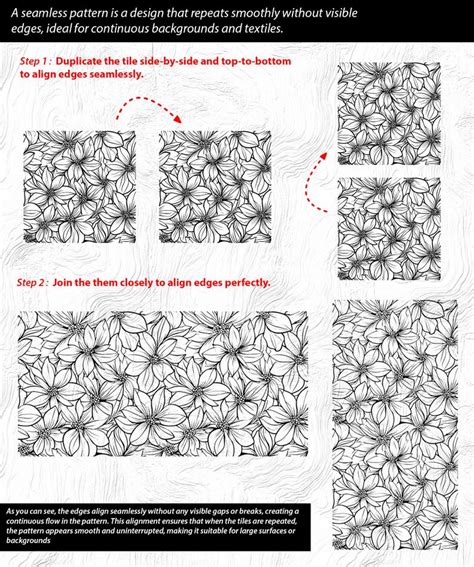
Pattern Repeat Types:
- Block / Full Drop Repeat: Motifs are placed in a perfect grid.
- Half Drop Repeat: Every other column is offset by half.
- Brick-by-Brick Repeat: Every other row is offset by half.
- Diamond Repeat: The block is rotated and repeated diagonally.
- Mirrored Repeat: Every other column or row is mirrored.
- Stripe Repeat: Tiling occurs on only one side of the block.
- Toss Pattern: Random placement of objects, often organic and visually interesting.
Inspiration and Application:
Pinterest boards curated with pattern designs offer a wealth of inspiration. Common motifs include florals, geometric shapes, animal prints, and novelty items. These patterns can be applied to a vast range of products, from t-shirts and home decor (blankets, pillows, bedding) to stationery, phone cases, and more. Companies like Spoonflower, Printful, and Zazzle specialize in printing custom designs onto various products.
How To Make Color Palette In Procreate - Tutorial For Beginners
Turning Art into Stickers
For artists looking to monetize their work or create tangible products, turning digital art into stickers is a popular option. Live tutorials often cover the process of creating simple drawings suitable for stickers and discuss how to get them professionally printed. Services like StickerApp can transform your digital creations into physical stickers. This opens up avenues for selling your art at craft fairs, online shops, or simply for personal enjoyment.
Exploring Procreate 5: A Powerful Update
Procreate 5, released in December 2019, brought significant advancements to the app, revolutionizing the digital art experience. The update is powered by Valkyrie, a new high-speed graphics engine that enhances performance and Apple Pencil responsiveness.
Key Features of Procreate 5:
- Animation Assist: This feature introduces a dedicated toolbar for animation, allowing for instant full-screen playback, customizable onion skinning (displaying previous frames with reduced opacity), new looping options (one time, loop, ping pong), and the ability to designate foreground and background layers for static elements.
- Brush Studio: A game-changer for brush creation, the Brush Studio offers a full-screen interface with over 150 sophisticated controls. This allows for unparalleled customization of brushes, enabling effects previously impossible in Procreate.
- Dual Brushes: Combine two brushes into a single stroke, with adjustable blend modes for interaction.
- Advanced Grain Settings: Control texture depth, moving versus static grain, and import any texture to be automatically converted into a seamless repeat for flawless brush textures.
- Shape Panel Enhancements: New controls for stamp count and count jitter.
- Rendering Options: New glaze settings and a "wet edges" function for realistic watercolor effects, alongside new settings for Wet Mix brushes.
- Brush Author Credit: Ability to see who created a brush and set default settings.
- Color Dynamics: This panel allows brushes to produce multiple colors and values within a single stroke. Pressure and tilt of the Apple Pencil can control hue, saturation, brightness, and even blend in a secondary color. Color jitter adds further variation.
- CMYK Color Profiles: For the first time, Procreate supports CMYK color profiles, crucial for accurate print reproduction.
- Clone Tool: A new tool in the adjustments menu that allows for duplicating areas of the canvas using any brush.
- Save and Load Selections: Added to Selection mode and the Transform tool, this feature allows you to save complex selections for later use.
- Import Photoshop Brushes: Procreate 5 enables the import of Photoshop brushes, expanding the available brush library.
The introduction of Procreate 5 significantly broadened the creative possibilities within the app, empowering artists with more control, advanced tools, and improved performance. This update, along with the continuous development of the app, ensures Procreate remains at the forefront of mobile digital art creation.