Changing eye color in a photograph is a popular and effective technique in portrait retouching, allowing for creative expression and enhancement of a subject's features. This process can be achieved through various methods within Adobe Photoshop, ranging from simple adjustments to more complex, layered approaches that ensure realism and non-destructive editing. Whether you aim for subtle shifts or dramatic transformations, understanding the core tools and techniques will empower you to achieve professional-looking results.
The Foundation: Selecting the Iris
Before any color alteration can occur, precise selection of the eye's iris is paramount. This ensures that adjustments are confined to the intended area, preventing unintended color shifts on the sclera, pupils, or surrounding skin. Several tools can be employed for this crucial step.
Utilizing the Lasso Tool for Initial Selection
A common and straightforward method involves the Lasso Tool. For this approach, zoom in on the eyes to facilitate a more accurate selection. With the Lasso Tool active, draw a selection outline around one of the eyes. While this initial outline doesn't need to be perfect, it should encompass the colored part of the eye. Once the first eye is selected, hold down the Shift key to add to the selection and draw a similar outline around the second eye.
Crucially, the pupils, being the dark center of the eye, should typically be excluded from the color change selection. To remove them, hold down the Alt (Windows) or Option (Mac) key and draw a selection around each pupil. This action subtracts the pupil area from the existing selection, leaving only the iris isolated.
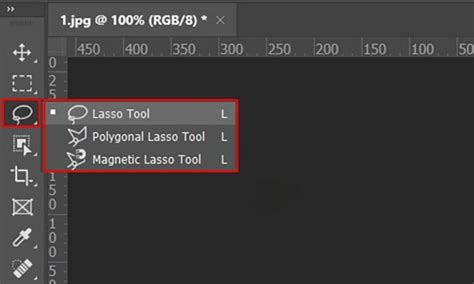
Employing the Elliptical Marquee Tool
An alternative, and often more precise, method for initial selection involves the Elliptical Marquee Tool. This tool is particularly useful for creating circular or oval selections that closely match the shape of the iris. To initiate a selection that starts from the center, place your cursor within the eye and click, then drag outwards towards the edges of the iris while holding down the Option/Alt key. This technique ensures the selection originates from the cursor's position.
It's important to make the selection as close to the iris's shape as possible, but perfection at this stage is not a strict requirement, as refinements can be made later. To exclude unwanted portions, such as the eyelid or lashes, a combination of keys can be used. Hold down the Shift + Option/Alt keys simultaneously. Then, create an oval shape that encompasses the part of the selection you wish to retain. Your cursor will display a "+" symbol on its bottom right. This operation keeps only the intersection between the initial circular selection and the subsequent oval selection, effectively removing areas that are not part of this overlap.
Refining Selections with the Pen Tool
For advanced users seeking the utmost precision, the Pen Tool offers unparalleled control in creating intricate selections. While it has a steeper learning curve, it allows for the creation of smooth, defined paths that can be converted into selections, ideal for complex eye shapes or when working with images where the iris is not a perfect circle.
Applying Color Adjustments: The Power of Adjustment Layers
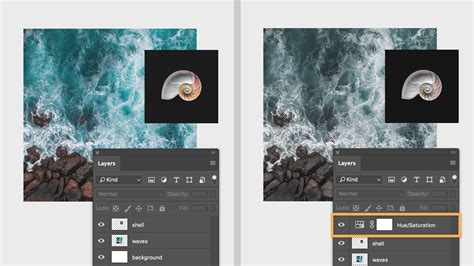
Once the iris is selected, the next step is to apply color adjustments. The most effective and recommended approach in Photoshop is to use adjustment layers, as they offer non-destructive editing capabilities. This means your original image remains untouched, and you can modify or remove the adjustments at any time.
The Hue/Saturation Adjustment Layer
The Hue/Saturation adjustment layer is the cornerstone of most eye color change techniques. After making your selection of the iris, create a new Hue/Saturation adjustment layer. This can be done by clicking the half-filled circle icon at the bottom of the Layers panel and selecting "Hue/Saturation."
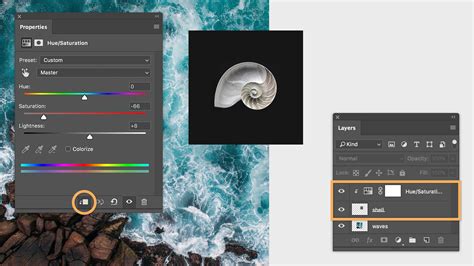
Crucially, when an adjustment layer is created with an active selection, Photoshop automatically generates a layer mask. This mask is initially white within the selected area and black elsewhere, meaning the adjustment will only affect the iris.
Understanding Hue, Saturation, and Lightness Sliders
Within the Properties panel for the Hue/Saturation adjustment layer, you'll find three primary sliders:
- Hue: This slider controls the basic color. Dragging it left or right will cycle through the color spectrum, allowing you to change the eye color to blues, greens, reds, purples, and more.
- Saturation: This slider determines the intensity or purity of the color. Increasing saturation makes the color more vibrant, while decreasing it makes it more muted, eventually leading to grayscale.
- Lightness: This slider affects the overall brightness of the selected area. It's important to use this slider with caution, as pushing it too far can lead to unnatural-looking results, such as blown-out highlights or overly dark shadows.
For Photoshop CS4 and later, the Hue/Saturation options appear within the Adjustments Panel. In earlier versions like CS3 and below, a separate dialog box will open. When you're satisfied with the new color, you can click "OK" to close the dialog box (if applicable) or simply leave the Adjustments Panel open.
The "Colorize" Option for Guided Adjustments
To aid in visualizing the color change and to help refine selections, the "Colorize" option within the Hue/Saturation adjustment layer's Properties panel can be invaluable. When checked, it applies a uniform color tint to the selected area. While this might not always produce the most realistic initial result, it makes it easier to spot areas that need refinement in the mask and to experiment with different base hues.
Refining the Mask for Naturalism
The accuracy of the layer mask is critical for achieving a realistic eye color change. A well-refined mask ensures that the color adjustment blends seamlessly with the original eye.
Feathering Mask Edges
Hard, sharp edges on a mask can make the color change appear artificial. To soften these edges, ensure the mask thumbnail is selected in the Layers panel. Then, in the Properties panel, adjust the "Feather" value. Gradually increasing the feather softens the transition between the adjusted area and the unadjusted parts of the image, creating a more natural blend.

Painting on the Layer Mask
If the initial selection or feathering isn't perfect, you can directly refine the mask using the Brush Tool (B).
- Painting with Black: To hide the effect of the adjustment layer in specific areas (e.g., if the color has bled onto the sclera or eyelashes), select black as your Foreground color and paint over those areas on the mask.
- Painting with White: To reveal the effect of the adjustment layer in areas that were missed or need more color, select white as your Foreground color and paint over them.
- Swapping Colors: Quickly toggle between black and white by pressing the "X" key on your keyboard.
- Brush Size: Adjust the size of your brush using the left and right bracket keys (
[and]) for precise control. A soft brush (0% Hardness) is generally preferred for mask refinements to ensure smooth transitions.
For those working with light-eyed subjects, darkening the pupils might be necessary to achieve the desired color saturation and depth. This can often be achieved by painting with a dark color on the mask or by using additional adjustment layers.
Advanced Techniques for Realistic Effects
While a single Hue/Saturation layer can achieve basic color changes, incorporating additional adjustment layers and utilizing blending modes can elevate the realism of the effect, adding depth, contrast, and subtle nuances.
Grouping Adjustment Layers
To maintain organization and apply the mask to multiple adjustment layers simultaneously, it's beneficial to group them. Create a new group by clicking the folder icon at the bottom of the Layers panel and name it appropriately (e.g., "Eye Color"). Then, drag the mask thumbnail from your Hue/Saturation layer onto this folder icon to apply the mask to the entire group. Subsequently, drag the Hue/Saturation layer itself into the folder. Any new adjustment layers added within this group will automatically inherit the mask.
Enhancing Contrast with Levels
To restore or enhance the natural contrast within the iris, a Levels adjustment layer can be added inside the "Eye Color" group, placed above the Hue/Saturation layer. Adjusting the black and white sliders in the Levels properties panel can bring out highlights and shadows, giving the eyes more dimension.
Adding Depth with Blending Modes
To further enhance realism, particularly in the darker areas of the eye, duplicating the background layer and manipulating its blending mode can be effective. Duplicate the background layer (Cmd/Ctrl + J), rename it (e.g., "Eye 2"), and move it inside the "Eye Color" group, placing it above all other adjustment layers. Changing its Blending Mode to "Saturation" can subtly enrich the darker tones. Experimentation with other blending modes (like "Color," "Overlay," or "Soft Light") and opacity adjustments may be necessary depending on the specific image to achieve the desired nuanced look.
Beyond Basic Color: Creative Possibilities
The techniques discussed form a solid foundation for changing eye color. However, Photoshop offers even more creative avenues:
- Vampire Eyes: For more dramatic effects, such as creating "vampire eyes," you can push the Hue and Saturation sliders to extreme values or utilize specific color channels within a Curves adjustment layer.
- Color Channels in Curves: A more advanced method involves using the Curves adjustment layer and manipulating individual color channels (Red, Green, Blue). By adjusting the curves within each channel, you can precisely control the color balance and create unique eye colors that retain subtle undertones from the original. For instance, to achieve a brown eye, you might increase the Red channel and decrease the Blue channel.
- Gradient Overlays: While not directly for eye color, gradients can be used to add atmospheric color to portraits, influencing the overall mood and color palette.
- Double Exposure: For highly artistic interpretations, the double exposure technique can be combined with eye color adjustments, layering intricate patterns or scenes within the iris.
How To Change Eye Color in Photoshop
The ability to modify eye color in Photoshop is a testament to the software's power in photographic manipulation. By mastering selection techniques, understanding adjustment layers, and employing thoughtful masking and blending strategies, you can transform the eyes in your portraits, adding a captivating element that draws viewers in. Whether for subtle enhancements or bold creative statements, the tools and workflows in Photoshop provide limitless potential for artistic exploration.