Understanding and correctly setting frame rates is a fundamental aspect of video editing, especially within a powerful platform like DaVinci Resolve. Frame rate, which refers to the number of still images (frames) displayed per second in a video, significantly impacts the visual appearance and the viewer's experience. This guide will provide a comprehensive breakdown of frame rate settings in DaVinci Resolve, offering effective methods to change and manage them throughout your projects. Many editors and editing enthusiasts have faced challenges with frame rates in DaVinci Resolve, and if you've encountered any related issues, you're sure to find answers here.
Strictly speaking, choosing the correct frame rate should start even before capturing the first footage with a camera. Even if you're not involved in the shooting process and simply using DaVinci Resolve, it's still important to understand frame rates. The frame rate you choose for your video will impact its appearance and the experience it delivers to viewers.
DaVinci Resolve offers flexibility in managing frame rates at three distinct levels:
- Project Level: At the project level, you can establish the overall frame rate for your entire project. This is the most crucial setting to get right from the outset.
- Timeline Level: Within each timeline, you can adjust the frame rate to suit specific sequences or scenes, allowing for creative flexibility.
- Clip Level: At the clip level, you can modify the frame rate for individual clips, which is particularly useful for achieving specific effects like slow motion.
Setting the Project Frame Rate: The Foundation of Your Edit
Setting the project frame rate correctly from the beginning is paramount. In DaVinci Resolve, the project frame rate is established when you create a new project and, crucially, it cannot be changed once you have imported any media. This is a critical point that many users overlook, leading to potential rework.
The Importance of Pre-Production Planning
In many projects, the frame rate is selected in pre-production, so this step will already be clear. Choosing your frame rate in advance will save you a lot of time from potentially having to redo work, especially since, in DaVinci Resolve, you cannot change your project frame rate once it’s been set. It is important to set your project frame rate correctly; it cannot be changed after importing any media.
Step-by-Step: Setting Your Project Frame Rate
- Open the Project Manager: Launch DaVinci Resolve. The first window you see is the Project Manager, which displays all your projects. Alternatively, you can bring up your Project Manager window by selecting File > Project Manager.
- Create a New Project: Click on the "New Project" button.
- Name Your Project: Enter an appropriate name for your new project and confirm.
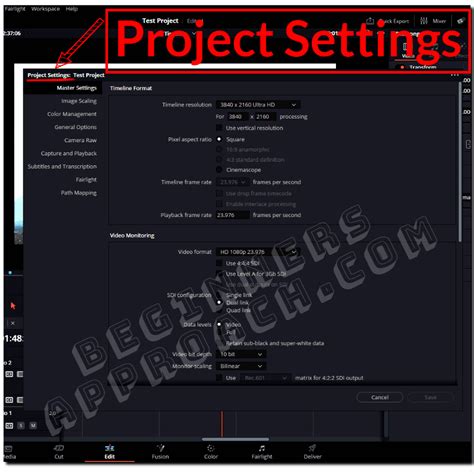
- Access Project Settings: Before importing any materials, click on the cog icon in the bottom right corner of the interface. The Project Settings window will open to the Master Settings tab by default.
- Set the Timeline Frame Rate: Under "Timeline Format," use the "Timeline frame rate" dropdown menu to select your desired frame rate. For example, set the Timeline Frame Rate to 23.976 fps (or whatever your chosen frame rate is).
- Match Playback Frame Rate (Recommended): While not strictly mandatory, it is generally recommended to ensure your Playback Frame Rate matches your Timeline Frame Rate for optimal viewing.
- Save Your Settings: Click the Save button to lock in your frame rate for the project.
Notice: Remember, once you import any media, you will be unable to change this. It is important to be aware that once you have imported clips and added them to a timeline in the master project settings, the timeline frame rate cannot be altered. The first imported clip sets the rate: If you forget to set your project frame rate and import a clip, DaVinci Resolve will automatically detect the clip's frame rate and prompt you to either "Change" the project settings to match or "Don't Change". This happens only for the first clip. Best practice: When you are starting a new project, always navigate to Project Settings immediately after creating it to confirm your frame rate.
Handling Mixed Frame Rates: DaVinci Resolve's Automatic Management
You do not have to be concerned if your footage does not match the frame rate you selected for your project. DaVinci Resolve is designed to automatically handle clips of different frame rates in a timeline. As an example, if you have a 30 fps timeline and some clips are 30 fps, some at 23.97 fps, and some at 60 fps, all the clips will play at normal speed on the 30 fps timeline.
This automatic conversion ensures that your project plays back smoothly without manual intervention for most common scenarios. The software intelligently interpolates or drops frames as needed to maintain the overall timeline frame rate.
Adjusting Individual Clips for Specific Needs
In some cases, the automatic handling of mixed frame rates may not be what you want to achieve. For example, if you intended your 60 fps clips to be slow motion b-roll and play at half speed, you need to change the clip’s frame rate interpretation. After changing it, the clip will use every frame and play at half speed on your 30 frames per second timeline.
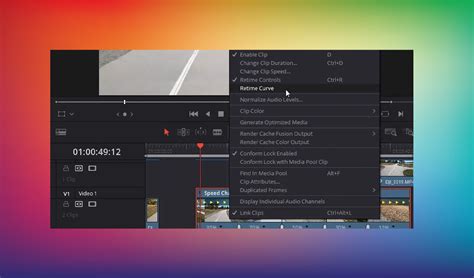
Method 1: Changing Clip Speed Using Retime Controls
This method is ideal for when you want to alter the playback speed of a clip directly within your timeline, thereby affecting its apparent frame rate.
- Ensure You Are on the Edit Tab: Make sure you are on the Edit tab and are in the timeline you want to adjust.
- Select the Clip: Select the clip where you want to adjust the speed on your timeline.
- Open Speed Settings: Press Control + R on your keyboard (or Cmd + R on macOS) to open the speed settings for the clip.
- Change Playback Speed: Click on the arrow next to the percentage value. Hover over "Change Speed" from the dropdown menu, and select the new playback speed you want. For instance, to make a 60fps clip play at half speed on a 30fps timeline, you would set its speed to 50%.
Method 2: Interpreting Clip Attributes for Frame Rate Conformance
This method, often called "conforming," changes how an individual clip is interpreted within your project. It is most useful for creating high-quality slow-motion footage, especially when you have shot your clip at a higher frame rate (e.g., 60fps or 120fps) than your project's timeline frame rate (e.g., 24fps).
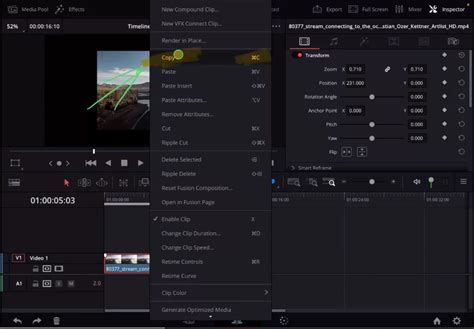
- Locate the Clip in the Media Pool: Go to the Media page or the Media Pool panel in the Edit page.
- Access Clip Attributes: Right-click the clip you want to modify and select "Clip Attributes…".
- Change the Video Frame Rate: In the "Clip Attributes" panel, click on the "Video" tab. Under "Video Frame Rate," choose the desired frame rate.
- Match the Timeline Frame Rate (for Slow Motion): To achieve slow motion, change the frame rate of the clip to match your timeline's frame rate (e.g., set a 60fps clip to 24fps if your timeline is 24fps). DaVinci Resolve will then interpret the clip as if it were recorded at the lower frame rate, effectively slowing it down to utilize all the frames from the original higher frame rate footage.
- Confirm the Change: Click "OK".
Important Considerations for Clip Attributes:
- Make the Change Before Editing: For best results, change the clip attributes before you add the clip to your timeline.
- Affects All Instances: Changing the clip's frame rate in the Media Pool affects every instance of that clip in your project.
- Audio Sync is Lost: This method only affects the video. The audio will not be adjusted and will no longer sync with the video. For slow-motion shots, this is usually not an issue as dialogue or synchronized sound is typically not needed.
- Variable Frame Rate Footage: Variable frame rate footage is typically captured using smartphones or screen recording software like OBS Studio. In this case, when you begin editing, you can set the frame rate of your project timeline to your desired standard (e.g., 24 fps). Then, use the "Clip Attributes" settings to interpret the VFR footage correctly.
If you are certain and want to export the final project at the frame rate of the clip, click "Change". In the future, even if you import media with different frame rates, you will no longer receive this warning.
Creating Timelines with Custom Frame Rates
What if you've already started editing and realized your main project timeline wasn’t set to the correct frame rate, or you need a specific timeline with a different frame rate? While the project-level frame rate is locked after media import, you can create new timelines with custom frame rates.
- Open the Media Pool: On the "Edit" page, click on the "Media Pool" tab.
- Create a New Timeline: Right-click on an empty space in the Media Pool panel, and navigate to Timelines > Create New Timeline.
- Name Your New Timeline: Enter an appropriate name for the new timeline.
- Set the Custom Frame Rate: Crucially, uncheck the "Use Project Settings" option. This allows you to override the locked project settings for this specific timeline. Click on the "Format" tab and select your desired frames per second (FPS) from the "Timeline frame rate" dropdown menu.
- Create the Timeline: Click the "Create" button.
Now, you have created a new empty timeline with a different frame rate. You can then switch back to your original timeline, select all the clips (Ctrl + A or Cmd + A), copy them (Ctrl + C or Cmd + C), switch to your new timeline, and paste them (Ctrl + V or Cmd + V). The pasted clips will now conform to the new frame rate of this specific timeline. The project timeline frame rate remains as it was initially set (and grayed out).
Managing Multiple Timelines in a Single Project | DaVinci Resolve 15 Tutorial
Understanding Playback Frame Rate
The playback frame rate is the speed at which frames are shown on your external display. For example, let's say you have a 4K timeline with a frame rate of 24 FPS. In fact, even if the frame rate exceeds 60 frames, it can still be displayed on a 60 Hz monitor. Generally, it's best practice to keep your playback frame rate the same as your timeline frame rate for accurate monitoring.
Key Considerations When Choosing a Frame Rate
The frame rate of your video has a significant impact on its appearance and feel, ultimately affecting how realistic it looks.
- Desired Effect: Do you want a cinematic look (24fps), smooth motion for sports or action (60fps or higher), or standard broadcast quality (25fps or 30fps)?
- Type of Video: Different media platforms, such as TV shows, digital cinema, or YouTube, often have different standard frame rates.
- File Size and Export Time: Choosing a higher frame rate means dealing with more information, which will take longer to export and increase the file size.
Advanced Techniques and Third-Party Solutions
While DaVinci Resolve offers robust tools for frame rate management, some advanced scenarios or specific desired outcomes might benefit from external solutions.
Aiarty Video Enhancer for Advanced Frame Interpolation
DaVinci Resolve's methods for frame rate conversion can sometimes lead to artifacts like ghosting or unnatural-looking motion, especially when significantly altering the frame rate or attempting to create very smooth slow motion. For those seeking superior results, AI-powered tools offer an alternative.
Aiarty Video Enhancer, for instance, uses advanced AI technology to generate brand-new, highly realistic frames in between existing ones. This process, known as frame interpolation, can create stunning, ultra-fluid slow-motion effects up to 120fps with just a few clicks. The workflow is often simpler, involving dragging and dropping your video, enabling frame interpolation, and exporting. Importantly, all processing happens locally on your computer, ensuring offline privacy.
Dynamic Project Switching
For editors looking to speed up their project workflows, exploring features like Dynamic Project Switching in DaVinci Resolve can be highly beneficial, allowing for quick transitions between different projects and settings.
Conclusion: Planning is Paramount
With a solid understanding of these methods for managing frame rates in DaVinci Resolve, you are now equipped to handle virtually any frame rate scenario. For new projects, establishing your project frame rate from the start is the most seamless approach. When you're further along in your edit, you can use the new timeline method to adapt without disrupting your progress. The key takeaway is that planning is paramount. By thinking about your desired frame rate and the effect you want to achieve before you begin editing, you can save a lot of time and potential headaches. Whether you're working on a cinematic 24fps project or a high-action 60fps video, mastering these techniques will give you full creative control over the motion and timing of your edits.