Adobe InDesign offers a versatile set of tools for graphic designers, and among them, the Polygon tool stands out for its ability to create more than just simple geometric shapes. While often overlooked, this tool is the key to generating striking starbursts, a common element in graphic design for adding emphasis, dynamism, and visual appeal to layouts. This guide delves into the intricacies of using the Polygon tool to create starburst shapes, exploring its various settings, manipulation techniques, and even advanced applications.
Unveiling the Polygon Tool for Starburst Creation
The journey to creating a starburst in InDesign begins with the Polygon tool, which is conveniently nestled under the Frame tools in the InDesign toolbar. Many users might initially be confused, asking, "Where's the Starburst tool?" The answer lies in understanding that the Polygon tool is the foundation for such shapes.
Normally, when you select the Polygon tool and drag it across your page, you'll typically get a standard hexagon. However, this is just the default. To transform this basic polygon into a starburst, you have two primary methods:
Method 1: Utilizing Polygon Settings
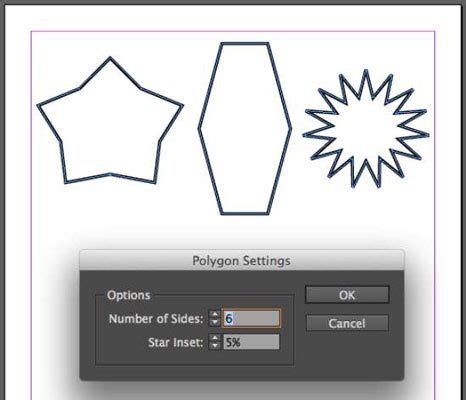
The most direct way to customize your starburst is by accessing the Polygon Settings dialog box. This can be achieved by double-clicking the Polygon tool icon in the toolbar. Once this dialog box is open, you'll find two crucial parameters:
- Number of Sides: This determines the basic structure of your polygon. For a starburst, you'll want to experiment with higher numbers of sides to create more complex and pointed shapes.
- Star Inset: This is the defining characteristic of a starburst. The "insert" value dictates how much the sides of the polygon are pressed inwards, creating the characteristic points of a star. A higher star inset value will result in deeper, sharper points, while a lower value will produce a more rounded or less pronounced star shape. Experimenting with this value is key to achieving the desired aesthetic.
Method 2: On-the-Fly Control with Arrow Keys
An alternative and often quicker method, especially for those who prefer keyboard shortcuts, involves using the arrow keys on your keyboard while dragging the Polygon tool. After selecting the Polygon tool, simply click and begin dragging on your page. While still holding down the mouse button, you can then press:
- Up Arrow: Increases the number of sides or points.
- Down Arrow: Decreases the number of sides or points.
- Left/Right Arrow: Affects the star inset, controlling the depth of the points.
It's important to note a specific behavior for Macintosh users, particularly in older versions of InDesign like CS3 and earlier. For the arrow keys to function correctly in these versions, the mouse must be actively moving (wiggling) while you're dragging and pressing the keys. This "effort" can create a straightforward starburst. As soon as you release the mouse button or click away, the shape is finalized.
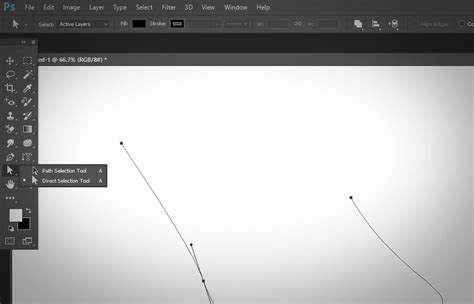
Refining Your Starbursts: Anchor Points and Direct Selection
Once you've drawn your starburst, InDesign's powerful editing capabilities come into play. As soon as you select the Direct Selection Tool (the white arrow), you'll be able to see the individual anchor points that define the star's path. These anchor points are the crucial nodes that allow for precise manipulation.
By clicking and dragging these anchor points, you can subtly alter the shape of your starburst, fine-tuning the angles of its points, adjusting their length, or even creating more organic and irregular starbursts. This level of control ensures that your starbursts are not just generic shapes but perfectly tailored elements for your design.
Advanced Techniques and Creative Applications
The utility of the Polygon tool extends beyond simple star creation. Its adaptability allows for more complex design applications.
Transforming Starbursts: A Dynamic Workflow
Imagine you've created a page filled with your favorite starbursts, and then you decide you want to change their configuration - perhaps converting a 10-sided polygon into a 20-sided one. In earlier versions of InDesign, this might have involved a more involved process, possibly referencing methods like those described in blog posts detailing how to convert one kind of starburst into another.
However, Adobe has streamlined this process significantly. In more recent versions of InDesign, such as CS4 and beyond, a remarkably convenient, albeit undocumented, feature exists. You can select one or more starbursts on your page, then double-click the Polygon tool icon again. This will reopen the Polygon Settings dialog box. Here, you can modify the number of sides or the star inset. Upon clicking "OK," all the selected polygons will instantaneously update to reflect the new settings. This makes iterative design and global changes incredibly efficient.
Incorporating Color and Style
To bring your starbursts to life, color plays a vital role. You can easily apply colors using the Swatches palette. The Swatches palette features two squares in its upper-left corner:
- Solid Square: The color chosen for this square determines the inside color of your starburst.
- Hollow Square: The color selected here dictates the border color of your starburst.
By selecting your desired colors from the Swatches palette before or after drawing your starburst, you can control its fill and stroke. Furthermore, you can adjust the border width and style through the Stroke panel, allowing for a wide range of visual effects, from thin, hairline outlines to thick, dashed borders.
Placing Images Within Shapes
A common design requirement is to place images within specific shapes. Placing an image into a starburst (or a circle, rectangle, or any other object) is straightforward in InDesign:
- Select the object: First, select the starburst shape you want to contain the image.
- Place your image: Go to
File > Placeand choose your desired image file. - Replace selected item: Crucially, ensure the "Replace selected item" box is checked in the Place dialog. This will automatically fit the image within the selected starburst.
If you need to adjust the image's position or scale within the starburst afterwards, the white arrow (Direct Selection Tool) is your best friend. You can select the image content within the frame and then transform it as needed.
A Nice Trick: Images within Text
For an even more creative application, you can place an image within text itself, effectively turning your typography into a container for visuals. This technique involves a few steps:
- Type your text: Enter your desired text into a separate text frame.
- Create Outlines: With the text frame selected, navigate to
Type > Create Outlines. This converts the editable text characters into vector paths, essentially turning them into shapes. - Place your image: Now, you can paste an image into these outlined text "shapes" using the same
File > Placemethod described above, ensuring "Replace selected item" is checked.
3 EASY InDesign Clipping Techniques You Should Know
This advanced technique opens up a world of possibilities for typographic design, allowing for visually rich and impactful layouts where text and imagery are seamlessly integrated.
Understanding the Underlying Mechanics
The Polygon tool's ability to create starbursts is rooted in its fundamental geometric principles. A polygon is defined by a series of connected line segments forming a closed shape. The "number of sides" parameter directly corresponds to the number of these segments. The "star inset," however, introduces a non-linear transformation. Instead of simply connecting points in a circular fashion, the star inset effectively "pulls" the midpoints of the sides inwards towards the center of the shape. This inward pull, when applied to a polygon with a sufficient number of sides, creates the characteristic points and concavities of a starburst.
For example, a hexagon (6 sides) with a significant star inset will have its points pushed inwards, creating a shape that resembles a six-pointed star. Increasing the number of sides to, say, 10, and applying a similar star inset will result in a more intricate 10-pointed starburst. The degree of the inset determines how "sharp" or "deep" these points are. A star inset of 0% would simply result in a regular polygon, while values approaching 100% would create extremely sharp, almost needle-like points, potentially leading to self-intersecting paths if not handled carefully.
Considerations for Macintosh Users
As previously mentioned, Macintosh users, especially those working with older versions of InDesign (CS3 and earlier), might encounter a specific nuance with the arrow key controls. The requirement for the mouse to be in motion while using the arrow keys to adjust sides and inset is a direct consequence of how these older versions handled input events. The software needed a clear indication that the user was actively manipulating the tool through a drag gesture, and the arrow keys were interpreted as modifiers to that gesture. In newer versions, this dependency has been largely removed, allowing for more direct and intuitive control with the arrow keys, regardless of mouse movement, as long as the tool is active.
The Power of Libraries
When you find yourself creating a page full of your favorite starbursts, or perhaps a series of consistently styled starbursts, the InDesign Library feature can become an invaluable asset. Unlike a physical library where borrowing a book leaves a gap, an InDesign Library allows you to store and reuse graphic elements without depleting your original design.
To use a library:
- Create a new Library: Go to
Window > Librariesand then click the flyout menu in the Libraries panel to select "Create New Library." Give your library a descriptive name. - Save your Starburst: Drag your completed starburst graphic from your InDesign document directly into the newly created library panel.
- Reuse: You can then open this library in any InDesign document and drag the saved starburst out onto your page as many times as you need, ensuring consistency and saving significant time.
This is particularly useful for branding elements, repeated motifs, or complex shapes that you want to deploy across multiple projects.
Avoiding Common Pitfalls
While the Polygon tool is straightforward, a few common misconceptions or pitfalls can arise:
- Confusing Polygon and Star Tool: The absence of a dedicated "Star Tool" can lead some users to believe starbursts are not possible. Remembering that the Polygon tool, with its "Star Inset" setting, is the key is crucial.
- Inconsistent Starbursts: Without understanding the "Number of Sides" and "Star Inset" parameters, users might create starbursts that look uneven or amateurish. Double-clicking the tool to access its settings ensures control and consistency.
- Difficulty in Editing: Not realizing that anchor points become visible with the Direct Selection Tool can limit a user's ability to fine-tune shapes.
By understanding these aspects, designers can move beyond basic polygon generation and leverage the Polygon tool to create sophisticated and visually engaging starburst graphics within Adobe InDesign. The ability to precisely control points, inset, color, and even incorporate images makes this a surprisingly powerful tool in the graphic designer's arsenal.