Concept art production demands extensive drawing, painting, and meticulous adjustments, making the selection of a comfortable and effective brush paramount. Many professional concept artists go a step further, customizing their digital brushes to precisely match their unique work styles, natural pen pressure nuances, or preferred brush textures. However, for beginners, navigating this landscape of brush creation and customization can feel daunting. Clip Studio Paint (CSP) offers a robust starting point with a wide array of pre-installed brushes, including versatile hard and soft painting brushes that respond dynamically to pen pressure. Should the default options not meet your specific needs, the Clip Studio Assets platform provides access to over 40,000 drawing materials. By utilizing relevant keywords, you can discover and download a vast library of brushes. Once a brush is downloaded, it's automatically integrated into your CSP application. Adding it to your sub-tool palette is as simple as a drag-and-drop action. Furthermore, CSP exhibits compatibility with brushes created for other software, such as Photoshop's ABR brushes. When acquiring brushes from sources external to Clip Studio Assets, you can integrate them into CSP by dragging and dropping them directly from your file explorer.

Exploring Pre-installed and Downloadable Brushes
Clip Studio Paint is equipped with a variety of brushes suitable for different artistic needs. The "Hoarse oil" brush, for instance, is a straightforward yet highly adaptable tool, making it an excellent choice for those new to digital painting. This brush masterfully responds to pen pressure, enabling the creation of both soft and hard edges. A light touch results in color blending, while firm pressure yields a defined, hard edge. Its versatility extends to sketching; by reducing the brush size, it can effectively function as a digital pencil. Another valuable set includes four painting brushes, two smudge brushes, and a texture spray, all designed for rendering thick painting styles with an inherent canvas texture.
For those seeking a more delicate touch, Suzumori Nishiki’s "fluffy pen" offers remarkable adaptability. Depending on color layering, it can produce effects akin to watercolor or thick paint. Each stroke with this brush intensifies the color, adding depth and richness to your artwork.
Beyond general painting, CSP also offers specialized brush sets for specific tasks. One such set is designed to rapidly sketch bushes and tree foliage. Its unique leaf-shaped brush tip allows for layering in different colors, swiftly building a sense of depth and volume in natural elements. For rendering water effects, a "water pattern texture" brush is available, perfect for simulating light reflections on water surfaces. Similarly, sets of wood grain textures and wooden flooring brushes are invaluable for quickly adding intricate detail to wooden furniture or interior design sketches. For establishing atmospheric backgrounds, a set of 24 gradient materials is ideal for creating mood-setting skies at the initial stages of your drawing process.
Beyond Brushes: Leveraging CSP's Toolset
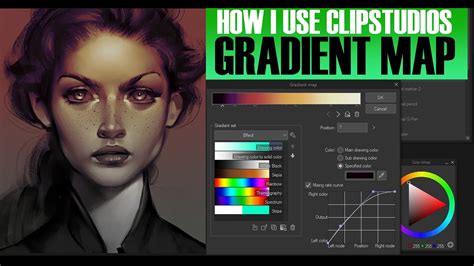
Clip Studio Paint's utility for concept artists extends far beyond its brush offerings. A plethora of other tools are integrated to enhance creative efficiency. Gradient maps, for example, dynamically apply the colors of a selected gradient to your image based on the existing color values. At higher opacities, a gradient map can dramatically transform the color palette of your painting, while subtle application can unify the overall color scheme. You have the freedom to utilize any pre-existing gradient or craft your own, with real-time preview adjustments allowing you to fine-tune the effect to your precise vision.
While CSP is primarily designed for 2D painting, its capabilities are augmented by the ability to import and manipulate 3D materials directly on the same canvas as your 2D artwork. 3D drawing models serve as invaluable references for scale in architectural and machinery concept art, and can also act as base models for costume design. Complex 3D models, such as detailed representations of train stations, castles, and entire city streets, provide excellent guidelines for environmental concept art. You can employ highly detailed models or opt for simpler 3D primitives like cubes and cylinders to establish the foundational references for your environmental concept art.
For achieving accurate spatial representation, specialized rulers are indispensable. The perspective ruler, available in one-point, two-point, and three-point configurations, is crucial for drawing locations with reliable perspective. The Copy Stamp tool, often referred to as a clone tool, is a staple in photobashing techniques. This tool samples a portion of an image and replicates it precisely where you paint.
Mastering Paper Textures and Halftones
Understanding how to effectively integrate paper textures into your workflow can significantly elevate the realism and tactile quality of your digital artwork. If you find yourself unsure about the best approach, a helpful video tutorial offers step-by-step instructions on utilizing paper textures within Clip Studio Paint. For those who prefer a text-based guide, the process involves opening a paper texture file in CSP. These textures, along with their associated effects, are typically organized within a folder. It is crucial to ensure that any new layers containing your artwork are placed below this paper and effects folder.
To add your artwork:
- Select a pen brush.
- Begin drawing on a new layer beneath the texture folder.
The texture depth can be fine-tuned by selecting the "Adjust Texture" layer. Similarly, ink effects can be modified by clicking on the "Adjust Ink Effects" layer.
Texture Tutorial (Clip Studio Paint)
The "ColorLab Comic Color Kit" provides halftone brushes, which are exceptionally useful for imparting authentic color and shading that mimics the appearance of traditional print media. Halftones are a powerful element in the toolkit of any artist working with a retro aesthetic. However, the concept of "one size fits all" does not apply to halftones; they can be customized to suit individual needs. A step-by-step guide is available to help you create halftone brushes that are as unique as your artistic vision. This guide emphasizes that halftones are a potent tool, and their adaptability ensures they can be tailored to diverse applications. For a practical demonstration, the best-selling "DupliTone" halftone swatch set can be explored in a quick Clip Studio Paint brush demonstration.
Creating Custom Brushes from Scratch
Clip Studio Paint is a highly adaptable digital painting software that integrates seamlessly with tools like Astropad Studio, offering users an extensive suite of brushes and functionalities. While the properties of existing CSP brushes can be readily modified, sometimes these adjustments may not suffice for achieving a desired outcome. If your goal is to create a completely custom brush in Clip Studio Paint, the foundational step involves creating an image that will serve as the brush tip and then registering it as a material.
The process begins by creating a new canvas. It is recommended to use a large canvas size, ideally within the thousands of pixels, to ensure sufficient detail for the brush tip. For the "Basic Expression Color," select "Gray." While not suitable for a typical painting, this grayscale setting is essential for brush creation, as it allows the resulting brush to be used with any color. The gray tones will effectively represent the opacity of your brush.
Once the canvas is prepared, you can begin creating your brush tip. This can involve drawing, painting, or even importing an image. If your brush tip design utilizes multiple layers, it's imperative to merge them into a single layer before proceeding. Select all relevant layers that constitute your brush tip design.
With your brush tip material created, the next step is to assign it to a brush. This is typically achieved by duplicating an existing brush. Right-clicking on any brush will bring up a context menu, and selecting the option to duplicate it will create a copy. It is advisable to name this duplicated brush something descriptive, as this is the brush to which you will apply your custom material.
To assign the material, navigate to the "Tool Property" tab and click on the wrench icon located at the bottom. Within the brush settings, find the "Brush tip" section and select "Material." This action will open a material selection window. Locate and select the material you previously created for your brush tip, and click "OK" to assign it. Your custom brush is now ready for use in your next project. For an optimal experience, trying out your new Clip Studio Paint brush with Astropad Studio is recommended, allowing you to maximize the potential of CSP on your iPad.

Emulating Traditional Media: Dry Brush Effects and Edge Control
Achieving a traditional, painterly look with digital tools requires a specific mindset. It's a common misconception to search for a single "magic brush" that can do everything; in reality, both digital and traditional art benefit from a variety of tools. Traditional oil painters utilize an assortment of brushes, palette knives, and even rags to achieve loose, painterly styles. Digitally, this translates to using brushes that can produce two distinct types of edges: hard, or "found" edges, and soft, or "lost" edges. The focal points of an image, such as a character's face or a key object, often benefit from a higher concentration of hard edges, while less important areas can incorporate more soft edges to guide the viewer's eye.
A curated selection of brushes can help achieve this dry brush effect. Some brushes may be purchased, while others can be created by the artist. A crucial element for a traditional look is painting over a photographic canvas texture. Many artists recommend acquiring textures from websites specializing in digital art resources.
When emulating traditional media, especially oil paint, the "Oil paint flat brush" that comes with Clip Studio Paint is a strong starting point. It offers excellent blending capabilities straight out of the box. Using it at around 90% opacity allows for mid-tone transitions, enabling you to pick colors from the canvas and paint with them. This setting facilitates a smooth transition between hard and soft edges.
A variation, the "Cat's tongue brush," can be created by duplicating the "Oil paint flat brush" and modifying its "brush size dynamics" in the sub-tool details palette to respond to pen pressure, resulting in a tapered edge at both the beginning and end of a stroke.
Purchased brush sets, such as those from specialized providers, can also be invaluable. For instance, the "Ink tapered raw" brush, despite its name, is excellent for achieving a traditional media brush effect. Used at 100% opacity, it offers a look similar to the "Cat's tongue" but with a distinct dry brush texture at the stroke's end, and it blends colors effectively. These brushes are often created using scans of natural media combined with watercolor paper textures.
Custom brushes like "Flat ribbon vertical," "Flat ribbon," and "Flat ribbon horizontal" can be created to achieve specific edge qualities. "Flat ribbon vertical" features a vertical chisel that doesn't necessarily follow the stroke's direction. "Flat ribbon" behaves similarly but aligns the brush tip's direction with the line's direction. "Flat ribbon horizontal" creates sharp, hard edges with a flat texture during downward strokes. "Flat ribbon soft" enhances these by incorporating additional textures from the Clip Studio materials library. The goal is often to find brushes that produce spontaneous, unplanned edges for a genuine dry brush appearance. Some brushes are designed to randomly apply textures, creating a varied and organic look with each stroke.
The "Pigmento 10" brush from a commercial set is noteworthy for its ability to introduce shadow into paint colors. While tempting to paint directly with it, care must be taken as it can easily incorporate the shadow color into intermediate color picks, potentially leading to less pure and clean hues. A common technique is to use "Pigmento 10" at a low opacity, around 20%.
Understanding Edge Transitions: Lost and Found
The core principle in achieving realistic traditional media effects digitally lies in understanding and emulating the transitions between "lost" (soft) and "found" (hard) edges. These transitions are fundamental to how light interacts with surfaces and how our eyes perceive form.
Several methods can be employed to create these transitions. One approach involves layering colors with varying opacities. For example, starting with gray undertones at 60% opacity, then adding orange at 90% opacity, and finally laying shadows with a brush like the "Oil paint flat brush" can create areas rich in hard-edged strokes. Subsequently, switching to a "lost edge" brush, such as the "Ink tapered raw" brush, allows you to color-pick from the existing image and smoothly blend these transitions. You can create a rough, lost edge stroke with the "Ink tapered raw" and then refine it with the "Oil paint flat brush" to reintroduce hard edges. This iterative process, whether starting with hard edges and softening them or vice versa, offers flexibility without a single "correct" method.
Another effective way to transform a hard edge into a lost edge is by utilizing blending tools. Clip Studio Paint includes a capable blender known as "Soothing watercolor." For artists who prefer to integrate blending into their brush workflow, the "Bristle broom" brush, even though categorized as a brush, can be moved to the blenders folder for quick access. The final touches can then be applied with a brush like the "Daub Pigmento" brush, often used at a low opacity (10% to 20%) to avoid overworking the edges.
For those seeking practical application, resources like tutorials on platforms such as Gumroad.com offer guided instruction on specific techniques, such as the "Simple Dry Brush Technique." These tutorials often focus on using a limited set of brushes while emphasizing the underlying method and mindset for achieving a traditional look digitally. Reuben Lara, a traditionally trained artist, provides valuable insights through free video tutorials, reviewing affordable tools and sharing production-proven techniques honed over decades in the design and illustration industry.
Advanced Texture Creation and Customization
Creating truly unique textures for brushes involves a deeper dive into material creation and manipulation within Clip Studio Paint. If you're looking to craft a brush with specific texture characteristics but are unsure how to proceed, a methodical approach can yield impressive results.
The process begins with preparing your texture image. After creating or obtaining a texture, it's essential to remove its background. Tools like the magic wand can select and remove areas, with the lasso or selection brush available for refining selections.
An optional but often beneficial step involves merging layers. If you've used multiple layers to achieve your desired texture, merging them into a single layer ensures a cohesive material. For instance, placing a darker texture layer on top of a base layer and then merging them can enhance the texture's depth.
A common issue encountered when registering textures as materials is the presence of empty spaces or artifacts at the edges. If this occurs, navigate back to the layer containing your design. Ensure your design fills the entire canvas size. Select the entire canvas and then use the "Delete outside selection" option. This action should resolve the edge artifacts, allowing for normal registration of the image as a material.
When incorporating textures into your brushes, several settings within Clip Studio Paint offer fine-grained control:
- Paper texture: This setting directly applies the texture you've selected to your brush stroke.
- Scale percentage: This option dictates the size of the pattern, ranging from 1 to 1000. A smaller scale means a larger pattern repeat, while a larger scale results in a smaller, more frequent pattern.
- Brightness: This slider controls the visibility of the texture, with a range from -100 to 100.
When adjusting both "Scale" and "Brightness," it's important to note that lower brightness generally leads to higher contrast. However, this relationship isn't always perfectly reciprocal. The overall opacity setting will also significantly influence the texture's appearance. Experimentation with these options is key to achieving the desired effect.
Crafting Textured Brushes: Two Core Techniques
For artists aiming to emulate traditional mediums like paints, watercolors, and pencils, creating custom textured brushes is a powerful technique. Two primary methods can be employed to generate six distinct custom brushes.
The journey begins with creating a new square canvas. A resolution of 300 DPI is standard for high-quality results, and a canvas size of 4000 pixels is often recommended for ample detail.
A useful organizational tip is to duplicate an existing tool menu. This allows you to create a dedicated space for your custom brushes, which you can then rename, for example, to "Crimsy's homemade brushes."
Technique 1: Doodling Brush Tips
- Select a base brush: Choose any brush type. The resulting custom brush's behavior will vary depending on the characteristics of the base brush selected.
- Doodle the brush tip shape: On a new canvas, draw or paint the desired shape for your brush tip. This is where you can experiment freely. Transparency can also be incorporated into the brush tip design.
- Save as a material: Once satisfied with the brush tip shape, open the "Material" window. Navigate to "All Materials" > "Image Material." Right-click and select "New Folder" to create a dedicated folder for your custom brushes (e.g., "Crimsy's Brushes"). Name your brush tip material (e.g., "Sketchy hearts") and save it within your newly created folder.
- Assign to a brush: Create a new basic sub-tool. In the "Tool Property" tab, click the wrench icon to access brush settings. Under "Brush Tip," select "Material," and then choose your saved brush tip material.
- Adjust brush settings: Explore the various brush settings. Key areas to focus on include:
- Amount of paint: This setting controls how densely new paint layers override previous colors. Higher values mean stronger overrides.
- Density of paint: Similar to opacity, this affects the stroke's intensity and how it blends with underlying colors. Unlike simple opacity, this setting actively blends colors.
- Color stretch: This influences the degree of blending between colors. Higher values result in more pronounced color blending.
- Stroke tab: Instead of "Gap," consider activating "Ribbon" for a continuous stroke effect.
- Texture: Crucial for emulating mediums like watercolors, this setting adds texture to strokes, mimicking paint on paper.
- Watercolor edge: Specifically designed for watercolor effects, this setting adds a darker border to stroke edges.
Using these steps, you can create brushes that capture the essence of watercolors, such as a "messy ink pen" created from a black rectangle with ink blots, ensuring seamless top and bottom edges for continuous strokes. Adding a paper texture and utilizing the "Stabilization" feature in the "Correction" tab can further enhance the traditional feel.
Technique 2: Using Existing Images as Brush Tips
This technique involves using pre-existing images or creating detailed elements that will serve as your brush tip. For example, drawing vines with thorns can be transformed into a brush.
- Create the brush tip image: Draw your desired elements, such as vines and thorns. Ensure that the top part of your design seamlessly connects to the bottom part to avoid visible seams in the final stroke.
- Save as a material: As with the first technique, save this design as an image material in a dedicated folder.
- Assign and configure: Create a new sub-tool, assign your custom material as the brush tip, and then adjust settings. In the "Stroke" tab, activating "Ribbon" and adding a paper texture can significantly enhance the brush's traditional appearance.
By mastering these techniques, you can create a diverse range of custom brushes that accurately emulate traditional media, offering a unique and personalized digital art experience. The ability to control edge transitions, incorporate textures, and fine-tune brush behavior empowers artists to achieve specific stylistic goals with remarkable fidelity.